

This project isn’t strictly for small sailboats or for boats in general. It’s a multi-purpose project that you can use for many jobs.
Do you change your own motor oil, not just in your outboard motor but in all your vehicles and power equipment? Do you still stoop down or lay on your back to remove the drain plug? Pour the used oil from a drain pan through a funnel into a different container for disposal? Clean your hands, drain pan, funnel, and garage floor or driveway when you’re through?
There’s a better way. Do it like a professional mechanic instead.
Before I continue, a bit of legal housekeeping. This post contains affiliate links. That means I receive a small commission if you make a purchase using those links. Those commissions help to pay the costs associated with running this site so that it stays free for everyone to enjoy. For a complete explanation of why I’m telling you this and how you can support this blog without paying more, please read my full disclosure.
I’ve been a DIYer my whole life and I’ve always changed my motor oil myself. I don’t remember paying to have it done. Ever. This is a project that I wish I would have known about decades ago. It would have saved me a lot of time and messes over the years.
Professional mechanics use an oil extractor to remove motor oils, transmission fluids, and other fluids from the motors they work on. They don’t waste time doing it the old-fashioned way, why should you?
An oil extractor makes a vacuum that pulls the oil out through the dip stick or fill hole. The oil flows through tubing to a reservoir from which you can conveniently empty it. Extractors use several different methods to make the vacuum: a small electric pump, a hand pump, or a venturi powered by an air compressor.
They make much less mess and avoid dropping the drain plug into the drain pan. An oil extractor can even remove more oil than through the drain plug in cases where the drain is above the bottom of the oil pan.
I use a homemade oil extractor to change the oil in my outboard motor like I describe in 15 Outboard Motor Maintenance Blind Spots You Can’t Afford to Miss. It’s a lot cleaner. Even though the drain plug in my outboard has a short rubber extension to direct the oil away from the output shaft, some of it always seems to miss the drain pan if I remove the plug. But when I use my oil extractor, there isn’t a stray drop anywhere.
There are commercially made oil extractors for home use that you can buy for around $100. One of the popular ones is the Mityvac 7300.

 Mityvac 7300 PneumatiVac Air-Operated Fluid Evacuator
But even the Mityvac has several significant design drawbacks that the oil extractor that I’m going to show you how to make doesn’t have:
- When full, it can be easily knocked over, potentially causing a huge mess.
- It operates on the venturi principle, so your air compressor might have to run continuously to keep up the vacuum. Not everyone has a compressor rated for continuous use and that can maintain high enough air pressure to produce effective vacuum. That’s also a lot of unnecessary noise.
- It empties through a cap on the top, which still means a dirty funnel and potential spills, not an improvement over the old-fashioned drain pan it replaces.
Jury Rig or Jury Award?
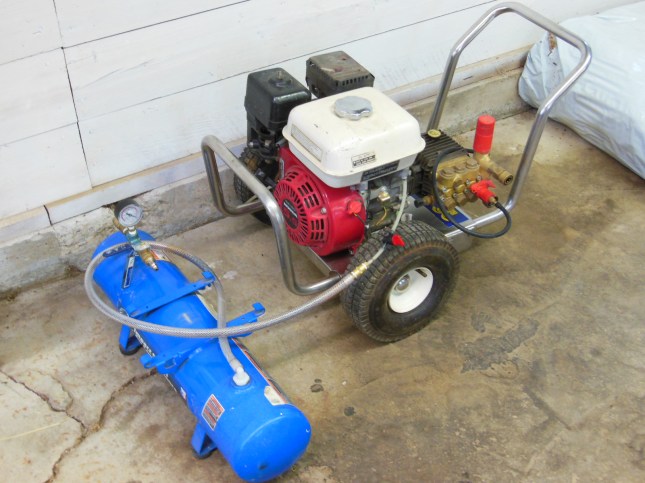
One of the first air compressors I owned was a cheap, oil-less type. They’re fine for occasional use but if you run them too hard, the lack of lubrication causes them to overheat easily and fail. Mine failed before long and I replaced it with a heavier duty, oil-lubricated model. But I kept the broken air compressor as spare parts for the future.
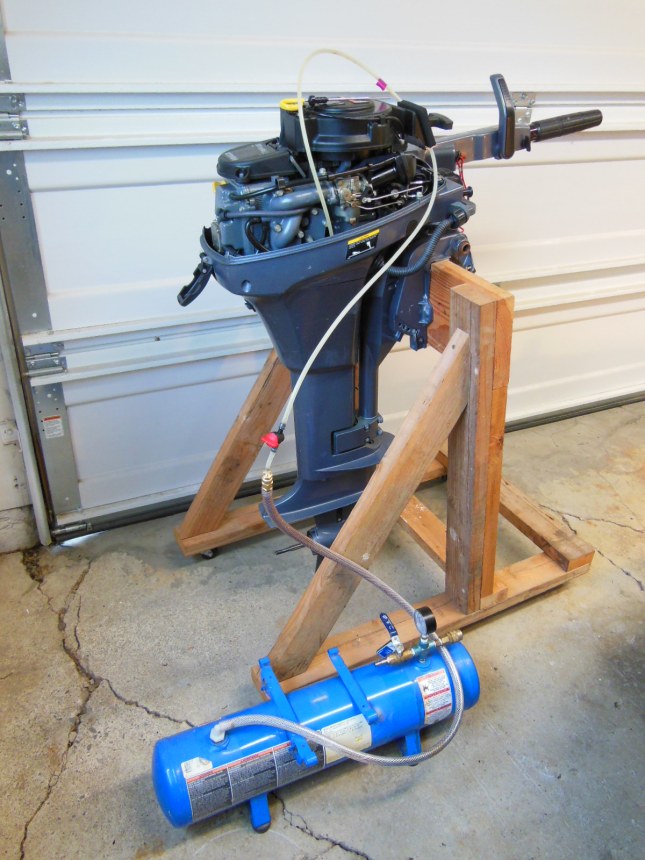
When I decided that I would make my own oil extractor and I was thinking of a suitable tank to hold the oil, that old air compressor tank came to mind and it was a perfect choice:
- Metal construction means no broken plastic parts
- Very stable and can’t be knocked over
- Drains from the petcock valve on the bottom of the tank, no pouring needed
- Small enough to be portable
- Built-in bungs for attaching a vacuum hose and suction tubing
If you have a similar tank on hand, chances are you can adapt it to work as an oil extractor too. It should have at least three openings: a small one on top to connect to your air compressor for vacuum, a small one on top to connect the suction tube you’ll insert into the oil, and either a larger one on top to empty the tank when it’s full or a small one on the bottom to drain it. If you don’t already have a tank, you can buy an inexpensive 5 quart plastic gasoline can that you can modify easily to attach the connections.
Once you have a tank, you need a way to apply a vacuum to it. If you already have an air compressor, you already have a vacuum pump. An air compressor and a vacuum pump are basically the same thing, an air pump. They both pull air in one side of the pump and push it out the other side. An air compressor just stores the air it pushes out. So why not use the inlet side of your air compressor as the vacuum source for your oil extractor? It’s easier than you think.
All that’s left to put together your oil extractor is some small pipe fittings, two valves (one optional), air couplings, and a vacuum gauge (optional). I already had many of the pipe fittings on hand that I needed. That included an inexpensive vacuum test tool. I rarely use that tool and when I do, the amount of vacuum usually doesn’t matter, so I replaced the vacuum gauge on it with a plug and attached the gauge to my oil extractor where it’s more useful. If I ever need the gauge for the tool, I can borrow it temporarily from the oil extractor.
If you don’t already have a vacuum test tool for bleeding brakes, testing vacuum diaphragms, and so on, consider buying one. You should have one to bleed the brake system on your sailboat trailer. And if you don’t have brakes on your trailer, you really should have them too. To learn why and how to install them yourself, see my post titled Do It Yourself Trailer Surge Brakes.
Here’s a complete list of the parts and materials I used to build my oil extractor. I bought all the fittings at a home improvement store. Your list may vary depending on what you have already:
- Tank (from salvaged air compressor)
- 3/8″ barb x 1/2″ MIP ell
- 3/8″ ID braided vinyl tubing x 4′
- 3/8″ barb x 1/4″ MIP adapter
- 1/8″ barb x 1/4″ MIP adapter
- 1/4″ FIP x 1/4″ FIP adapter
- 1/4″ OD polyethylene tubing x 4′
- 1/4″ cut-off valve (look in the lawn mower parts department)
- 1/4″ MIP close nipple (2)
- 1/4″ FIP tee
- 1/4″ MIP male air coupler
- 1/4″ FIP ball valve
- 0″ – 30″ Hg vacuum gauge with 1/4″ MIP connection (removed from vacuum test tool)
We’ll use two sizes of tubing for the suction tube, 3/8″ (inside diameter) for most of the length to cut friction so the oil flows faster and 1/4″ (outside diameter) to fit down most automobile dip stick tubes. We’ll make a reducing adapter to connect the two sizes together with several of the fittings. Both lengths of tubing should be as short as is convenient to reduce friction and extraction time. The 3/8″ vinyl tubing only needs to reach from the dip stick tube of your largest vehicle to the oil extractor tank. The 1/4″ polyethylene tubing only needs to be a few inches longer than your longest dip stick tube.
Following is an overview of the steps to build your oil extractor. Depending on how your air compressor is made and your choice of tank, you might need to improvise or adapt these to work for you.
To assemble your oil extractor:
- If you’re using an existing air compressor or similar tank, empty the tank of any remaining fluids and remove all existing fittings that you won’t reuse.
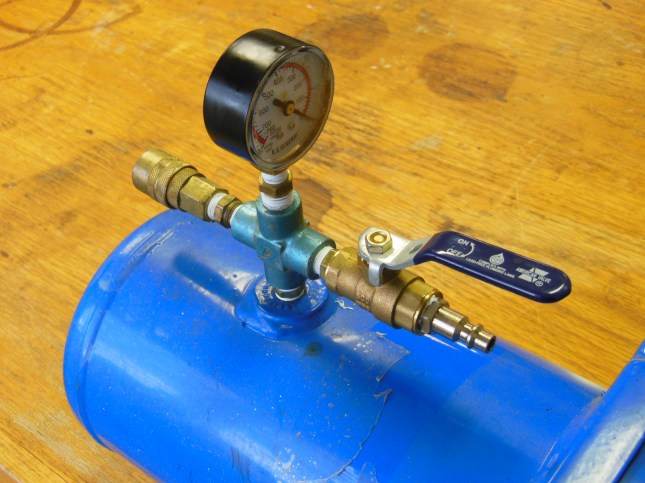
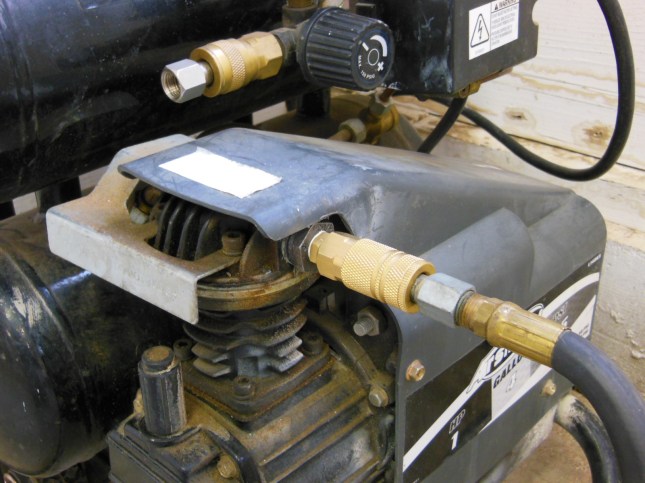
- For the vacuum (air compressor) connection, attach one side of the tee to the tank, one side to the vacuum gauge, and the remaining side to the ball valve. Use nipples as necessary. You’ll use the ball valve to hold the vacuum in the tank while it’s extracting the oil.
- Attach a male air coupler to the other side of the ball valve. You will attach this to your air compressor’s inlet with an ordinary air compressor hose that has a male coupling on one end and a female coupling on the other.
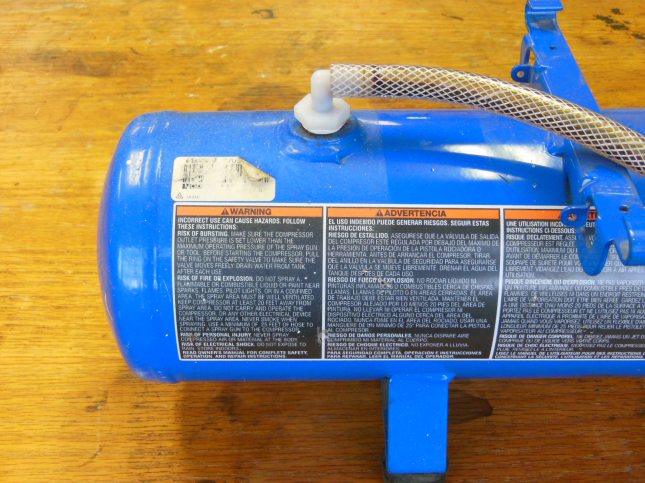
- For the suction connection, attach the braided vinyl tubing to the tank using a barb adapter. The braided reinforcement in the tubing keeps it from sucking flat from the vacuum pressure and hot oil.
- Make a tubing reducer by connecting the 3/8″ barb adapter to the 1/8″ barb adapter with the 1/4″ adapter.
- Attach the reducer to the open end of the 3/8″ vinyl tubing.
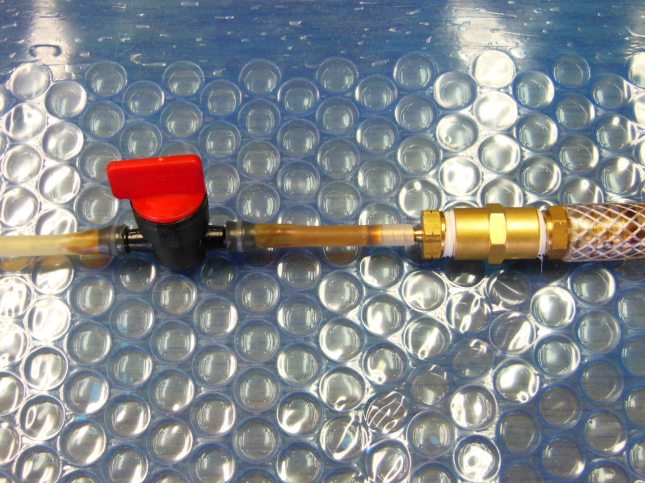
- Cut a few inches off the end of the 1/4″ polyethylene tubing and insert the 1/4″ cut-off valve between the two pieces. If the tubing is too small for the valve barbs, heat the tubing slightly to soften it so that you can insert a Phillips screwdriver or similar tool 1″ into the tubing to expand it. Allow it to cool before removing the tool. Then the tubing should slip onto the barbs of the cut-off valve.
- Attach the end of the polyethylene tubing nearest the valve to the 1/8″ barb of the reducer you made.
- Locate and replace your air compressor’s inlet filter with a female air coupler. You’ll connect this to the male coupler on your oil extractor with a regular air hose. When it’s not connected to the oil extractor, insert a male coupler by itself to hold the inlet open when you use it as an air compressor again. You can attach an in-line tool air filter
to the coupler to replace the original air filter.

To use your oil extractor:
- Run the motor that you want to remove the oil from until it reaches its normal operating temperature. The oil will flow faster if it is warm. Don’t extract oil when it is very hot because it can soften the polyethylene tubing too much and loosen the barb connections.
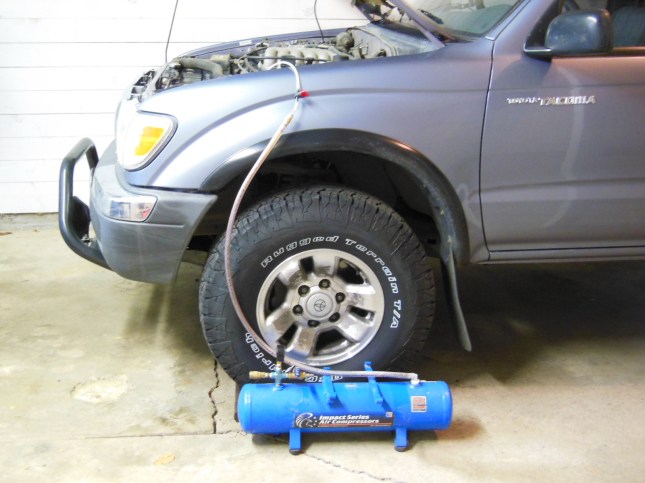
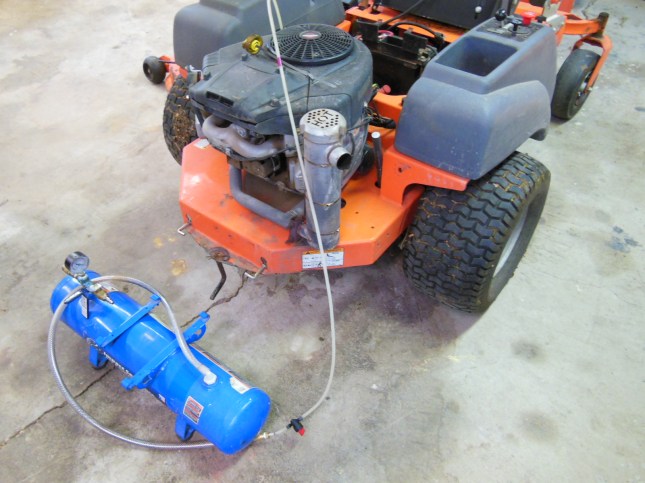
- Position the oil extractor near the motor that you want to remove the oil from. It will work best if it is below the oil to be removed so that gravity can help.
- Connect the male coupler of an ordinary air hose to the female coupler on the inlet side of your air compressor. Connect the female coupler of the air hose to the male coupler on the vacuum side of your oil extractor.
- Open the cut-off valve in the oil extractor suction tubing and insert it down the dip stick or fill hole of the motor. Push the tubing until you feel or hear it just touch the bottom of the crankcase. If you push too far, the tubing will curl upward and not extract all the oil.
- Arrange the tubing so there are no kinks or rises in the tubing as it leads to the oil extractor and it won’t fall out after it’s filled with oil.
- Open the ball valve on the oil extractor and the tank drain valve on your air compressor. You don’t want the air compressor to build pressure on the outlet side when you are using it as a vacuum pump.
- Start the air compressor and watch the suction tubing. After a few seconds, you should see oil flowing through it.
- After about a minute or when the vacuum level at the gauge stops rising (somewhere between 15″-30″ Hg, close the ball valve and turn off the compressor at the same time. That’s as much vacuum as your air compressor can make. Running it continuously like that may damage the compressor.
- While the oil is being extracted from the motor, you can replace the oil filter and do other maintenance on it. Check the vacuum gauge occasionally and when it gets below 5″-10″ Hg, repeat steps 7 & 8.
- Repeat charging the tank until all the oil is extracted. It’s finished when you hear sounds like you make when you’re sucking the last drops from a milk shake through a straw.
- Pull the suction tubing out of the equipment, close the cut-off valve to prevent the oil from draining out of the tubing, and wipe off the tubing with a rag.
- If your oil extractor tank has a drain valve, sit the extractor on something so that you can place an empty disposable jug under the valve. If your oil extractor tank doesn’t have a drain valve, pour the oil out whatever opening you do have.
- Open the drain valve to allow the oil to drain into the jug. To speed up the process, leave the air hose connected to your oil extractor but disconnect it from the inlet side of your air compressor and connect it to the output side instead. Apply 5-10 lbs. of air pressure to the oil extractor and the used oil will squirt out in seconds.
- Use a clothespin or similar spring clamp to store the oil extractor with its suction tubing raised for a few hours so that all the oil in the tubing drains down into the tank and not on the ground.

Because your oil extractor has a cut-off valve on the inlet side and a ball valve on the outlet side, you can close the cut-off valve, charge the tank, close the ball valve, and then carry the extractor to small jobs where you only need one charge worth of suction. If you don’t think you’ll ever need to use your oil extractor that way and you’re careful to not let oil accidentally drain out of the tubing, you can skip the cut-off valve. But I’ve found that it’s handy to be able to shut off the vacuum at the suction tube.
You’ll find many other uses for your DIY oil extractor, but don’t take up DIY dentistry!
Not This Ambitious?
If building this oil extractor doesn’t appeal to you but you still like the idea and don’t want to spend a hundred bucks for a commercial-made extractor, consider getting the Topsider 5060 Multi-Purpose Fluid Removing System from Air Power America. It’s about half the cost, hand-operated, and built of tough, powder-coated steel right here in the US of A.

 Air Power America 5060 Topsider Multi-Purpose Fluid Removing System
Changing the oil in your vehicles and power equipment won’t be such a chore after you start using an oil extractor. If you’re like me, you’ll wonder where they were all these years.
Would you like to be notified when I publish more posts like this? Enter your email address below to follow this blog and receive notifications of new posts by email. You will also receive occasional newsletters with exclusive info and deals only for followers and the password to the Downloads page. It’s free and you can unsubscribe at any time but almost nobody does!

Nice details, $tingy Sailor! Like your post!
The only flaw in your savings calculation is that you are valuing your time at $0.00! Not mentioning, of course that the Topsider actually retails in the $50-$60 range at most marine retailers and less at some hardware stores.
It reminds me of something my wife said to me when I sold a restored boat for three time what I paid for it, he comment was that I didn’t break even if I had charged my time at $1 an hour! You’ve just got to love doing it.
That’s very true for labor-intensive jobs. At some point, the money you pay yourself by keeping the cash in your wallet isn’t worth the time you spent. Especially if you can’t do it as well as if you paid somebody with the skill. That’s the difference between being a stingy sailor and a cheapskate. But most of the time nowadays with the cost of things, you come out ahead if you at least value the skill or experience you gain.
This is great. I am very interested in building my own oil extractor. I am having confusion with your parts list. Is the 1/4″ FIP tee actually a 1/4 FIP Cross 4-way? It would also be really cool if you could post a video this baby in action! Thank again.
Hi, Brian
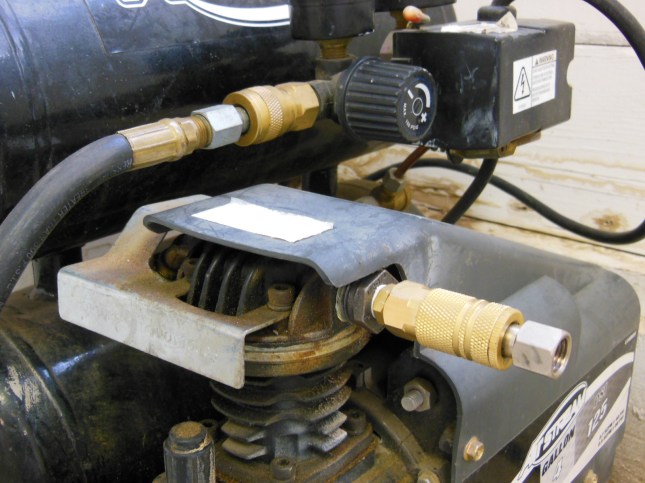
You want a tee unless you already have a 4-way coupler on hand like I did. The female quick coupler you see in that picture is unnecessary.
After you see the first of the used oil come out of the motor and into the reservoir, it’s kind of boring as there’s nothing more to watch.
If you wanted to, could you not close off the drain and switch your air hose from the inlet side to the outlet side and pump the used oil from the tank that way? Sure, you may have to disconnect the 1/4″ hose but if you were using a large enough tank, say 15 gal, it wod be faster I would think…. please let me know what you think….
Jon
That’s what step 13 of the procedure is describing. A few pounds of air pressure will force the used oil out of any tank pretty quickly.