

This is a guest post written by Andrew Evans who is a highly-experienced, single-handed, offshore racer who hails from Victoria, British Columbia in Canada. He is also the author of Thoughts, Tips, Techniques & Tactics for Singlehanded Sailing. Since Andy shared with us how he likes to abuse his spinnaker in Lessons on Spinnaker Repair, he’s also a good tester for this interesting new product.
DrSails is an epoxy developed by Sailing Technologies specifically for sailors. Their website claims that it will bond to pretty much anything including sails, metals, carbon fiber and fiberglass. It cures in 20 minutes.
One Thing Wrong
I’ll give you the one, simple thing they got wrong first just to get it out of the way, there are no instructions provided in the package. There are lots of videos and instructions on their website but that won’t help when I’m 100 miles offshore. Will it work wet? What materials will it bond together? How can I use a stiff epoxy on my sail like they advertise? The tube says 20-minute cure, but does that mean it is usable in 20 minutes? All of these answers are available on the website, but I shouldn’t need to look at a website before using an epoxy. There are some really tiny instructions depicted in pictures on the tube, but like most men in their 50’s, I can’t read without my glasses and nothing on a boat should require glasses. At night — forget about it. A simple sheet of instructions, on waterproof paper, would make DrSails spectacular.
Many Things Right
First, and my absolute favorite, it comes in several package sizes including: 10ml pouch, 10ml tube, 25ml tube, and 265ml tube. I hate buying a large container of anything knowing that I only need a tiny bit and the rest will dry out on the shelf after a year or two. They have really made me happy here. I can see myself buying a few pouches to handle the day-to-day stuff, and one big tube for significant problems on an offshore voyage. The 10ml pouch is priced at €8.30 (about $9.50 USD) so it is not free, but any repair that I can do on a boat for less than a ten-spot is pretty good by my miserly standards. I can’t see paying €21.50 for the 10ml tube, just for convenience it provides, but at €96.25 for the 265ml tube that will handle a major repair, we are once again back in my realm of extreme frugality. What major repair can you do on a boat for $100?
Second, they’ve made it extremely easy to use. The tubes are self-mixing, meaning that the epoxy and hardener mix inside the nozzle and come out of the tip ready to apply. This is great when I’m sailing and don’t want to use a mixing board. I’ve done this enough times with other epoxies to know the mess that ensues. (If you think of the problems that Robert Redford had patching his hull with West System epoxy in “All is Lost”, then you know what I mean. That would have been a snap with DrSails.) The DrSails video even shows a repair being completed 80’ up in the air at the top of a Volvo Ocean Race sail. This level of convenience is a brand new concept to sailors. Even the cheapest pocket pouch is designed to be premixed by kneading it in the package, and they’ve come up with a way to mix it with fiberglass fibers inside of a little plastic bag. I’m thrilled with the product designer!
Next, it’s flexible when dry, so it’s great for repairing sails. I don’t know how they made an epoxy flexible, but this puts it in a different game from anything else on the market. I can truly see this being used to repair the spreader rip in a Mylar sail halfway to Hawaii.
It bonds to pretty much anything that you will find on a boat, from the sails to the aluminum tiller to the hull itself. It even works underwater, so with some challenge, it could be used to apply a patch made from a Mylar sail to a punctured hull. Imagine that. Just rough up the surface a bit, apply the DrSails and stick on whatever you are using as a patch.
How I Tested
As you may know from Lessons on Spinnaker Repair, I treat my spinnaker with total abandon, thinking nothing of ripping it to shreds in a 30-knot broach. I have to admit that my latest adventure took it past the point of no return but that made the remaining rags perfect for this type of product testing. So this was my challenge: Could I pull my sodden spinnaker with a 20’ rip out of the ocean, add DrSails and be flying it again in under an hour?
The company only sent me a small, 10ml tube with just one tip. So I took a couple of pieces of my shredded spinnaker down to the beach and soaked them in salt water. While still wet, I applied a single bead of DrSails down 18” of the rip, overlaid the material, flattened the epoxy to about ½” wide with my finger and waited. I gave it a full 30 minutes in the sun. The sail was dry by that time.

I gave the nylon a good pull and it stayed together. Certainly this was 1000% better than anything spinnaker repair tape would have done, especially on wet nylon. I am confident that this would hold up under most wind conditions. I could easily have hand-sewn a stitch every 6” to be completely safe. I wanted to test it to the max, so I pulled as hard as I could and yes, it did come apart.

For a second test, I used dry nylon and spread the DrSails 2” wide down a length of 1’. A 10ml tube would only be able to do this for 24”, so my theoretical 20’ rip would take a lot of product. After 30 minutes, I pulled with the strength of Hercules and there was no way that repair was coming apart. I estimate that a 1” wide strip of epoxy would be enough for anything I might ever face. My challenge was met. Yes, it would be possible to pull a sodden spinnaker out of the water, repair a 20’ rip, and be flying it again in under an hour.
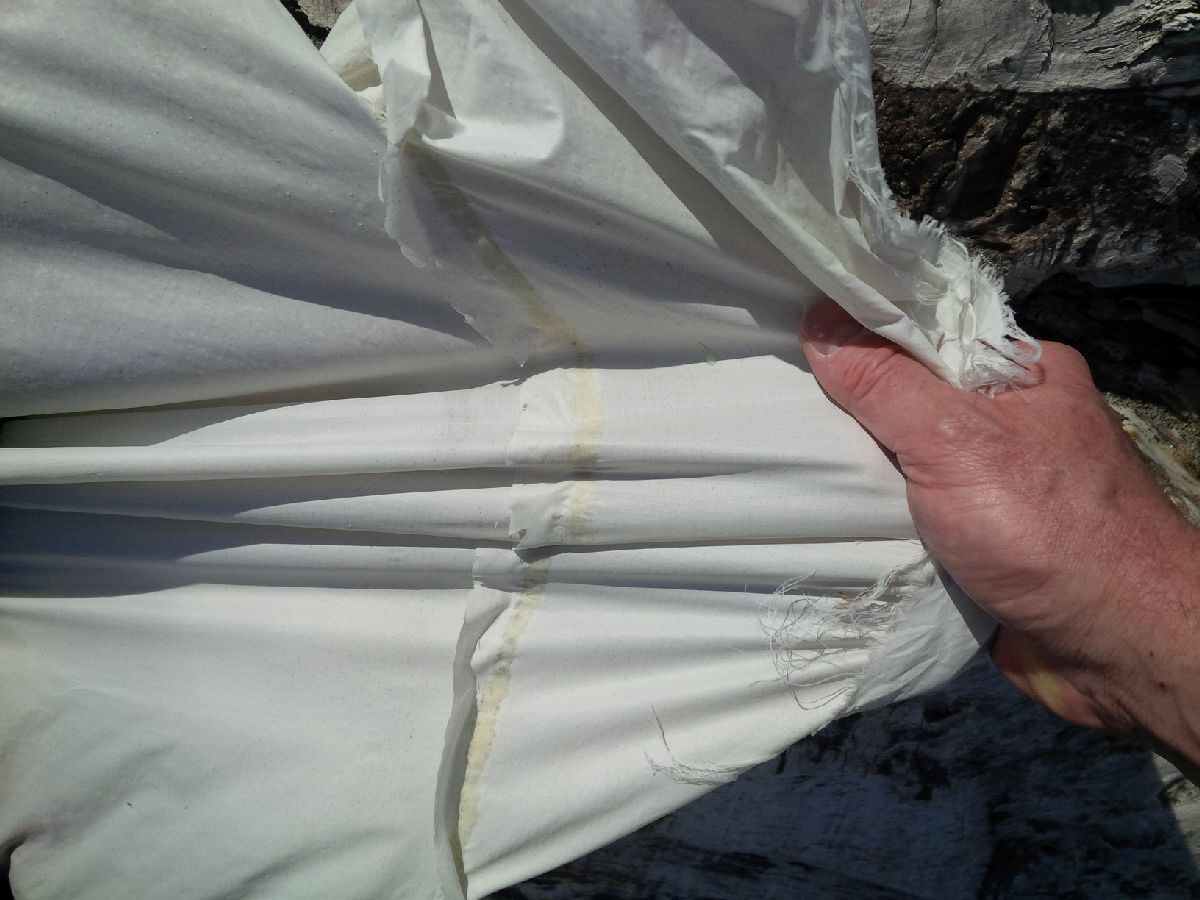
The next day, the epoxy remained flexible on the sail and the bond against pulling the two pieces of sail away from each other was even stronger, so there is no way that the wind would ever explode my chute. However, I was able to peel the two pieces apart very easily. It was clear that the epoxy had not impregnated the fabric to create a mechanical bond. [$tingy note: When asked to comment about Andy’s results, DrSails responded with a video that shows their recommended technique for preventing peeling. The proper technique is to spread the DrSails adhesive to the edge of the fabric and to even overlap the repair joint. Several of the DrSails repair videos on YouTube also show this technique. I recommend that you watch all their videos that are relative to the kinds of repairs that you expect to make with DrSails and be sure you understand the correct techniques before using the product, especially since no instructions are provided in the package.]
My recommendation is that every boat should keep a few of the 10ml pouches of DrSails on board for small repairs. For an offshore voyage, the 265ml tube would be a wise investment, even for a stingy sailor.
Would you like to be notified when I publish more posts like this? Enter your email address below to follow this blog and receive notifications of new posts by email. You will also receive occasional newsletters with exclusive info and deals only for followers and the password to the Downloads page. It’s free and you can unsubscribe at any time but almost nobody does!

Great information!