

I’m not a neatnik that needs everything to be squeaky clean and new. Well, maybe just a little. But if maintaining a part gets neglected to the point that it affects functionality, then the part needs to be repaired or replaced in my book. A good example of this is your sailboat’s cockpit scupper, galley, anchor locker, and other drain tubing.
Before I continue, a bit of legal housekeeping. This post contains affiliate links. That means I receive a small commission if you make a purchase using those links. Those commissions help to pay the costs associated with running this site so that it stays free for everyone to enjoy. For a complete explanation of why I’m telling you this and how you can support this blog without paying more, please read my full disclosure.
When you don’t see it actively leaking, it’s easy to think that it’s okay and doesn’t need any attention when in reality, the tubing could be cracking, waiting for the worst possible time to leak. And it might be held on with rusted hose clamps waiting to resist your repair efforts when the leaking starts. These and other dangers could be hiding in tubing that is so full of gunk and so stained that you have no way to tell if the drains are clogged or clear.
The biggest danger is the inability of the tubing to keep water outside of the hull. Much of this tubing drains out of through-hull fittings below the waterline. If the tubing cracks or breaks at one of these fittings or if the clamp fails and the connection comes loose, the water outside the sailboat will quickly come inside the sailboat. Or if the tubing gets clogged with debris because you haven’t kept them flushed clear, then the water that they are supposed to drain outside the hull will back up inside the hull.
In the case of galley drain tubing, that might only make an inconvenient mess. In the case of cockpit scuppers, that could mean a cockpit full of water that contributes to sinking, which is partly why Catalina Yachts changed the design later to larger scuppers through the transom instead.
Don’t call Roto-Rooter
To keep your drain tubing clear:
- Don’t allow solid debris into the drains in the first place. Keep the collection areas that they drain clean.
- Periodically flush them with pressurized water. Plug all inlets except one and the outlet that are connected to the same network of tubing. Force water through the open inlet with a garden hose until it runs clear and freely from the outlet. Then plug that inlet and flush the next inlet on the same tubing. Repeat until all the inlets have been flushed.
When in doubt, take it out
It’s time to replace your drain tubing or hose clamps when:
- You can see visible cracks anywhere in the tubing. If it’s already cracked there, it can crack anywhere.
- You cannot easily bend the tubing or if you do, it cracks.
- The tubing has any kinks or flat spots that could reduce its ability to drain.
- The hose clamps show much rust, wear, or damage or are difficult to tighten or loosen.
I recommend that you replace all drain tubing (and all potable water tubing, for that matter) with reinforced vinyl tubing meant for high pressure applications. This isn’t a high pressure application but the braided reinforcement helps the tubing to hold its shape better through bends without kinking, it provides a better visual sign of any debris in the tubing (especially in poor lighting), and it doesn’t cost much more than non-reinforced tubing. It’s a cheap upgrade to an important system.
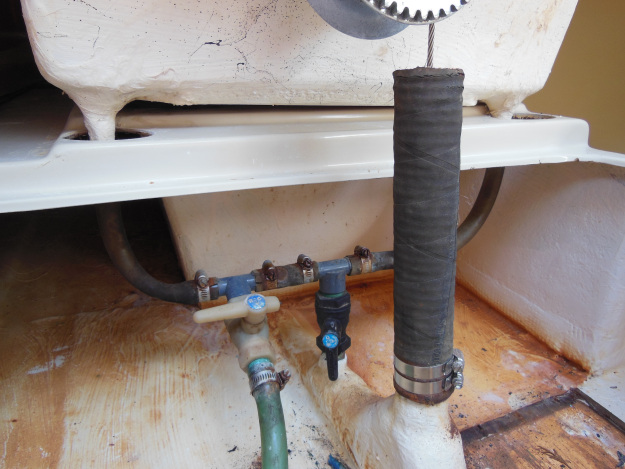
Replace all hose clamps with only good-quality, stainless steel clamps. Normal steel clamps, even zinc plated ones, will quickly rust and need replacing again and aren’t worth the cost savings. Use two clamps for critical through-hull connections like the winch cable hose shown above and at left. That hose doesn’t drain anything but it is a critical part. For more, see blunder #5 in Five Swing Keel Maintenance Blunders and How to Prevent Them.
While everything is apart is a good time to service any ball valves in the system as described in The Complete Beginner’s Guide to Ball Valve Maintenance. Also inspect the fittings for cracks and corrosion that the tubing connects to. Repair or replace any that are suspect.
For first generation C-22s and other sailboats plumbed like shown above, you can replace all the tubing and clamps for about $30:
The same materials for a new design C-22 are only slightly more.
Once everything is replaced, it only takes a quick glance to see what’s in those drains and you can forget about them leaking for a long time to come.
Would you like to be notified when I publish more posts like this? Enter your email address below to subscribe to this blog and receive notifications of new posts by email. You will also receive occasional newsletters with exclusive info and deals only for subscribers and the password to the Downloads page. It’s free and you can unsubscribe at any time but almost nobody does!

Another great project! Thanks so much!
I also just bought your e-book about rigging since, as a new owner of an ’81 Catalina, I felt uneasy not knowing what everything does. Your book is excellent.
Lou
I noticed that you used the same hole for your ball valve. Everything I read says to abandon that and add a true thru-hull in a different location. Did you seal it somehow or reinforce it?
Do you mean for the galley drain? There’s no need to make a dedicated thru-hull for it and introduce another potential failure and water intrusion source. The original design has worked fine for 50 years if the tubing and valves are kept in good condition.
No, I meant for the whole scuppers and galley drain. That pipe that drains into the keel slot is below water level.
While removing the rusty, frozen gate valve in my boat this weekend, the whole thing unscrewed. I could reinstall and reseal a new pipe nipple, but I’m concerned about failure.
While reading your post about that system I noticed you have a new gate valve on that pipe and thought I’d get your thoughts on it.
That valve was on it when I bought the boat. If it were me, I would replace the nipple unless it was in good condition and reseal it into the hull with 3M 4200 sealant and, of course, replace the ball valve.
Thanks. Great site, full of information. Much appreciated!