

I’ve been asked many times if I have a chartplotter on Summer Dance. Up to now, I’ve answered that I didn’t have a need for one and that my handheld GPS worked fine for my needs. But recently, I’ve challenged myself to do more fishing and I haven’t been very successful yet at filling up my electric smoker. I’m also seriously considering cruising the San Juan Islands off the Washington state coast. And there’s my failure to get my handheld GPS to play nice with my tiller autopilot that nags at me. For these reasons, I bit the bullet and installed a Garmin ECHOMAP UHD 73sv chartplotter. I’ll give you my objective evaluation in this review.
Before I continue, a bit of legal housekeeping. This post contains affiliate links. That means I receive a small commission if you make a purchase using those links. Those commissions help to pay the costs associated with running this site so that it stays free for everyone to enjoy. For a complete explanation of why I’m telling you this and how you can support this blog without paying more, please read my full disclosure.
The Garmin 73sv is chocked full of features and you can read about them all elsewhere. In this review, I will focus on the features that I feel are most interesting to the readers of this blog, stingy sailors.
Caution
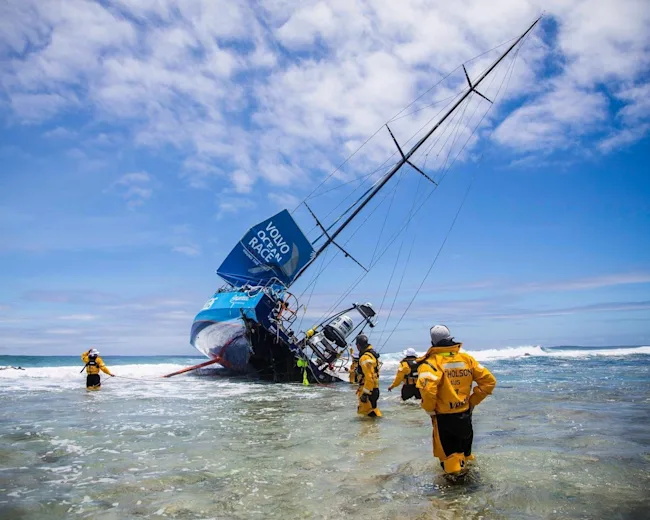
Electronic devices (chartplotters, GPS units, cell phones, etc.) should not be used as a replacement for paper maps and direct observation. GPS accuracy is good but not perfect. The same goes for digital maps. One weakness of all devices of this type is that they can only display a certain amount of information on the screen at a time. To compensate for this, they hide details that would be too small to display at the current screen resolution and zoom factor until you zoom in further. This means that you’re always only seeing a portion of the data. There could be a reef, rocks, or pilings that aren’t showing up on your device because you’re zoomed out to far. That can be easy to forget and many captains have accidentally grounded their boats on obstacles that weren’t visible on their devices, even expert captains racing around the world in the most technologically advanced sailboats ever designed.
So if you decide to use a chartplotter, learn to use it well, but don’t rely on it as your only map. Always have a paper map for the area where you’re sailing, even if it’s just a backup in case your chartplotter fails. Compare it with the digital map and take note of the differences. Then correlate everything with what you can actually see with your eyes. Your best navigation tool will always be between your ears.
Size
The Garmin 73sv screen measures 7″ wide horizontally, not diagonally like a TV. Garmin also has the same chartplotter in 4″, 6″, and 9″ models, but the 73sv is the smallest size with a touchscreen, which I believe is worth it for sailors as I explain below. It’s small enough to install almost anywhere on a sailboat but large enough to read map details several feet away without squinting at a tiny screen. The resolution is high enough that using the split screen layouts is practical even though each screen only uses a fraction of the whole.
Touchscreen
Smaller chartplotters than this one, although they might cost less, typically don’t have a touchscreen. Instead, to zoom and pan in maps and menus, you have to use arrow buttons on the side of the unit, which is slow and clumsy, especially while your sailboat is rocking. If you’re used to controlling a phone or tablet with gestures, a touchscreen chartplotter will feel natural and will be faster. That can be important when you need to zoom in to see shallow depth markings and submerged obstacles.
Sonar
Sonar is a depth finder on steroids. Besides telling you the depth of the water under your sailboat, it can show you the geography of the bottom, which can help you to know whether it’s rocky and not a good place to anchor or flat mud/sand and a much better choice. It can also show you the rate at which the water is getting shallower, which can make navigation decisions faster and easier than trying to interpret changing depth numbers.
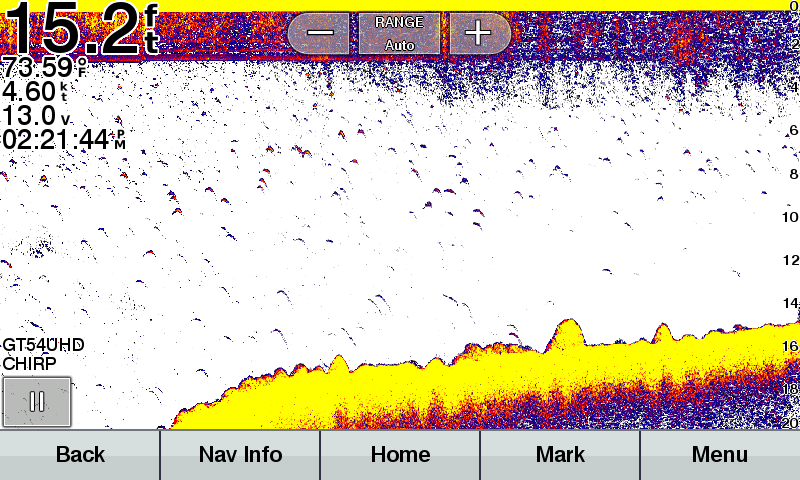
The icing on the cake, of course, is that it will also show you suspended objects in the water like fish and logs. Just be sure to set the Keel Offset setting of your chartplotter to the vertical distance between the transducer and the keel bottom. Then depth readings will account for your sailboat’s draft.
The Garmin 73sv also features a high frequency, side scanning mode called ClearVü that produces 3D imagery of the bottom, which is great for detecting rocks, trees, and weeds.

The Garmin 73sv takes sonar to the next level by allowing you to create a custom topographic map of the bottom in real time. This is great for smaller inland lakes or remote areas that aren’t included in the Navionics map data that comes with the chartplotter.

With it, you can make custom maps of your favorite anchorages with lines at smaller intervals than the standard maps.

Maps
The Garmin 73sv comes with Navionics U.S. LakeVü g3 map data for inland lakes. I chose the 73sv because I mostly sail on an inland lake. US and Canadian coastal cruisers will want the 74sv that includes BlueChart g3 map data. Canadian lake sailors will want the 75sv that comes with Canada LakeVü g3 map data. International cruisers will be interested in the 72sv that includes a worldwide base map. You can purchase additional maps to download onto your chartplotter from Garmin.

Autopilot Control
If you have a tiller autopilot like the one I describe in How to Install a Tiller Autopilot, one of the most enticing features of a chartplotter is the possibility of connecting them to work together. With a route stored on the chartplotter and an autopilot capable of following a route stored on a GPS device, your sailboat can steer itself, freeing you to trim sails or just enjoy the ride hands free. The key is that both devices must communicate using the same network communications protocol, either NMEA 0183 for older devices or NMEA 2000 for newer devices.
Sailing Features
When you set the Vessel Type setting of the Garmin 73sv to Sailboat, it enables special features for sailing.
Starting Line Guidance
Many races are won or lost at the starting line. Timing when you cross the starting line and doing so at maximum speed while avoiding other sailboats is a skill not easily mastered. This feature takes the guesswork out of timing your starts. First, you mark the locations of both ends of the starting line. From then on, the chartplotter automatically and continuously calculates your position relative to the starting line and updates its display.
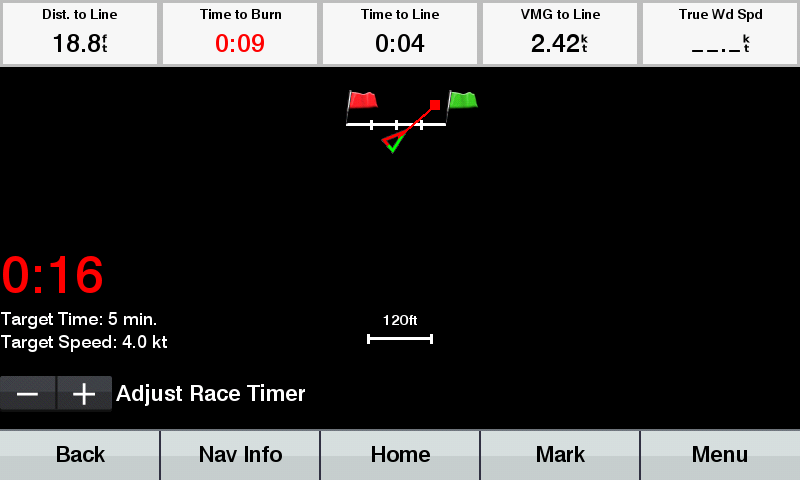
The configurable 5 minute countdown timer keeps you in sync with the standard starting sequence used by most race committees. The color of the display indicates by how much you will arrive at the starting line early (red number) or late (black negative number).
It takes some practice to find your favorite starting line strategy and run-up distance but this feature really helps you to dial it in.
Wind Sensor Features
If you’re fortunate enough to have a wind sensor on your sailboat, you can take advantage of the following features. Since I don’t have a wind sensor installed on Summer Dance, I was not able to review these features.
Laylines
Draws port and starboard lines on the navigation map that indicate possible headings relative the sailboat’s current heading and configurable sailing angles.
Wind Hold
When the chartplotter is connected to an autopilot, maintains the sailboat’s heading relative to the wind direction.
Tack and Gybe
When the chartplotter is connected to an autopilot, automatically controls the rudder through a tack or a gybe.
Installation
The hardest part about installing a chartplotter on a sailboat, especially a smaller sailboat, is where to place it and how to install the sonar transducer.
Control Unit
Larger sailboats have cockpit pedestals on which to mount a chartplotter in the swivel bracket they usually come with. Or they have large bulkheads in which to surface mount the chartplotter. But few of us want to cut a large hole in our cabin bulkhead that might leak. It also makes it difficult to upgrade to newer technology in the future if the hole winds up too big or, heaven forbid, you need to fill it back in. Mounting the chartplotter permanently in the cockpit also limits its convenience. You can’t review the day’s track data or plot your next day’s course from inside the cabin after dinner.
In my opinion, the best solution is one that lets you use the chartplotter either in the cockpit or in the cabin. A popular way of achieving that is with a swing arm that positions the chartplotter in the companionway for use from the cockpit but can be retracted for use inside the cabin. Some owners resort to building DIY swing arms. I considered that option but decided that I wanted something sturdier and easier to use. That’s when I discovered the RAM® Vertical 12″ Swing Arm Mount.

This thing is a beast, weighing in at 8 lbs. all by itself and is very stable. The arms and base are thick, cast aluminum connected with 3/8″ diameter bolts and large, easy to grip plastic knobs. All four pieces can rotate independently and then be locked in place, allowing for multiple chartplotter positions without moving as the sailboat rocks. The two positions that I use most are extended to the companionway and facing aft for use in the cockpit or retracted against the bulkhead and facing forward for use in the cabin.


I mounted it as high as possible so that it can be seen with the top companionway crib board removed or replaced with an acrylic window. It also tucks out of the way so that crew can sit in the aft seat of the settee. I fabricated a wedge from solid mahogany and installed it between the mounting bracket and the bulkhead to compensate for the 25º bulkhead angle and keep the arm vertical.
Transducer
Sonar transducers come in two basic mounting styles: through-hull and transom mounted. The through-hull style requires a round hole in the bottom center of the hull that has the potential to leak. It also requires that the sailboat be out of the water to remove the transducer for service or replacement. Transom mount transducers are easier to install and less risky so that’s the style that I chose.
The Garmin 73sv comes with its own transducer mounting bracket that is designed to locate the transducer below the water line right behind the transom. The ideal location for sonar accuracy is at the centerline of the transom but this is where the rudder is mounted and rotates to either side. The next best location is offset out of the way of the rudder but this could raise the transducer out of the water and interrupt the sonar image when the sailboat is heeled over on the opposite side.
To get the best of both worlds, I fabricated my own mounting bracket from StarBoard HDPE plastic.
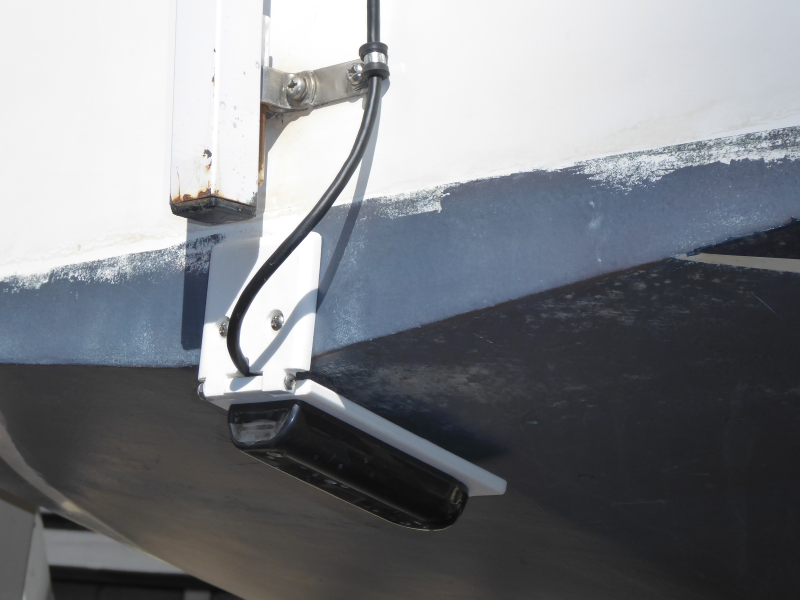
I designed the bracket to hold the transducer in the same orientation as the stock bracket but to mount on the transom centerline and position the transducer under the hull, out of the way of the rudder. This keeps the transducer submerged at all times and maximizes sonar accuracy. If you’re interesting in making this bracket for yourself, a dimensioned drawing can be downloaded from the Downloads page.
I routed the transducer cable up to a small, sealed hole in the transom above waterline, then down inside the hull liner and along the cockpit sole to the control unit.
Cost
I took advantage of a Christmas season special offer at Cabela’s and purchased the 73sv for $450. That’s $400 below MSRP. The same price was available for Father’s Day and possibly other holidays. Garmin controls the pricing of their products tightly, so you’ll see the non-sale price of $650 everywhere you look. If you prefer to shop at Amazon, please use this link. For the specs of all Garmin chartplotters, visit the Garmin website.
Would you like to be notified when I publish more posts like this? Enter your email address below to subscribe to this blog and receive notifications of new posts by email. You will also receive occasional newsletters with exclusive info and deals only for subscribers and the password to the Downloads page. It’s free and you can unsubscribe at any time but almost nobody does!

Hi $tingy,
Could I ask where you carry your outboard when you are trailering Summer Dance?
Thanks,
Terry
________________________________
Hello, Terry
Take a look at How to Secure Your Outboard Motor for Safe Trailering (https://stingysailor.com/2019/06/01/how-to-secure-your-outboard-motor-for-safe-trailering-2/).
$tingy
Excellent blog article! Helpful for an amateur like me to get an idea of what to choose as my first satellite GPS. Thanks so much!
What about the keel? I have a fixed wing keel Catalina 25.
That’s why I said in the article “Just be sure to set the Keel Offset setting of your chartplotter to the vertical distance between the transducer and the keel bottom. Then depth readings will account for your sailboat’s draft.”