

If you’re not afraid to sail single-handed in a stiff breeze and get the toe rail wet, then you want to be able to move around in the cockpit and still have control of your tiller. You want to be able to lean back into the lifelines, sit as far forward as possible (to lighten the stern), or even sit up on the coamings. But you can’t do that without a tiller extension.
Before I continue, a bit of legal housekeeping. This post contains affiliate links. That means I receive a small commission if you make a purchase using those links. Those commissions help to pay the costs associated with running this site so that it stays free for everyone to enjoy. For a complete explanation of why I’m telling you this and how you can support this blog without paying more, please read my full disclosure.
When the going gets tough, the tough get a stick
A tiller extension gives you extra reach to the tiller so that you can pick a better seating position for the current sailing conditions. Racers use them almost universally. If you have hopes of racing someday too, it’s never too soon to master using a tiller extension.
Tiller extensions are surprisingly expensive for what they are, a modified hiking pole or ski pole. You can spend as much for one tiller extension as for a pair of ski poles but they aren’t twice as complicated, twice as strong, or twice as expensive to manufacture. In fact, you can make one out of an unused hiking stick, trekking pole, or ski pole for about a third of the cost of a commercial tiller extension and it will work just as well.
Materials list
Here’s a list of the materials you’ll need:
- (1) Ski pole, trekking pole, or equivalent at least 3′ long
- (1) Replacement tiller extension universal joint. There are several brands available on the web or from your favorite marine outfitter. I like the Ronstan Battlestick universal joint kit. It includes everything you need for the end of the tiller extension and for the mounting bracket on your tiller except screws.
- (1) Bicycle handlebar foam grips or grip tape. Any kind of waterproof grip will work, even coachwhipping.
- (1) Rubber cement to glue on the foam grips (Shoe Goo also works and it fixes shoes too)
To make your DIY tiller extension:
1. Measure the outside diameter of the universal joint tenon with a set of calipers where it inserts into the tiller extension tube. You want to cut off the tip of the ski pole right where the inside diameter of the pole is this size or slightly smaller for a tight fit.
2. Mark the ski pole at the point where its inside diameter is approximately the same as the measurement from step 1. The wall thickness of some ski poles tapers from thicker near the tip to thinner at the handle so find the point where the pole outside diameter is the same as the universal joint and move toward the tip a couple of inches so that you can start out too small and work your way up to the correct size after you find the inside diameter.
3. With a hacksaw, cut the tip off the ski pole at the mark from step 2, remove any burrs, and measure the inside diameter of the ski pole at this point with a set of calipers. It should be a little less than the diameter you’re shooting for.
4. Cut off short increments until you reach the desired inside diameter.
5. Use a fine file or sandpaper to smooth the cut and to remove any burrs and sharp edges.
6. Attach the universal joint to the tip of the pole. Here’s a good video on how to install a Ronstan universal joint.


7. Decide how long you want your tiller extension to be. About 3′ long is a good start. Take measurements from each helm position where you expect to use the tiller extension. You want the extension as long as possible without being too long to fold out of the way when you don’t need it. Cut the end of the ski pole at that length. You can always shorten it later if you want but you can’t easily make it longer.
Your tiller extension can actually replace a tiller lock if you make it long enough to secure temporarily to the cockpit coaming at 90° to the tiller like shown in the picture below. That way, the tiller extension holds the tiller centered in the cockpit just like a tiller lock.

In the picture above, the handle of the tiller extension is held by the hook-and-loop tape of one of the same bicycle flashlight mounts that I describe in Add a Solar-Powered Flood Light in Your Cockpit. When you want to take back control of the tiller yourself, just pull apart the hook-and-loop tape.

8. Apply the foam grip (with rubber cement or Shoe Goo) or grip tape and an end cap to the handle end of the tiller extension.
9. Mount the universal joint bracket to the top of your tiller handle.
I slightly modified the adapter that I made for my tiller lock so that it also accepts the universal joint bracket. This way, I can swap between the tiller lock and the tiller extension with just two screws if I want to. If you don’t have such an adapter, attach the universal joint bracket directly to the tiller handle.

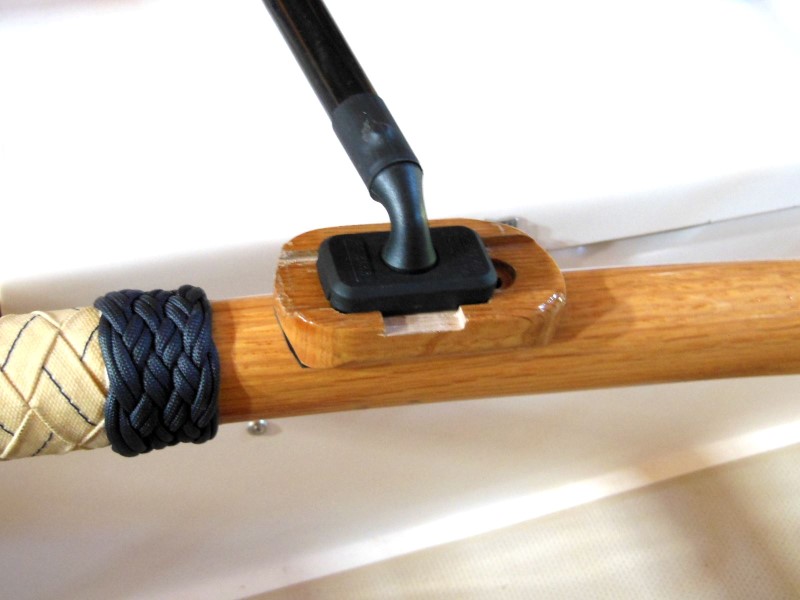
The universal joint attaches to the bracket by sliding the rectangular “key” sideways into the slot in the bracket. The attachment cap snaps over the bracket to keep the tiller extension from detaching during use. You can remove the tiller extension by unsnapping the cap and sliding the universal joint in the opposite direction.
I like using my tiller extension when I have crew onboard to set and trim the headsail and all I need to do is mind the tiller and trim the mainsail. But when I’m single-handing, I also use my tiller autopilot so that I can have both hands temporarily free to do everything else too.
Would you like to be notified when I publish more posts like this? Enter your email address below to subscribe to this blog and receive notifications of new posts by email. You will also receive occasional newsletters with exclusive info and deals only for subscribers and the password to the Downloads page. It’s free and you can unsubscribe at any time but almost nobody does!

Great idea and resource; it is good to give something a new life as opposed to tossing it! What is your take on having and adjustable length extention, using something like an old tripod leg or similar?
Cheers!
It’s a good idea if the locking mechanism is strong. Some of the commercial extensions have twist locking like adjustable trekking poles.
very good read, I did myn for £2, I got an old golf club, cut the head off, attached a bracket and bolted to my tiller, three years on still strong as can be, due a new rubber handle this season I think
At the other end of the tiller I added an open ended plastic clip that you use to secure 15mm plumbing pipe so that I can store the tiller extension flat on top of the original tiller when not required. When needed I just unclip and spin it around
You can save a few more bucks using a graphite golf club shaft whose head has broken off. I’ve been given a bunch of these free from a golf shop, and if you can get one long enough to do the job, it will already have a good grip on it.
I’ve used several of these for boat projects.