
You may not have seen or even heard of a self-tacking jib before. They’re usually only found on luxury sailboats. But that’s exactly what one is, a headsail that sheets itself when you tack. You don’t have to cast off the working sheet and haul in the lazy sheet on every tack. In fact, after you set it up, you don’t have to touch the sheet again while sailing. You just push the helm to lee, come about as you normally would, and the jib passes through the fore triangle by itself and stops on the new lee side at the same sheeting angle as it was before the tack. I set one up for free and you can too.
Before I continue, a bit of legal housekeeping. This post contains affiliate links. That means I receive a small commission if you make a purchase using those links. Those commissions help to pay the costs associated with running this site so that it stays free for everyone to enjoy. For a complete explanation of why I’m telling you this and how you can support this blog without paying more, please read my full disclosure.
Self-tacking headsails are becoming more and more popular on high-end cruising yachts as designers strive to remove as much effort from sailing as possible with headsail furlers, in-mast mainsail furling, electric winches, autopilots, and more. Seems it won’t be long before sailboats are fly-by-wire like airplanes and driverless cars. How lazy will we get?

But there are practical benefits to a self-tacking jib if you:
- Are single-handed or short-handed on crew.
- Are short tacking through a narrow passageway.
- Have a broken jib car or winch that makes normal tacking impossible or dangerous.
- Or your crew are seriously chilling (lazy) and you’d rather not have to mind the headsail.
A selfie (tacker) you can really use
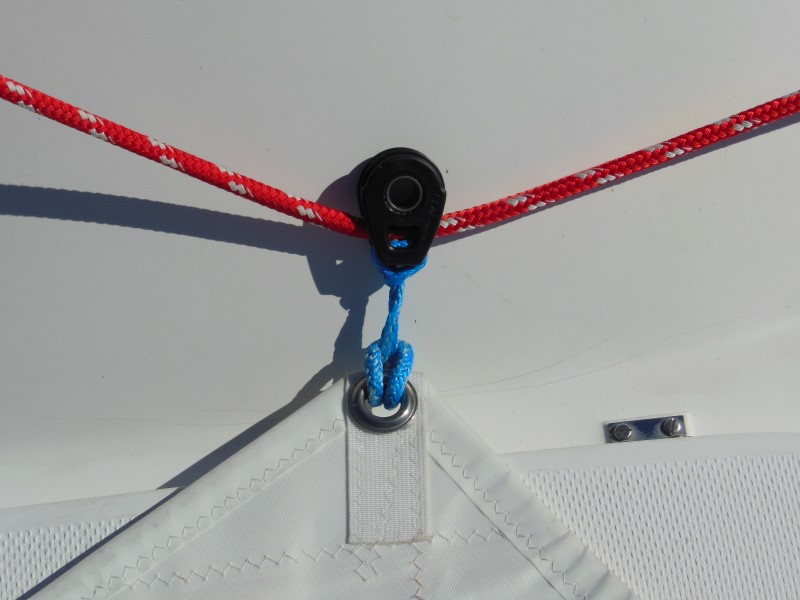
The basic principle of a self-tacking jib is simple; a means for the clew of the jib to remain sheeted throughout its arc of travel from one side of the sailboat to the other during tacks. Commercial self-tacking systems accomplish this with an arc-shaped track mounted to the foredeck. The jib clew is attached to the track by a single sheet to a car that glides freely on the track like a traveler. The sheet leads to the cockpit where the skipper can adjust the jib shape by trimming the sheet. Such systems can cost many hundreds of dollars to retrofit to a conventional yacht.
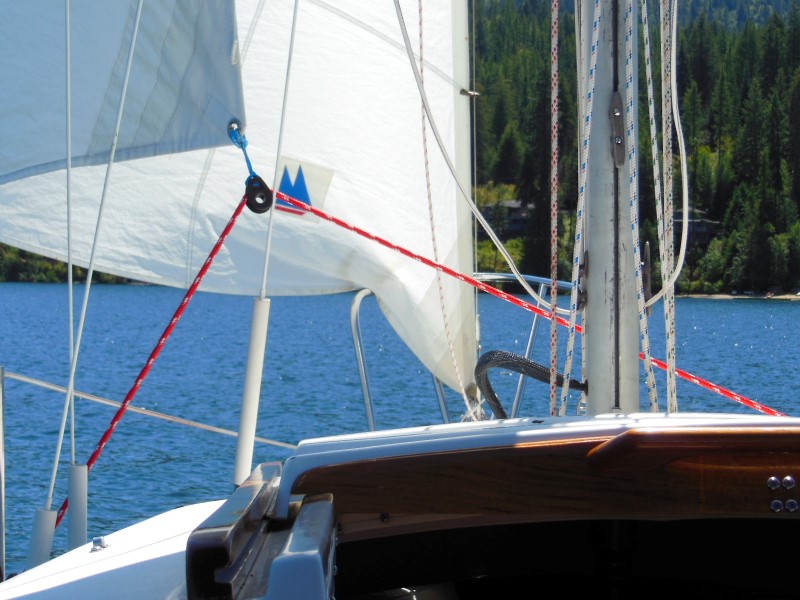
The picture below shows the system with a thick red line that I will describe and it cost me nothing new to set up.
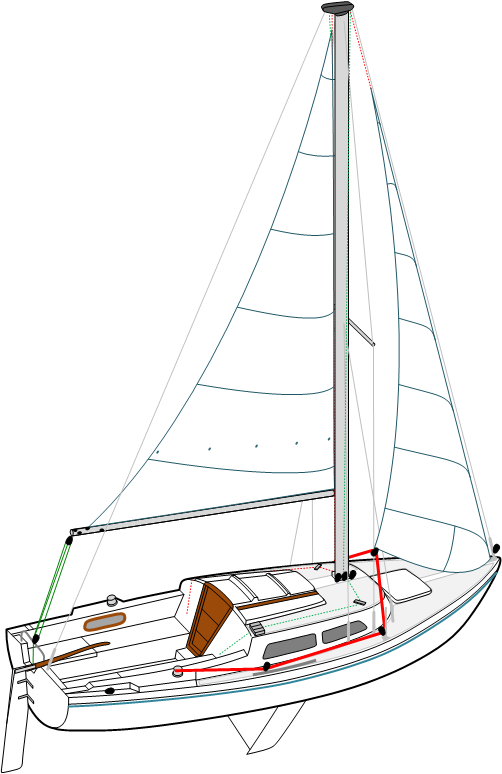
Instead of a track fixed to the deck, this system uses a block temporarily fixed to the jib clew. It reuses one of the headsail sheets you already have to form a bridle on the foredeck for the block to ride on. The other headsail sheet is not used.
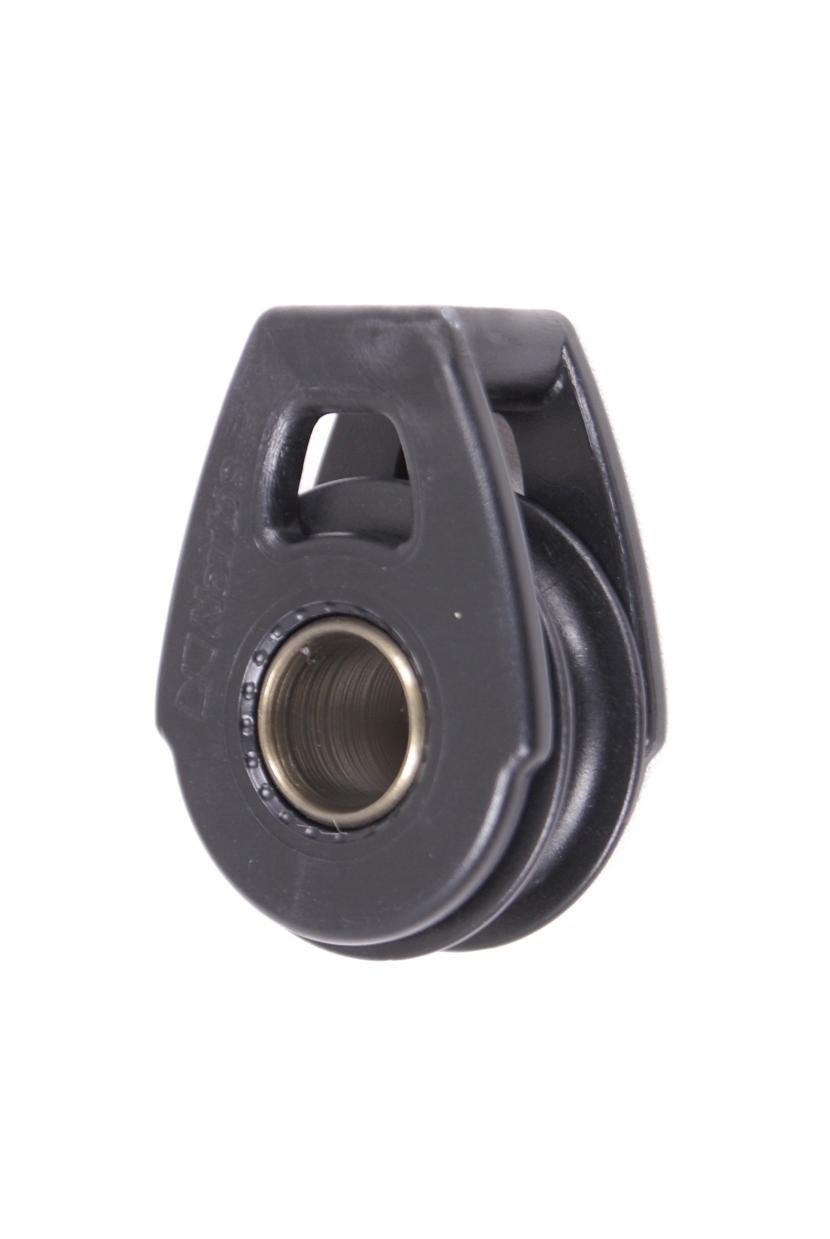
The only other parts you need are two turning blocks. They can be snatch blocks that you keep on hand for miscellaneous jobs, your spinnaker sheet blocks if they’re portable, or they can be permanent blocks that you install just for this purpose (in that case, your system won’t be free). Heck, even two carabiners will work. If you only have one block or carabiner, reave the sheet directly through the clew grommet in step 2 below instead and attach your block or carabiner to the side deck where it can lead the sheet. The clew will have a little more friction but not enough to keep it from working.
When I want to set up the jib for self-tacking, I just move my existing spinnaker sheet blocks forward from the aft coamings to midship. I won’t be flying the spinnaker at the same time so they won’t be in use anyway. I like these 40mm web attachment style blocks from Nautos. They’re high quality, inexpensive, and work great. Instead of lashing them with webbing, I use 5/32″ dyneema loops or soft shackles.
For easy, versatile, and economical ways to attach these blocks to almost anything like you see in the pictures here, check out the continuous loops of dyneema that I describe in How to Rig a Cruising Spinnaker in 4 Stingy Stages and DIY Soft Shackles for Quick and Easy Headsail Changes.
This self-tacking setup works best with a small headsail. I set up my 110% jib this way and it works okay. A larger headsail would not work. A 90% jib, storm sail, or trysail would work even better. That’s because, in order for the jib to set as flat as possible, the foot of the sail should be no longer than the distance from the sail’s tack to the jib sheet bridle.
Do it your self-tacker
To rig a self-tacking jib:
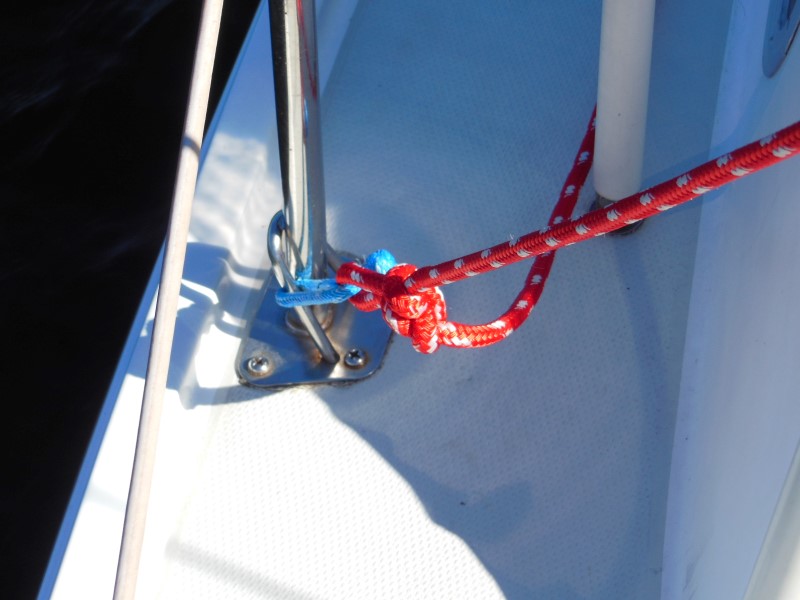
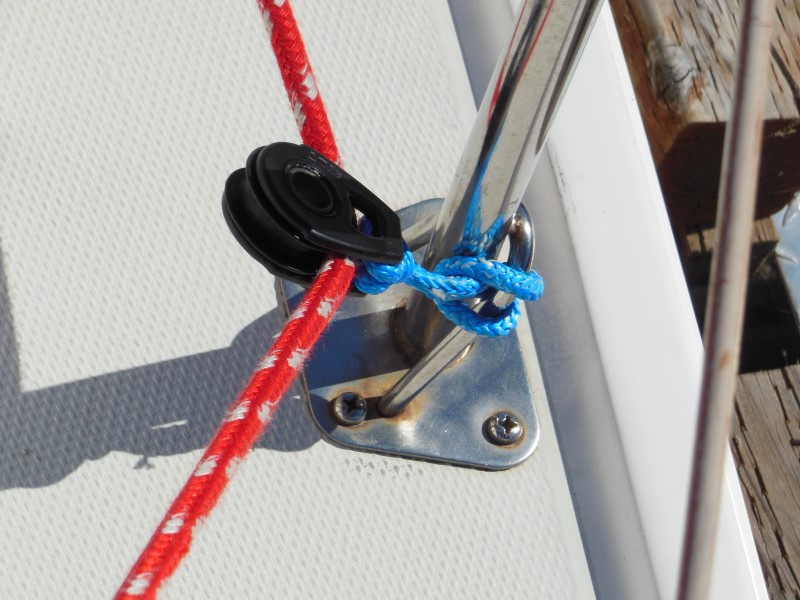
1. Tie one end of the sheet to a point on the deck approximately abeam of the mast and as far outboard as possible. On a C-22, a forward stanchion base is a good place. If you have a toerail, you have lots of choices and can adjust the bridle position for the best sail shape. The picture below (taken from the foredeck looking aft) shows the middle of my single sheet tied to the starboard forward stanchion base. The lazy half of the sheet is leading aft. The working half of the sheet leads out of the picture frame to the right. I keep a soft shackle tied to an alpine butterfly knot in the middle of my headsail sheet where I attach the clews of my headsails. I describe this more in DIY Soft Shackles for Quick and Easy Headsail Changes . That soft shackle is tied to the stanchion base here.
2. Lead the working end of the sheet to the foredeck and reave it through one of the turning blocks that you have attached to the jib clew. The picture below shows one of my spinnaker sheet blocks tied to the jib clew with a simple girth hitch. The continuous loop makes it easy to tie and remove in seconds.
3. Continue leading the sheet across the foredeck to the opposite point on the toerail or stanchion base and reave the sheet through the second turning block (or carabiner) that you attach there. The picture below (taken from the foredeck looking aft) shows the block tied to the port forward stanchion base.
4. Continue leading the sheet aft and through the jib car block as usual. Wrap the sheet a couple of turns around the winch and cleat it off as usual, leaving a couple feet of slack at the jib clew.
That’s all there is to it. Now you just need to trim the sheet out on the water.
Get your self-tacker into shape
To trim the self-tacking sheet:
- While pointed straight into the wind, raise the jib as you normally would. If you normally use one, the self-tacker works best without a pendant to raise the tack off the deck. You want the sail to open up as much as possible and to do that it needs to be as low as possible.
- Bear off the wind slowly until the jib fills.
- Trim the self-tacking sheet to get the best shape possible. Ease the sheet out and the clew will rise, the sail will twist, begin to luff, and spill air. Pull the sheet in and the clew will pull toward the deck, hook the sail toward the mast, and form a full, baggy shape. Experiment with your particular setup until you find the optimal shape that you can get when rigged this way for your wind conditions.
You probably won’t be able to get a nice, flat, foil shape, especially with a working jib but it will still work. I’ve made 4.5 knots with this setup in 10-15 mph winds and that was with a reefed mainsail and dragging a wad of weeds the size of a basketball wrapped around my keel cable. Temporarily suppress the rule in your mind that says you have to trim the headsail flat when sailing upwind. You can pull the rule back out when you revert to a conventional headsail setup.
When it comes time to tack, just announce “helm’s a-lee!” and come about. The clew block will roll across on the bridle that you have tied across the deck and the jib will set on the other side by itself.
When not to be self-centered
There are a few caveats that come with this technique:
- It works best in medium airs due to the compromised sail shape. Light airs are too weak to develop much forward power with this shape. The sail also isn’t flat enough for safe sailing in heavy airs. But if an unexpected gust comes up, you can blow the jib by casting the sheet off at the winch like you normally would.
- It doesn’t work well downwind because the sail is held too close to the center of the boat where it falls in the mainsail shadow. So use this setup upwind only or in very short downwind runs.
- You won’t be able to point very high into the wind, also due to the sail shape. Consequently, you won’t make much upwind progress if that’s your course. It’s best used when you’re casually daysailing or turning laps between two points 180° opposed. It works great for that.
- You can’t heave-to when set up this way because you can’t backwind the jib. It will just cross the foredeck and you’ll wind up tacking. To heave to, you have to reset your sheets to a conventional setup.
I think this is an interesting technique that’s useful in specific conditions. Racers and other sail trim experts may scoff and call it a dumb trick. Let them, but give it a try sometime and consider it another tool in your bag of sailing skills. You shouldn’t need to buy anything (or very little) to set it up and you’ve got nothing to lose by trying but a little of your time. I bet that if you set it up right, you’ll be pleased with how much more relaxing it can make sailing. Especially if you don’t have a particular destination in mind and you don’t care how fast you get there. Isn’t that some of the best of times to be had when sailing?
Would you like to be notified when I publish more posts like this? Enter your email address below to subscribe to this blog and receive notifications of new posts by email. You will also receive occasional newsletters with exclusive info and deals only for subscribers and the password to the Downloads page. It’s free and you can unsubscribe at any time but almost nobody does!

Looks good – looking forward to trying it out. Thanks Mr. $tingy!
I may have missed something, but I don’t see how the self tacking headsail can be adjusted to allow for heave to. To me, that’s one of the most important maneuvers a sailor need to have under his/her belt.
You’re right, Bill. I forgot to mention that as one of the caveats. You can’t backwind the jib when setup this way without first going forward and moving the normal clew knot back to the clew.
Just got round to reading this – what a great idea! Will try this next time I take Tamariu out – thank you $tingy, another winner!
I’ve recently sold off the last of my salt-water navy in favor (at age 81) of returning to lake sailing where the hint of menace that added spice to my coastal adventures for fifty years is blissfully absent. After restoring a derelict Rhodes 19 and launching her last summer, I quickly realized that instead of tacking every hour or two or three as on Penobscot Bay, I was coming about every five or ten minutes. Time for a self-tacking jib, but I am unwilling to spring a few grand for a Hoyt or whatever, I’ve been looking high and low for an easy solution for this matter. Bingo! Today I discovered The $tingy Sailor and this great article. I’ll be putting this great plan into action next week, and every time I call out “hard a-lee” this coming summer long, I’ll thank you that all it means for the crew is “hold onto your drink while I come about”. Ahhh…
Cheers!
Sail on, Eliot!
Nice trick, nice explanation, good warning of caveats. A riggig to try in my sailboat. Thanks!
Maybe a silly question, but I have a roller furler, not a hank on headsail. Is it still possible to use this set up with a furler? I imagine that you would just slack the sheet as you furl the sail. I don’t think the the clew block would be an issue. Any thoughts?
Hi, Joanne
It shouldn’t be a problem. Give it a try!
$tingy
Well, I rigged up this self tacking jib on my boat and love it!! It’s so much easier having guests aboard without them all constantly moving around to grind the winches and pull lines. I have it set up on a furler which makes the job even easier. The sail luff stops just before the mast, so it’s perfect. I am loving the ease of it! Thank you so much for this great idea!
I will try it on my 1977 Hunter 27 with 85% hank on jib. Thank you.
Thanks – Extremely interesting, and very clear!
From the introducing picture you can already see that this doesn’t work. In the picture the jib maybe uses 30% of its efficiency on a beat to windward. A real self tacking system gets 100 % out of the sail size. Needs a track and a sail that is designed low enough at the clew.
A keelboat can be tacked slowly, so you have time to pull the jib sheet tight before the jib fills in the tack. We rarely use the winch handle on a J/80 while racing (international level) in up to 30 knots.
And yet, this system DOES work. I didn’t claim that it would work as well as a “real” self-tacking system and I state the limitations in the article. But for the average recreational sailor (not J/80 racers) that doesn’t need and can’t afford an engineered system, it works well enough to be an option in some situations.
Greetings , thanks for a very interesting article. I’m brand new at sailing just spent a year restoring a 17ft Proctor Pirate , hoping to launch next month so I’m looking all over the net for articles on sailing. I must add this one I am going to try for sure . Looking forward to more sailing info. Thanks for this =) Phill
Just out of curiosity, was the C-22 you were referring to a Catalina 22? We have one also, and I’m hoping a self-tacking jib will make my wife more amenable to cruising along the Southern California coast with our 110 percent jib. Also, was there a link for the soft shackle?
Yep, C-22 is shorthand for Catalina 22. You can read my post about soft shackles at DIY Soft Shackles for Quick and Easy Headsail Changes
Hi, Flying Scot (T) sailor writing. Just came accrost your article about the self Tacking Jib for free! Like’d it very much! Very clear and good directions. Do you think rig will work on my Flying Scot(t) ?
Thanks.
Flying Scot(t) from Syracuse NY.
Hi, Scott
Because the mast of the Flying Scot is so far forward, it would only work with a headsail that doesn’t overlap the mast.
On a furling headsail, can this be rigged at the dock and the headsail rolled up until it’s time to unfurl? Hard for me to visualize how that would look.
Yes, works just the same but instead of having knots at the clew, you have a block.