

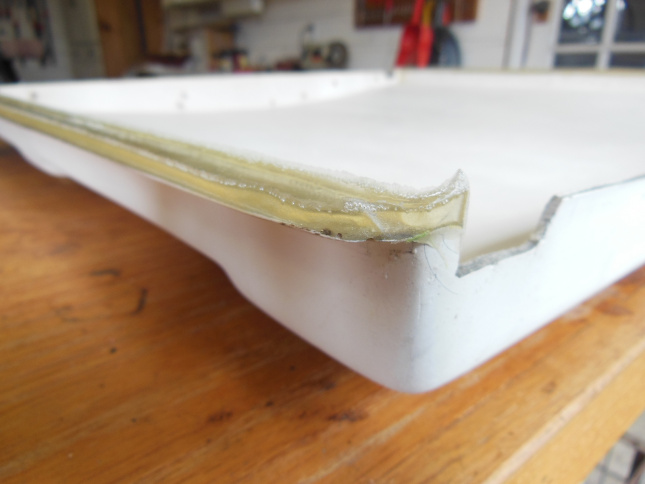
A very common problem with older C-22s is a companionway hatch that screeches when opened or closed. Over the years, the flanges on the sides of the hatch and the teak rails that they slide in wear thin from use.
This eventually lowers the hatch until it scrapes against the cabin roof. The sound it makes is like fingernails on a blackboard, only louder. It’s not something that you want to put up with for long.
If left unattended, the flanges can begin to crack and chip. Fortunately, you don’t need an expensive new hatch or a complicated fiberglass repair. Instead, a simple rebuild of the bottom of the flanges with epoxy often suffices and at a very stingy cost.
After the thickness of the flanges has been restored, the front edge of the hatch should clear the cabin roof and not screech.
Masking tape–it’s not just for painting anymore
Here’s a trick to make this job even easier – use masking tape to make a temporary mold around the worn flange.
To rebuild the hatch flanges:
1. Remove the screws on the underside of the cabin roof for one of the teak hatch rails and remove the rail. You might need to gently pry it off with a putty knife if sealant was used to install it. Remove the hatch to an area where you can work on it. Now would be a good time to refinish both rails like I describe in Restore Your Exterior Teak to Better Than New.
2. Prepare the bottoms of the flange surfaces. Turn the hatch upside down and use an abrasive mesh wheel in a drill or a similar tool to remove all paint and loose fiberglass anywhere the epoxy needs to adhere. Then wipe everything down well with Acetone to remove any oils or films that could prevent the epoxy from bonding.
3. To contain the epoxy, wrap masking tape around the outer and inner edges of each flange. Affix half of the tape width to the hatch and leave the other half of the width standing free. This makes a simple mold that can be easily peeled off. Be sure to seal off the ends and do not leave any gaps in the tape or the epoxy will run out.
4. Mix a batch of unthickened epoxy in a small paper cup or other container that is easy to pour. Each flange will take 2 pumps each of resin and hardener to produce about 1/4″ of flange material.
5. Pour the epoxy into the molds and use a mixing stick to spread it evenly down the full length of each flange. Use a bubble level to be sure the epoxy will settle to a uniform thickness along the entire length of the flanges.

6. After the epoxy has hardened completely, simply peel off the masking tape molds. The adhesive works like a mold release, leaving no paper behind.
7. Sand the edges flat and round them over slightly with 80 grit sandpaper on a hand-held belt sander or sanding block. No gel coat or painting needed.

8. Before you reinstall the hatch, test the fit of the flanges in the slots of the teak hatch slide that you removed. If necessary, sand off more epoxy until the flanges slide easily without binding.
9. Replace the hatch and the teak rail.
You might discover that the hatch still screeches even if there is space between the middle front edge and the cabin roof. That might be because one or both of the cutouts in the front of the hatch (see the close-up photos above) is scraping on the side of roof rib beneath it. If so, then the hatch may be too loose from side to side within the rails because the flanges are too narrow.
You can either make them wider when you rebuild the flanges as above or try rounding the edges of the hatch cutouts with sandpaper so that there are no sharp edges to scrape on the ribs.
At last, no more screeching!
Would you like to be notified when I publish more posts like this? Enter your email address below to subscribe to this blog and receive notifications of new posts by email. You will also receive occasional newsletters with exclusive info and deals only for subscribers and the password to the Downloads page. It’s free and you can unsubscribe at any time but almost nobody does!

Nice site, thanks for sharing.
Love the detailed pictures.
I got my C-22 last fall and look forward to playing once the ice melts.
What are your thoughts regarding a cheap battery from wall mart and a cheap solar set up? Just enough juice for running lights. I do have small battery powered LED red/green flashlight style lights that may keep me legal.
Hi, Hunter
Thanks for stopping by and your comment.
It sounds like you don’t have a battery setup now? If it’s just for navigation lights and low to moderate cabin light use, a decent marine deep cycle battery charge should last you all weekend if that’s how you roll. At least it does for me.
But when you add in a music system and other accessories, or stay out longer, a single battery might not be enough and you don’t want to too deeply discharge a wet cell battery. That’s when most guys starting shopping for solar charging. If you dock at night with shore power, you can charge more efficiently than with solar.
If you don’t yet have a battery, l’d consider two 6v golf cart batteries instead of one 12v battery. Look into it and you’ll find it’s a better and more cost-effective, long-term solution for not much more up front.
Do you have an outboard motor? If so, it might have a generator built in already like my Yamaha 8HP or you can add one for not a big investment. I’m finishing up installing a rectifier/regulator on mine right now. It should put out up to 10 amps. I’m hoping it will be all the charging that I need. I’ll be publishing a post about it soon, so stay tuned!
Hope to see you around.
Ever windward,
$tingy
This is another post I wish I would of found a couple of years ago. Anyway, I went a slightly different route. I purchased two pieces of 4′ aluminum “L” from Home Depot. I had to cut them down to be just long enough to fit inside the hatch. Essentially the hatch runners would rest on the horizontal part of the “L”, while the vertical part of the “L” is on the inside vertical face of the hatch. I then pop riveted the vertical to the hatch. I did have to bend up the ends of the runners 1/16″ though. So the wear is on the Aluminum and not the fiberglass. When I did hull #8050 this came out great. Even added a little silicon to the track and I could open/close the hatch with a finger. Though this was a little scary if you were to step on the hatch as it would move under your foot too easily. When I did this to the #5622 hull, I must of purchased a thinner wall Aluminum as it has bent under the pressure of someone stepping on the hatch. In the end the Aluminum was something like $14. Pop Rivets were cheap and I had in the garage from some other project.
Good solution, Matthew, and less work. The aluminum angle you used is obviously thin enough that the combined thickness still fits in the rail slots without binding.
Thanks. I love coming up with other ways to do something on my boat (mainly to save money). Just a reminder to be sure to get the thicker gauge of aluminum “L” so it can hold up to the weight of a person. I’ll have to redo hull #5622 because I got the thinner gauge, but I’ll do that this winter. Presently it is like a poorly hung car door, one you have to lift and shut in order for it to close properly. Oh well, I know the solution, just don’t have the time.
I’m wondering what you think about trimming the front lower edge of the hatch to keep it from scraping? I’ve already attacked it with a dremel bit and found some relief. But I’d like to remove the hatch and make a more even cut along the entire width.
You can do that and it will probably help but it might just delay the inevitable. I’d recommend not cutting off more than 1/16″.
If the flanges are badly worn, they’ll continue to wear until they start cracking off. If you then repair them like in this post, the front edge may be too high and admit water that leaks into the cabin.
Some screaching is also caused by the notches on the front edge of the hatch for the two molded ribs next to the teak hatch rails. If there’s too much side-to-side movement of the hatch because the flanges are too narrow or the slots in the rails have worn, then the inside vertical edges of those notches can rub against the ribs. You can cut those out wider too but again, it might allow more water in.
Also be sure you have a good seal all the way around the underside of your pop-top. Leaks there are common, even behind the vinyl trim around the inside of the cabin roof opening.
You make an excellent point. Thank you.
I did a similar repair but added graphite powder to the epoxy to decrease friction on the wear edges. While it turns the epoxy black it works like a charm.
I have this same issue, not only in the main sliding hatch, but also my cockpit lockers (hinges gone). I was wondering if I might be able to use two paint stirrers as a better mold, but use tape on the inside as a release agent, and use some parts of stirrers as gappers between sticks, and maybe some clamps to hold it together. Just a thought.
Sounds reasonable, whatever it takes to rebuild the thickness and height of the flanges.