

When we purchased Summer Dance, the standing rigging was one system that I knew I would need to replace right away. The upper shrouds had been replaced recently with well made cables, probably from that popular online Catalina parts retailer. The backstay and forestay were in satisfactory condition but were original from 1981. The lower shrouds were a mix of mismatched, poor quality, oversized replacements and failing originals.
At first, I assumed that I would replace the backstay, forestay, and lower shrouds with kits from that same retailer. They make replacement easy with pre-made kits or they can make custom replacements from your original rigging. But their prices are steep and I’d had a bad experience with their technical support so I decided to look for other options.
Shopping around
I tried to get price quotes to compare with the Catalina parts retailer from several other rigging shops that advertise in sailing magazines and online but they were either unresponsive or vague. Next, I considered making the rigging myself from materials bought online. But investing in the proper tools would dilute the cost savings considerably. I would have to replace the rigging multiple times to recoup that investment.
Then I remembered that there is an industrial rigging company located near me. I was familiar with their regular steel wire rope products from a job that I held long ago that used their products. I called them to find out if they worked with stainless steel and if they were experienced in building sailboat rigging. Their answer to both questions was yes and they gave me a very encouraging cost per foot estimate. For about the cost of the bare wire rope to do it myself (not including tools, thimbles, and sleeves), they could do it all. That’s what I call a no-brainer.
Following are approximate costs per foot (in 2014) for standing rigging from several popular sources compared to the rigging company in my area.
Popular online Catalina parts retailer: $4.00/ft. complete
West Marine: $1.02/ft. cable only
McMaster-Carr: $0.85/ft. cable only
Local industrial rigger: $1.13/ft. complete
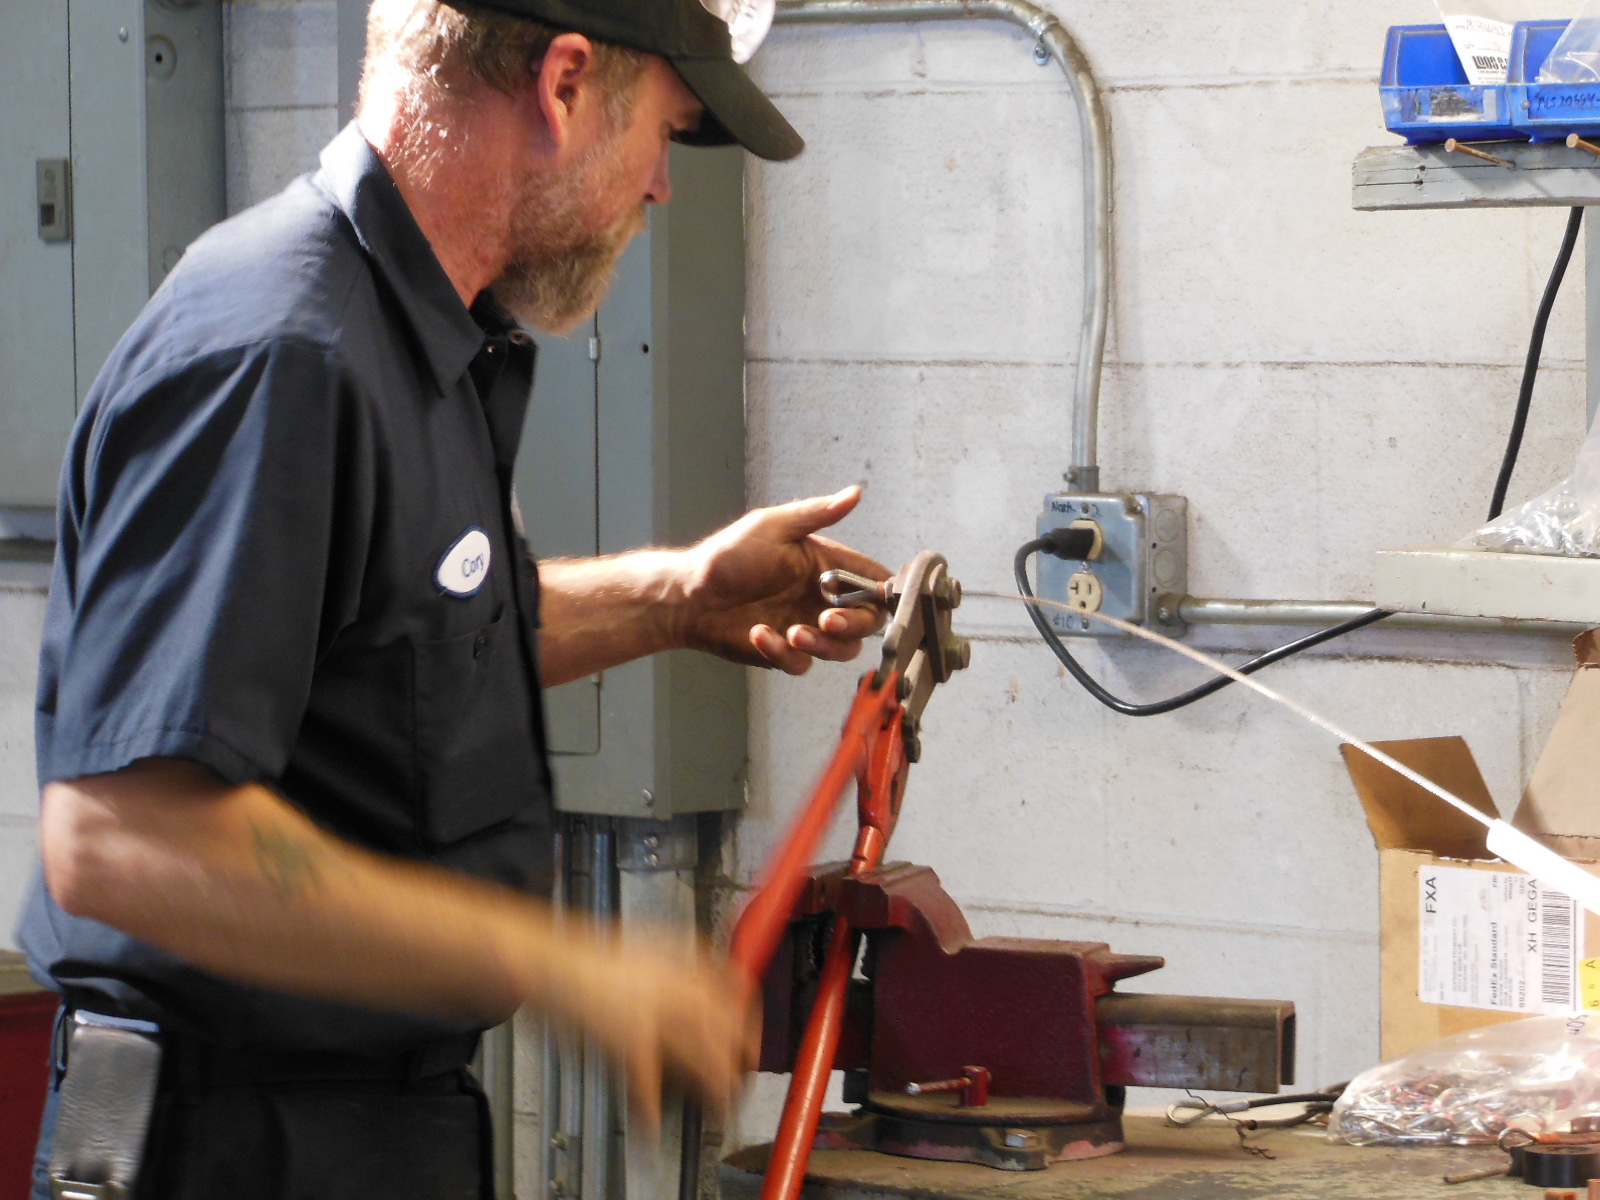
I met with Cory at Broadway Industrial Supply and was surprised to learn that they fill many orders for stainless steel wire due to its popularity for architectural railings. I decided to have the shrouds made out of 316 stainless steel with thimbles and Nicro Press sleeves rather than roller-swaged terminals for two reasons: cost and simplicity.
The newer, roller-swaged style fittings are significantly more expensive than hand-pressed sleeves. The common reasons for using the new fittings are: there are fewer parts to maintain, fail, or chafe sails, and their ability to withstand a higher percentage of the breaking strength of the cable. I do admit they look really nice. Proponents make impressive claims about their superiority over the more primitive pressed sleeves. But the fact remains that pressed sleeves have been used successfully for decades in a multitude of application, are still an accepted industry practice, and even as bad as my rigging was, they performed well.
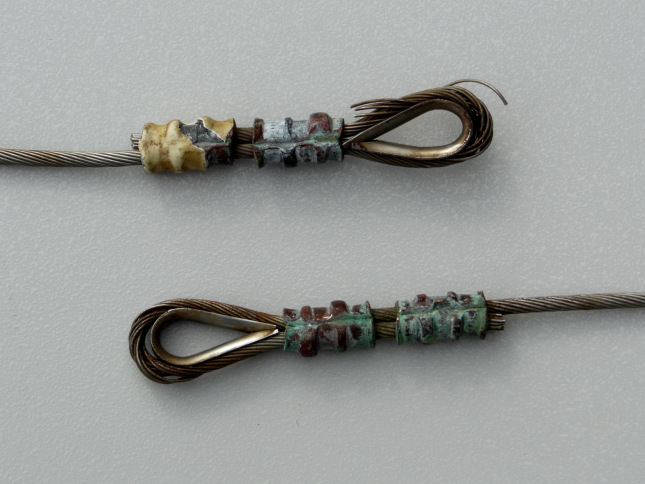
In all of the pictures in this post, the rigging tape was removed from over the swaged fittings to show their condition and workmanship.
A few words about cable types
When working with a rigger, especially an industrial rigger who may not be familiar with sailboat rigging, it’s important that you specify the correct cable type for strength, chafe avoidance, and rust resistance.
Regular steel wire rope like you can find in a home improvement or hardware store will not last long in a marine environment. Fuggedaboutit. Only stainless steel will survive and, among the different types of stainless steel cable, there are a couple of common choices. The first is 304 grade, which is slightly stronger but is less corrosion resistant or 316 grade, which is slightly less strong but more corrosion resistant. The difference between the two grades is due to the chemical composition of the metal. Your choice as to which grade to use should be made with consideration of the type of sailing you usually do (cruising or racing) and the water that you sail in (fresh or salt water).
Besides the material that the cable is made of, the construction is also important. The most common constructions that you will see are 1×19 (1 strand of 19 wires) and 7×19 (7 strands comprised of 19 wires each). The two types have different strengths, stiffness, and stretch. For applications where ease of bending and use with blocks is more important and the amount of stretch is not as important (wire to rope halyards, for example), 7×19 cable is better. In applications where minimum stretch and maximum strength are important and stiffness is not important (standing rigging, for example), 1×19 is best.

Lastly, there’s the matter of cable diameter. Your sailboat was originally equipped with cables of sufficient diameter for its design and intended use. Seldom is it beneficial to oversize the rigging diameter for racing or to endure abuse or neglect. Doing so just adds to the cost and weight aloft for negligible benefit so stick with the original diameters.
What not to do
Substandard rigging workmanship isn’t hard to spot once you’ve seen the right stuff. The cable should fit tightly around the thimbles, which should not be too small or too large for the cable diameter or the connection pin. The sleeves should be the correct size for the cable and the sleeve seam aligned perpendicular to the eye opening. Each sleeve should have the correct number of evenly spaced crimps that are appropriate for the cable diameter. Two sleeves should be pressed at each end with a space between them equal to one to two cable diameters. The cut end of the cable should extend completely through the second sleeve but not more than one cable diameter farther so as not to create frayed wires that can snag sails and skin.

The old rigging on Summer Dance was a mix of 1/8″ 1×19 wire rope (right side of the big picture) and 5/32″ 7×19 wire rope (left side of the big picture). The oversize 7×19 cables weren’t even installed in the same locations on opposite sides of the boat, which probably produced uneven loading of the mast from one side to the other.
Standard wire rope lengths
Here are the lengths of the cables for a Catalina 22 with standard rigging. All cables are 1/8” diameter, 1×19 construction.
| Part | Length | Quantity |
| Forestay | 26’ – 5 ½” | 1 |
| Upper shrouds | 25’ – 3” | 2 |
| Forward lower shrouds | 12’ – 10 ¼” | 2 |
| Aft lower shrouds | 12’ – 11 ¾” | 2 |
| Non-adjustable backstay | 28’ – 2 ¼” | 1 |
| Stock adjustable split backstay | 24’ – 1 ¾” | 1 |
| Stock adjustable split backstay bridle | 4’ | 2 |
Now’s the time to customize your rigging
Shortening or lengthening your running rigging is fairly easy and most of us have done it at some time to optimize how it works. Once your standing rigging is built, however, except for significantly shortening a cable, any other changes usually require complete replacement of the part, which can be several times the cost per foot of running rigging. So when you order your standing rigging is the time to consider any length changes for things like:
- Different type of backstay (fixed or backstay)
- Different length turnbuckles
- Extra mast rake angle
- Quick release levers
- Other modifications that can’t be accomplished with your current rigging.
Remove, replace, retune
To make it easier for Broadway Industrial Supply to build my rigging, I removed the old rigging and dropped it off with them for reference. If you do the same, label each cable so that you know where it came from. If your new rigging arrives without corresponding labels, you can at least match up the lengths with the old rigging to figure out where they go.
About a week later, I picked up the new rigging and was impressed with the quality of workmanship. All of the eyes were consistently and accurately formed. I had given my rigger a supply of white, heavy duty heat shrink tubing similar to what was on the original rigging. I asked him to put two pieces on each cable before making the eyes, enough to cover the crimped sleeves to prevent snagging and chafing the sails and running rigging. A few minutes with a heat gun sealed them all shut. Last, I slid white vinyl cable covers on the lower ends of all of the cables to prevent chafing the running rigging.
Installing the new standing rigging is simple for a trailer sailor after the mast is unstepped:
- Remove the clevis pins at each end if you haven’t already, replace the old cable with the new cable, and reinstall the clevis pins. Now is also a good time to install all new cotter pins or rings to leave no doubt as to the integrity of your connections.
- Step the mast back into position. You might need to first loosen any overly short turnbuckles.
- Tune the rigging as you normally would. I own a Loos tension gauge and its been a good investment to keep all the stays and shrouds at proper tension. For more about tuning and tension gauges, see How To Measure Standing Rigging Tension.
Open body vs. closed body turnbuckles
If you’ve done this job before, you might be asking, “But what about the turnbuckles, $tingy?” I chose not to replace my turnbuckles at the same time and that is reflected in my overall 70% cost savings over retail. My reasoning was not simply to save money, though. That was secondary. The biggest reason was that my existing closed body turnbuckles were still in good condition and I’m not convinced that open body turnbuckles are absolutely necessary, contrary to what many riggers will tell you in order to sell you more hardware.
I regularly disassemble, clean, inspect, and lubricate all of my turnbuckles. That alone negates the biggest reason given by the open body turnbuckle proponents. Yes, a tiny bit of water and dirt can get in those tiny holes in closed body turnbuckles. Yes, it won’t dry as fast as in an open body turnbuckle. But there’s also much less of it in there to begin with and to work its way down into the threads and corrode them compared to open body turnbuckles.
Another reason that proponents give for open body turnbuckles is that it is harder to see if a closed body turnbuckle is overextended. My rebuttal is that anybody who adequately familiarizes themselves with their closed body turnbuckles (through regular maintenance is a good way) should have no trouble recognizing whether a turnbuckle is overextended or not.
Moreover, my closed body turnbuckles are only exposed to fresh water so salt water corrosion isn’t a concern. I’ve also replaced some of the T bolts that were bent due to incorrectly rotated chain plates so those threads are new. If you’re not sure if your chain plate bolts are turned correctly, read Turn Those Chain Plate Bolts!
Open body turnbuckles are great, especially if you’re going to neglect their maintenance. If I needed to replace my turnbuckles, I’d give more consideration to open body ones. But body style alone isn’t enough reason for me to throw hundreds of dollars of working hardware away for shiny new hardware. Nuf said.
It’s now been almost ten years since I replaced by standing rigging this way and I have not had a single issue with it. And I sometimes push my rigging hard. If I ever need to do this job again, I’ll probably do it the same way.
Would you like to be notified when I publish more posts like this? Enter your email address below to subscribe to this blog and receive notifications of new posts by email. You will also receive occasional newsletters with exclusive info and deals only for subscribers and the password to the Downloads page. It’s free and you can unsubscribe at any time but almost nobody does!

Stingy, I really enjoy your common sense approach to boat projects, Thanks for sharing! Another thing I have seen done by cruisers on a budget is to use 2′ to 4′ of the appropriate strength galvanized chain from the chain plates to galvanized open body turn buckles that attach to the rigging. These short lengths of chain keep the extra weight down low and keep the “budget” turnbuckles up away from the elements a bit and seem to last 10 to 15 years with proper maintenance and care. Galvanized is also not prone to the “invisible” failure fractures that even good Stainless is. If you are on a budget, you can either do what works to keep moving or sit there and grow barnacles while you wait for your (money) ship to come in! Keep up the great posts!
Good advice, Warren. I can’t help but think that sailors were some of the original MacGyvers, making and fixing things with only what they had on hand and lots of ingenuity.
Stingy, I live inland and it is difficult to source knowledge, sail rigging and assorted parts. The more detail and source info you add is appreciated tremendously and if you get some money for the link good for you. If you can edit your post to add in size of shrink wrap dia. and dia. + length of vinyl covers it would be very helpful. I was even wondering if you remembered the length of the forward shrouds after converting over to quick release system I just found a 1982 and this will be my first upgrade for money well spent. There is allot of older Catalina 22s out there in disrepair or missing parts and fewer places to ask questions. This web site is fantastic you have great ideas, thank you for taking the time to share your lessons learned and Catalina 22 knowledge.
Hi, David
I know what you mean. Even though we sail most often on Lake Pend Oreille where there’s a very active sailing community, we don’t live there and so can’t take advantage of their clubs to exchange knowledge. I’ll try to remember to add more detail to my posts for those who need that level of info. One of my challenges is to also make this blog general enough to be relevant to as many pocket cruisers as possible.
I believe the heat shrink tubing that I used on my standing rigging was this: 1/2 in. White Polyolefin Heat Shrink Tubing (3-Pack). It needs to be only large enough to slip over the crimped sleeves then shrink as small as possible. That particular tubing only shrinks down to about 1/4″, so it won’t be tight around the 1/8″ shrouds but it keeps sails and lines from snagging on the thimble and sleeve edges and the wire ends. It also gives the rigging a more finished, professional look like the original rigging.
I shortened my forward lower shrouds 8-1/2″, which is close to the closed length of each quick release lever of 8-3/8″ from the bottom pin to the top-most pin position of the lever. They have two more top holes spaced 1/2″ apart that are lower that you could also use. The amount you shorten the shrouds by isn’t critical since you will leave the turnbuckle attached above the lever for fine tuning. As for the actual length of the shrouds, they should be about 12’10-1/4″ before shortening according to this diagram from the 1987 Owner’s Manual but double-check your current lengths first as there was considerable variation between boats and years.
By the way, here’s ads for two levers currently on eBay:
NEW JOHNSON MARINE QUICK RELEASE HIFIELD LEVER STAINLESS SAILBOAT
Hobie Shroud Extender Quick Release Hyfield Lever 1/4″ Holes 10049
Best of luck with your purchase. I hope you get a good one and we’ll see you around here as you fix her up!
Great information $tingy! One thing people may want to keep in mind, especially if they’re salt water sailers, is that the heat shrink will hold moisture at the swage and it’s virtually impossible to inspect for corrosion in that area already, even without the heat shrink. it’s a trade off one needs to conceder when building new rigging. what I do on my own boat is to leave it bare, but slip a short (12-16″) piece of 1″ pvc pipe over the lower end the the shrouds, which also covers the adjusters. moisture doesn’t collect and the cable ends, cotter pins, and other poaky things are kept away from your sails.
.02
That’s a good point, Russ. It really is a trade-off. The tubing can help prevent water from getting into the swages in the first place but if it does, then it’s trapped there longer before it dries out. Ideally, after a five years or so in a salt water environment, we should cut the tubing off and do a closer inspection, then tape back over them.
Ironic that you should mention PVC turnbuckle boots. Watch here the day after Christmas 🙂
Where is the rigger located? In FL, by any chance??
In Spokane, WA, but there should be industrial riggers in your area. Look for one that supplies stainless steel cable for architectural hand railings, it’s the same stuff.
How did you achieve the making of the backstay with the pigtail? Did the maker create the braiding necessary to create the pigtail? e.g. Backstay, split backstay, split backstay bridle.
If you’re referring to the short pigtail attached to a single backstay that is used to hold up the boom when the mainsail is lowered, yes, the rigger made a new pigtail on the new backstay. If you’re referring to the adjustable backstay that I recently wrote about, I did not make a pigtail on that backstay. I use the topping lift instead.
I am finishing a homemade sailboat. Landlocked in Kansas. No stainless steel cables in stock, I have checked. Willing to order the 1 x 9, 1/8″ 316 cable and do the swaging myself. Planning on using eye and turnbuckle studs,at the ends of the cables as I do have turnbuckles left from another boat. These are for standing rigging.
Question: can I use a swager tool bought from lowes for under $30 to get this job done on such small diameter wire?
Hi, Randy
If you’re talking about the Blue Hawk Swaging Tool model AC1058 item 348539, then yes. That’s the same type of tool that most riggers use. There is a smaller tool that is made like a pair of dies with bolts that you tighten with a wrench to make the crimps but I’d shy away from it. Just use copper ferrules and observe the guidelines that are available only from rigging companies like Loos & Co so that you use the correct number, position, rotation, and spacing of ferrules, thimbles, and crimps.
Best of luck finishing your project!
$tingy
Hi $tingy,
I believe the issue that Russ mentioned regarding the extra corrosion from putting the heat shrink on the fitting isn’t so much the trapping of the moisture but the lack of oxygen to the surface of the stainless steel. Stainless can cope with moisture excellently as long as it has access to oxygen to enable it to build up a protective oxidation layer. For the same reason many riggers advise against taping up stainless fittings.
Love the article though, and I’d be interested to find out what you think about Dyneema as an alternative to rigging with stainless.
Hi, Matthew
I think Dyneema is an interesting alternative and might have an advantage in some applications like high performance racing due to its very low weight aloft and the simplicity of low friction eyes instead of traditional blocks. But for the average guy cruising and club racing, it’s a novelty and he’s better off with standard parts and the wide availability products and services. I have a friend who pursued the synthetic route and by the time he was set up to make his rigging and factoring in the extra labor for splicing and pre-stretching plus the shorter lifespan of Dyneema it wasn’t any more economical.
Thanks for your question,
$tingy
Great article, I am going to do exactly what you did including the addition of levers on the forward lowers and forestay. I also like the swaged eyes on both ends of the wire instead of swaged threaded stem. Do you happen t have the hole to hole measurements of the wire you had built? That would save me a bit of measuring. You mast lowering video showed me how to lower the mast single handed while the boat was on the mooring. The only hiccup I had was the mast wanted to swing from side to side when it got near the Mast-up. But no damage done.
Hi, John
I don’t have my exact forestay measurement handy but it’s the standard length shown in the table in the article. I didn’t modify it for a quick release lever, I simply replaced the turnbuckle with the lever and set the mast rake angle with the adjustment holes in the lever and fine tune it with my adjustable backstay.
The mast will want to swing a little from side to side when you’re raising or lowering it so just be careful for the first 45 degrees or so until the shrouds start holding it centered. If you use a 1/4″ hinge bolt in the mast step instead of the stock 5/16″ bolt, it will allow a little wiggle room without binding or bending plus it’s easier to insert and remove. That bolt never really has a load on it so strength isn’t an issue.
Thanks for your question,
$tingy
Check out the Dyneema! https://www.riggingdoctor.com/life-aboard/2015/8/10/synthetic-rigging-conversion We have guys in the marina with it almost two years on and zero signs of deterioration. They get remnants from cordage houses pennies on the dollar. I would have replaced with the synthetic but I was too much of a newb. No more stainless cable for me.
Hi,
I’m surprised that no one has mentioned a concern about using two different metals, stainless, and copper, for these hand-pressed sleeves. In a marine environment, aren’t you guys concerned about corrosion? Worst of all, you have no way of seeing the progress of the corrosion. I’m going with the traditional rolled stainless swages or maybe even drop forged, which I just discovered here: https://www.savacable.com/Content/Images/uploaded/sava_cat.pdf (see p. 16)
Thanks,
Rick
Owner of a Merit 25, with 3/16th head stay and back stay.
Hi, Richard
Stainless steel and copper are very close to each other on the nobility scale so they do not react to one another very much at all. Just look at the pictures in this post of the over 30-year old rigging. The sleeves are still holding strong and the wire underneath them is unaffected. Metals that are far apart from each other like stainless steel and aluminum will react to each other noticeably as I show in Beware of Galvanic Corrosion! so that’s why you would not want to use aluminum sleeves.
$tingy
You mentioned using 1/8″ 1×19 wire for standing rigging. Would the running rigging for a Catalina 22 use the same diameter for 7×19 or does it need to be larger? Also, what size would you recommend for the keel-lifting cable? I didn’t see it listed in the keel maintenance article.
Hello, Sal
If you have half wire, half rope halyards and want to keep them that way, use the same diameter in 7×19. The keel lifting cable is the same diameter too. For more about replacing your standing rigging, see How to Replace Your Standing Rigging for Less. And for more about the keel lifting cable, see point #3 in Five Swing Keel Maintenance Blunders and How to Prevent Them.
Best wishes,
$tingy
Interesting, I compared your lengths with the book that came with my boat and with real life lengths after a mast failure and that is what I found (totals):
Forestay is 27′ 5.5″
Upper shrouds 25′ 11.75″
Forward lower shroud 13′ 6″
Aft lower shrouds 13′ 4.75″
Why? I don’t know, but I had to redo several lines (not very complicated process and cheap). Thanks for rough measurements as it allowed to arrive to some measurements.
David,
What year is your boat? The lengths that I gave are from the owner’s manual for the pre-’86 design.
$tingy
Lots of very useful information here to save money when on a limited budget without sacrificing safety