

If you don’t have a headsail furler, a downhaul line is one of the easiest and least expensive control lines that you can add to your sailboat. It adds major convenience and safety for around $30. The line can be used with any size jib or genoa.
The primary job of a headsail downhaul is to pull the headsail down to the deck so that the crew doesn’t have to go to the bow to douse and secure it. There’s more friction at work on headsails than the mainsail due to the forestay angle, so they don’t often fall down by themselves and need a little extra help to douse them. A headsail downhaul let’s you do it remotely from the cockpit.
The secondary job is to hold the sail down so that it doesn’t blow back up the forestay by a gust of wind. If that happens, part of the sail can get blown overboard into the water or it can begin to fill and turn the boat unexpectedly.
The key to rigging this line is to run it aft to where it can be worked from the safety of the cockpit, especially when you’re single-handed. The best cleat location is close to the headsail halyard since the two lines should be hauled in opposite directions at the same time; the downhaul pulled in while the halyard is eased and vice versa.

To make a headsail downhaul, start with a small diameter rope about twice as long as your sailboat. For a Catalina 22, that’s 45′ (including an extra foot for a knot or splice). The rope doesn’t need to be particularly high strength. It won’t be holding much weight at all so choose a rope that’s easy to handle and doesn’t tangle easily. Quarter inch double braid is more than adequate and it can also serve double duty as a spinnaker tack line as I describe in How to Rig a Cruising Spinnaker in 4 Stingy Stages. If you don’t have a spinnaker, it can serve as a backup for other lines, if necessary.
Attach a snap or shackle to the working end with a knot or a spliced eye. Connect this end to either the working end of the headsail halyard at its shackle to the headsail or to the forestay above the top or second hanks of the headsail. When it’s not needed, you can easily clip it to the stem fitting, a pulpit stanchion base, bow cleat, or any other convenient place to keep it from laying loose on deck.
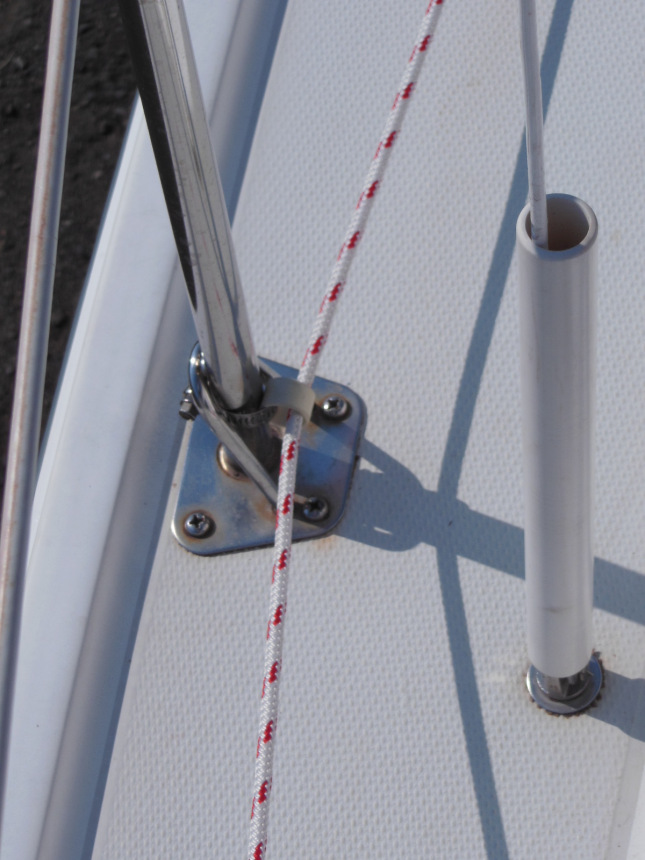
Lead the standing end of the line through a small diameter turning block attached to the stem fitting or attached to a nearby pulpit stanchion base like shown in the main picture of this post. The line can either run straight from the sail head to the deck or if it tends to foul during use, reave it between the headsail hanks to keep it gathered to the forestay. The latter can tend to add friction that makes the line harder to use, though.
From the turning block, lead the line aft to the cockpit either through fairleads or blocks attached to the lifeline stanchions, toe rail, or deck. The main point here is to lead the line out of the way of being a tripping hazard for crew members walking forward. To minimize friction, make as few bends or turns as possible.
At the cockpit, choose a location to cleat the line that is near the headsail halyard cleat but that keeps the deck clear and doesn’t require many bends or turns. Use an unoccupied cleat or mount a new cleat. Any kind of cleat will do; it doesn’t have to be very stout. Again, it won’t be holding much tension unless you also use it as a spinnaker tack line. In the picture below, I’m using a Sea-Dog Rail Mount Fender Holder. Later, when I started using the line as a spinnaker tack line, I mounted a new fairlead cleat forward of the cam cleats and cleated the line there instead. Leave enough standing end in the line to cleat it when the working end is connected and the headsail is fully hoisted.

To douse the headsail, first uncleat the headsail downhaul and the halyard at the same time. This is best done while pointing straight into the wind so that the sail will fall on the center of the foredeck. Haul in the downhaul as you simultaneously release the halyard. The headsail should slide easily all of the way to the deck, then recleat both lines to hold the sail down. The lines don’t need to be tight. Don’t allow much slack in the downhaul while you pull it down or it could foul, in which case someone will have to go forward to clear it and a second person in the cockpit might need to pull slack out of the lines.
In a brisk wind, depending on the size of the headsail, you might need to tie the headsail in its middle to a lifeline to keep it from spilling overboard. For more ideas on rigging for single-handing, see Lines led aft.
When you’re ready to hoist the headsail again, do the opposite. Uncleat both lines and haul in the halyard while you release the downhaul. After you cleat the halyard, slacken the downhaul a little so that it doesn’t interfere with the headsail shape on either tack and then cleat the headsail downhaul.
Would you like to be notified when I publish more posts like this? Enter your email address below to subscribe to this blog and receive notifications of new posts by email. You will also receive occasional newsletters with exclusive info and deals only for subscribers and the password to the Downloads page. It’s free and you can unsubscribe at any time but almost nobody does!

Quick question about the stanchion mounted clam cleat. I think the cleat is something like this: http://www.defender.com/product3.jsp?id=74821 but what sort of gear did you use to mount that to the stanchion? I couldn’t find anything on defender but I guess even home supply stores have some tube mounting hardware.
Hi, Richard
What I use is this Sea-Dog Rail Mount Fender Holder that’s available at several online stores.
Thanks for the pointer. I completed this project on my C25 and it works great! I mounted that stanchion mounted cleat “upside down” so that it would not try to auto cleat the line when raising the jib. Thanks for the project idea.
Hi, Richard
Yeah, they can be pretty grabby in the upright position. I recently moved my line over to the cabin top to also work as a spinnaker tack line. I lead it through a small bullseye fairlead near the deck organizer and back to a fairlead clam cleat near the aft edge of the cabin top. I’ll be publishing a lengthy post on cruising spinnaker setup very soon so stay tuned.
Thanks for your comment!
I went one further and ran the downhaul from a standup block on the foredeck centreline up through half a dozen eyelets in the sail, almost to the head, alternating from side to side like a Dutchman arrangement (that single-line alternative to lazyjacks occasionally fitted to mainsails).
This way when I pull the sail down (without leaving the helm) it is flaked and restrained down on the deck and won’t wash over the side, and I can attend to it later as circumstances permit. For my money this is a very appealing alternative to roller furling on boats smaller than 9 – 10m; combined with slab reefing headsails, the result can be a very weatherly, seamanlike, light, reliable and affordable setup.
Any chance you could post pictures of this. I have a Pearson Ensign I might like to try this on.
Unfortunately, you cannot include pictures in comments here but Andrew can post a link here to pictures posted elsewhere.
Hi Andrew, I would love to see how you did that too.
I don’t know how to post pictures elsewhere, so I’ll paint a picture in words:
Fit eyelets to the sail as follows:
1) On a sketch of the headsail, mark the midpoint of the foot
2) Draw an arc centered on the tack from that midpoint up to the luff
3) Draw a straight line, 3″ aft of and parallel to the luff, up from that arc to the top of the sail
Fit four eyelets along the arc, one just above the foot, one where it intersects line 3), and the other two equally spaced between.
Fit two small standup blocks to the foredeck on centreline, one at the point where the midpoint of the headsail meets the deck when sheeted amidships, the other where the line 3) meets the deck.
Take a line forward from the cockpit, through the aft standup block, thread through the eyelets in turn, starting from the midpoint of the foot, running up one side of the sail to the next eyelet up on that arc, passing through the eyelet, running up the other side of the sail to the next eyelet up on that arc, passing through the eyelet, running down to the forrard standup block, then back up the other side of the sail to the last eyelet on the arc, which is also the first eyelet running up parallel to the luff.
Then the line alternates through each luff eyelet to the top one, which it passes through and is terminated by a stopper knot which cannot pass back through the eyelet.
Tighten the downhaul as the halyard is lowered, and let it run out as the sail is hoisted.
I’m making sausage-style sail bags long enough to take the flaked sail without further folding, with a full length zipper along the top to allow the sail to emerge, and reinforced eyelet openings for downhaul line to emerge and pass around the standup blocks, which will stay with the sail, outside the underside of the bag (small snapshackles connect them to low profile saddles on the foredeck).
The bag can be secured to lashing points on the foredeck so the bag remains in place whether the sail is up or down. Two bags can be in place at one time, one on port and the other on stbd.
I have several headsails of differing sizes I am modifying, so I have saddles in several positions for the aft blocks, and two side by side for the front one.
I would still love to see pictures I am a very visual person! Thanks so much for the idea and description!
I added a drawing above.
Hope that helps,
$tingy
A slight correction: This only works with hank-on headsails.
My old “racer/cruiser” doesn’t have roller furling, but it does have a luff foil. As much as I’d love a downhaul, afaik it won’t work with sails bent onto a foil.
(Which is why I fantasize eventually losing the foil and converting my sails to hank-on.)
That’s right, Flick. The only solution for foil luff sails is a furler.
Actually there is a solution: you can use slugs or slides (as often used on mainsails) to enable downhauling a headsail with a luff foil, but it would work better if they were relatively low-friction. There is a special design of slide called “Kiwi Slides”, from Reef Rite, which enable downhauling and short-handed sail changes for rigs fitted with headfoils, even furling ones.
Home-made sliders along that pattern are not out of the question for someone handy.
Andrew Troup, this sounds like you might also be able to use your downhaul as a reefing line. Will partially lowering the sail and securing the lines leave the remaining hoisted sail to fill and work to sail the boat? If so, it sure seems like a workable alternative to a roller reefing system that can be a hassle for traikered boats!
I was wondering on the original post, could you run the downhaul line through the stantions’ base supports? Too much friction?
Love the creative and ‘budget conscious’ solutions to common needs!
Cheers!
Hi, Ed!
Yes, running the downhaul through the stanchion braces is too much friction because the angle of the line causes it to get wedged in the braces.
The downhaul I outlined is compatible with slab reefing for a headsail, but does not substitute for it. You need extra tack and clew eyelets, reinforced in the same way as the bottom ones, for each slab reef position. The sailcloth would not handle relying on the dowhaul eyelets for this, and the sail shape would be terrible as well.
Hi Stingy Sailor.
I really enjoy your tips and tricks. I do a lot of single hand sailing on a Venture 25 in Oregon. Am excited to install the job downhaul. Will do that when the weather breaks and the lake is full…
Did install gas struts for my pop top and they work great.
Keep up the great work.
Fair Winds, Gary Hamilton. 😎⛵️
Sent from my iPhone
>
Thanks for this post. I’ll put a downhaul on my project list for this spring! I admire the wooden hook holding the coil of line in one of the photos. What do you call that, and how can I find / make one?
Hi, David
I made four of those line hangers out of Honduran mahogany, which looks almost identical to teak. You could make them out of almost any material. The cord is a tied loop (paracord works great) about 12″ long and the knot is hidden in a recess in the back of the hanger between the screws. The cord exits the hanger through slots cut in both sides of the hanger, which leaves just the continuous loop exposed. They’re handy for hanging coils, which you can wrap separately to keep them apart, if desired. Just a tug on one pops them loose again.
Thanks for your question,
$tingy
Hi Stingy,
I just want the world to know that your “downhaul” project made my wife a happier sailor! It works great and saves her from walking up front in yucky weather to pull the thing down. A major victory! Thanks for the tip.
That’s terrific, Tom. I hope it leads to many more hours of the two of you sailing together.
$tingy
I tried out the downhaul system for our last sail on my gulf coast 18. The admiral gave it two thumbs up. Really makes it much safer in foul weather. I attached the block near the forestay.
I think that I am going to attach another horn cleat low on the mast to secure it.
Really enjoy the blog and ideas.
what do you think of the gerr downhaul?
I haven’t tried it myself because I don’t see a need for the extra friction and complexity. After dousing while heading to windward, I stretch the headsail out on the foredeck with one of the sheets and that holds it on deck enough for me. It should work well enough though. Try it and report back in a comment here.