

Think swing keel cables rarely break? Think again. Following is a small sample of the confessions of sailboat owners in a certain online forum over the past few years.
“Bad news as I’ve just discovered my keel cable is snapped with the cable all the way wound on to the winch.“
“I actually lost the keel when it swung down out of control, broke off and was gone forever – 600 pound of cast iron.”
“The metal cable that retracts the keel on my Macgregor 26S broke–as I was launching the boat to put it in a marina this spring”
“The keel cable on my Venture 25 broke.”
“Checking to make sure everything works, I let the board down, cranked it back up a little and BAM…the wire broke near the end of the steel tube.”
“It came up off the rest and then the cable snapped! Thankfully the keel only fell about an inch into the rubber padded keel holder on the trailer.”
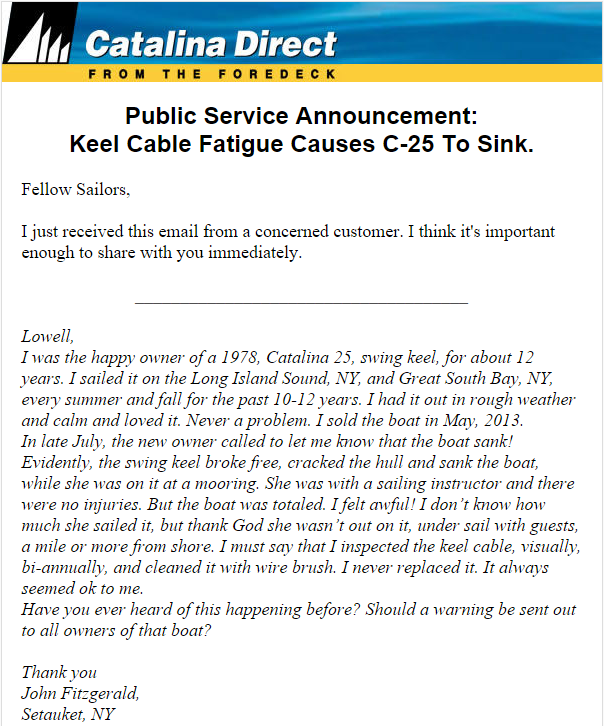
It happens quite often, actually, unexpectedly, and at the worst possible time in many cases. And if it happens to you, you’re in a serious pickle. If you’re lucky and the keel is still attached to the boat, retrieving the boat with the keel down is tricky. If you’re not so lucky and the keel tore loose from the bottom of the boat, retrieving the keel might be impossible. Worse, the damage to the hull could be extensive as described in this open letter from an online Catalina parts retailer to its customers about a C-25 that sank due to a broken keel cable.
If you were to ask any of those owners if their keel lifting hardware was in good condition, they probably all would have said yes. And yet, most of them would have been wrong. The fact is that it doesn’t take much wear or damage to compromise the reliability of a swing keel lifting system.
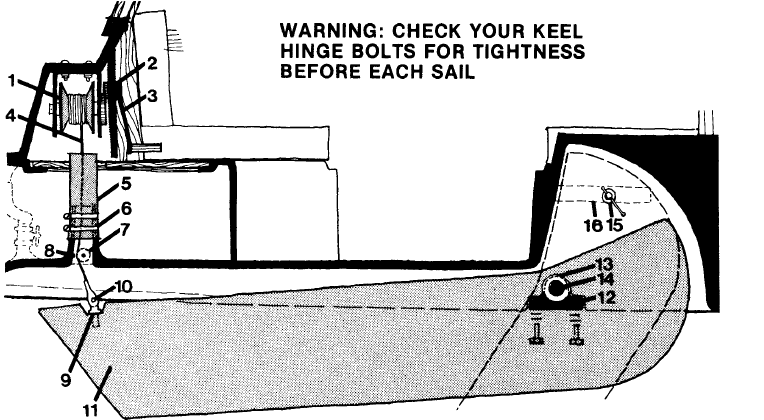
Most swing keel lifting systems comprise four critical parts: the winch (1), cable (4), one or more turning blocks or balls (7), and the eye bolt attached to the keel (9). The system is like a chain, only as strong as its weakest link. Consequently, you must keep each part of the system in good working condition and inspect it often to watch for signs of danger or you risk joining the examples above. The parts at the other end of the swing keel system: the pivot pin (14), keel hangers (12), spacing washers (13), centering spacers (not shown), and lock bolt (15) are not discussed in this post. I describe them and refinishing the keel itself (11) in my five-part series that starts with Refinish Your Swing Keel for Best Performance – Part 1: Removing.
Blunder #1: Neglect the keel winch
The winch is the part of a keel lifting system that does the work, obviously. Unlike the winch on your sailboat trailer, keel winches have a brake built into them that allows you to lower the keel under control and without you having to manually disengage the ratchet pawl. As long as it works smoothly and quietly, it’s not likely to fail catastrophically or without warning unless the system is badly abused or neglected.
On most trailerable sailboats, only two bolts hold the winch to the deck. They’re relatively closely spaced and inline with the grain of the wooden bridge structure that is likely to fail first. You can prevent that kind of failure by wrapping the winch cable properly as described below and by making sure to lower the keel onto your trailer with a bit of slack before taking it on the road. Under no circumstances should the weight of the keel get dropped suddenly or bounce on the cable.
To maintain your winch:
- Inspect it periodically for rust or corrosion and clean and refinish it as necessary (off the boat). Also inspect the structure that the winch is mounted to and the mounting hardware.
- If the ratchet pawl becomes sticky and doesn’t catch consistently, first refer to the owner’s manual for service instructions. If that’s not possible, remove the winch, carefully disassemble it noting the location and order of parts so that you can reassemble it correctly, lubricate the moving parts with a good quality marine winch grease or heavy oil, then reassemble it and test it for proper operation. Be sure to not get any lubricant on or near the brake.
- Attach and wrap the keel cable as described below.
Seldom do you need to replace the entire winch unless it has fallen into very significant neglect or abuse.
Blunder #2: Forget about the turning ball or blocks
Most keel lifting systems use a turning block, lifting tackle, or ball to redirect the keel cable from the keel attachment to the winch drum. The turning block or ball keeps the angle of the cable to the drum constant so that it can wrap evenly and to reduce chafing. It also allows the penetration through the hull in which the cable passes to the keel to be as small as possible regardless of the angle of the keel when retracted or lowered.
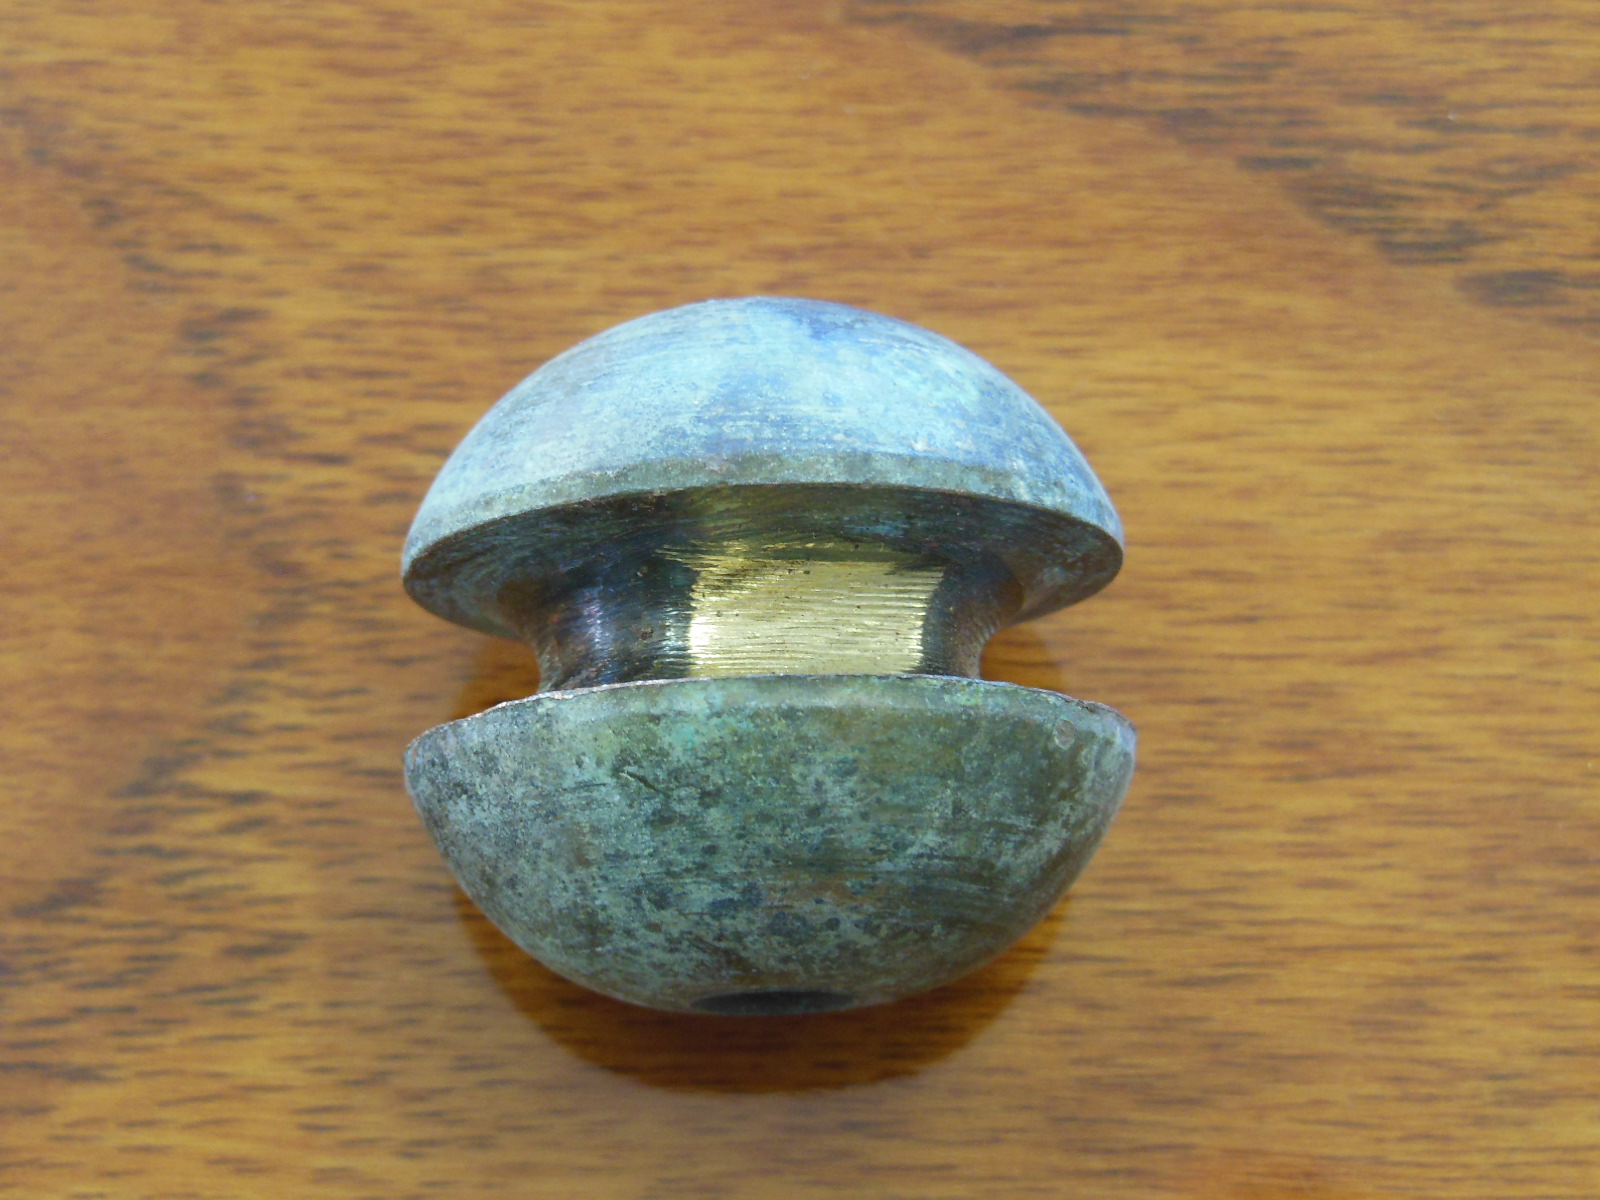
Catalina 22s and 25s with swing keels use a brass turning ball like the one shown below. The ball turns on a pin inserted into the top of the brass keel cable tube that is glassed into the hull. If the pin becomes corroded or dirty to the point where the ball cannot turn, even momentarily, the cable can cut a flat spot in the groove. If the flat spot is large enough, it alone can prevent the ball from turning and the groove will get deeper and deeper with each lowering or raising of the keel.
Stainless steel is harder than brass, so the brass will cut faster but the cable is not immune to damage and will itself begin to quickly wear from the chafing. That was the case in the picture below. The flat doesn’t look very serious but it’s about 1/8″ deep.
To maintain a turning ball:
- Periodically remove it (noting which side the cable runs over) and inspect the groove, pin hole, and pin for excessive or uneven wear.
- Apply a light film of marine grease like Sta-Lube Marine Grease
to the pin before you replace the ball (with the cable on the same side as before) and verify that it turns freely.
No amount of filing can repair a worn turning ball and you should replace it ASAP. It’s for this reason that replacement Catalina turning balls now have a Delrin bushing built-in to prevent the ball from seizing on the shaft.
Blunder #3: Ignore that noisy, messy keel cable
The winch cable is the most likely part of the system to wear and fail. It’s subject to stress when lifting the keel as the cable turns around blocks or balls and winds onto the winch but it’s designed for those stresses. It’s the stresses induced by sailing or from other compromised parts in the system that cause it the most damage.
The first place that the cable can get worn and damaged is right on the winch drum. The cable should always be neatly and tightly wrapped on the drum with as few crossovers and as little slack as possible. When the cable chafes hard against itself, such as when it’s sloppy on the drum, it damages wires that can quickly lead to breaks.

That is the noise you hear when you raise or lower your keel and hear sharp bangs and feel vibrations in the cockpit sole. Wraps of cable on the winch drum that have climbed on top of uneven lower wraps can fall off forcibly. This transmits a shock load through the entire boat, including the winch mounting structure described above and can cause splitting.
You lose a bit of your keel cable every time that happens and it’s not good news for your companionway bridge (where the winch is mounted) either. Excessive shock loads have been known to pull winch mounting bolts right through the fiberglass and wood.
When you’re sailing along with the keel down, the keel cable can vibrate in the water like a guitar string due to drag. That’s the humming that you might hear when the cable is too tight or too loose. The individual wires that make up the cable bend most where the cable is held by a fixed object like a turning ball or a fork terminal. Vibrating at a high frequency, the wires can quickly work harden and then break. This is the second place to watch for cable damage.
Think about when you bend a coat hanger back and forth to break it. At first, bending it is easy. It gradually becomes more difficult (work hardening) until the hanger cracks in the middle of the bend. Your keel cable acts similarly. If enough keel cable wires break, the entire cable can fail if subjected to enough force.
Since the point on the cable where it enters a swaged fork or sleeve is involved in every vibration event regardless of how little or how much cable there is between it and the turning ball or block, that point is the most critical place to watch for broken wires.
To maintain a keel cable:
- Disconnect it from the keel and unwind it from the winch drum. Make note of which side of the turning ball the cable is on, if applicable.
- Leave it attached to the drum but lay it out as straight as possible and unwind any twists and straighten any kinks.
- Inspect every foot of it all the way around. Look and feel (with a paper towel, not your bare hand) for broken wires just as you would in your standing rigging.
- Have a helper hold tension on the keel end of the cable while you carefully and neatly wind it on the winch in tight, flat layers.
- When you have only enough cable left to reach the keel eye bolt, have your helper hold the wraps on the drum while you thread the end through the tube (on the same side of the ball as before) and reattach it to the keel.
- Consider replacing the cable on a regular basis regardless of its condition to avoid a disaster like described at the beginning of this post.
Tip: I have saved over 70% on the cost of a new keel cable by having an industrial rigging company make it using identical materials as opposed to buying one premade. I enjoyed similar savings when I replaced my standing rigging, as described in How To Replace Your Standing Rigging For Less.

It might seem obvious to some, but if your keel lifting system has a turning ball, it’s very important that you replace the cable on the correct side of the ball. On Catalina 22s and 25s, this is the aft side. If you accidentally run the cable on the wrong side of the ball and swing the keel, the cable will start cutting into the end of the keel cable tube. That can make a sharp edge that, with just a little too much winching when you retract the keel, can shear open the fork terminal at the end of the keel cable as shown below and begin cutting through the cable wires.
You can see that if the fork pulls far enough into the tube over time, the swaged end of the fork will get sheared open to the point that it can no longer hold the weight of the keel. The cable will pull out of the fork, the keel will slam down, and the head of the keel will probably do serious damage to the fiberglass keel trunk, possibly even to the point of taking on water.

After you have the cable properly wrapped on the winch drum, from then on don’t let the cable get too slack or wraps begin to pile up on each other. If they do, rewrap the drum again. If you do this with a new winch cable from the start, the cable will develop bends that keep it flat and help it last longer. Inspect the cable where it is attached to the keel before every launch. It only takes a second and should be a part of your pre-launch checklist.

Even if you meticulously avoid letting your cable vibrate, chafe or kink, it can still get damaged by wear in other parts of the system such as a worn keel pivot pin and/or hole as shown in the following picture. Notice where the keel cable cut into the starboard side of the keel slot.

Blunder #4: Assume the eye bolt is invincible
The eye bolt where the winch cable is attached to your keel is the last link in the keel lifting system chain. It’s a simple part that doesn’t need much in the way of maintenance but it’s as critical as the other parts. If it fails, it will fail instantly and probably completely.
Failed eye bolts are indeed rare, but they do happen, as shown in the picture below. This eye bolt probably failed due to repeated shock loading by the keel cable. That could have been due to the keel hitting submerged objects and swinging up, which puts slack in the cable that is jerked out when the keel swings back down. A properly tightened keel lock bolt would have prevented the keel from swinging freely and building up damaging force.
It could also have been caused by or exacerbated by trailering with the keel up. That allows the keel to bounce when you hit bumps in the road and strains the entire system, including the eye bolt.

Notice how the eye bolt is fractured forward (right) at about the same angle as the cable when the keel is lowered. This further suggests that the eye bolt failed with the keel at the bottom of its travel.
Besides the bolt itself, the surrounding metal is critical to maintaining a secure attachment and should not be excessively rusted away as in the following picture. The C-22 eye bolt is only 1-1/4″ long and the more of it that is exposed, the greater the leverage on the remaining threads and the surrounding metal when the keel is in the lowered position. Ideally, the metal around the bolt should be solid and flush all the way to the bolt shoulder.

To maintain an eye bolt:
- Be sure it is tightly screwed into the keel. If it’s loose or if you are installing a new eye bolt, thoroughly clean the keel threads, apply blue LOCTITE
to the eye bolt threads, and screw it into the keel until tight and the hole is perpendicular to the keel centerline. The clevis pin that attaches the cable to the eye bolt should act as a hinge when you raise and lower the keel.
- When you’re inspecting the other parts of the system, also inspect the eye bolt hole for cracks, however small. Use a magnifying glass if necessary. If you have any doubt about the severity of any crack, replace the eye bolt with a new one.
- This is also a good time to inspect the clevis pin and its cotter pin for excessive wear and replace them if necessary.
Blunder #5: Consider the cable hose less important than a radiator hose
Catalina 22s and 25s with swing keels also have a keel cable hose. While not technically part of the keel lifting system, it’s only necessary with swing keels and it’s often removed and replaced along with the other hardware. It’s a critical part of the system because a faulty hose can sink the boat.
The joint between the keel cable hose, and the keel cable tube that is glassed into the hull, is below the waterline. That means that if the hose develops cracks in that area, the hose will leak inside the hull. If it comes loose, you will have an open hole in the very bottom of the boat that will be almost impossible to plug because the keel cable runs through it.
There is a coiled wire built into the wall of the hose to reinforce it. There is at least one story of this wire getting fouled in the winch when the keel was raised. The winch pulled the hose off of the tube in the hull despite two hose clamps. The boat’s owner was unaware of what had happened until he stepped into the cabin and it was filling with water.

Over time, all rubber hardens and any hose can develop cracks, particularly at the point where part of the hose bends and part of it is stationary. The principle is the same as described for the keel cable above. The joint between the hose and the keel cable tube is just such a point as shown in the picture above. The smaller crack on the right in this hose went completely through the hose but you might not think so by looking at it from the outside. The larger crack on the left had not yet broke through. The point is, you cannot really tell unless you inspect it.
To maintain a keel cable hose:
- Make sure it’s tightly fastened onto the keel cable tube. Even if it has small cracks, they won’t sink your boat. But if the hose comes off from loose clamps, you won’t be able to bail fast enough to keep up with the inflow. That assumes you’re even onboard when it happens. If it happens while you’re ashore, well, that would be tragic.
- Inspect the entire hose closely. Do you see a pattern developing here? You got it. While you’re looking at everything else discussed so far, get your eyes down there or remove the hose and inspect it thoroughly. Bend it to expose cracks in the making, before they’re a problem.
- Also inspect the hose clamps. They should be tight, rust-free, the threads not deformed, and two of them. Two clamps make a larger sealing surface and add redundancy in case one loosens or fails. Use high quality stainless steel clamps, not cheaper, auto quality steel clamps. Your boat’s life depends on them.
The more often you inspect the parts in your swing keel lifting system, the more likely you will discover wear patterns and problems early, when they’re simpler and less expensive to fix. A bit of maintenance will go a long way toward making your sailing safer and keeping your sailboat in top shape. Don’t make any of these blunders and become an example of what not to do.
Have you ever experienced or prevented a swing keel lifting system failure? If so, leave a short description in the comments for others to learn from.
Would you like to be notified when I publish more posts like this? Enter your email address below to follow this blog and receive notifications of new posts by email. You will also receive occasional newsletters with exclusive info and deals only for followers and the password to the Downloads page. It’s free and you can unsubscribe at any time but almost nobody does!

There is a wire rope supplier here in Anchorage AK. I am going to see if they can build me a new keel cable. My existing cable measures 10′ long. Is that what yours measures? How long did you have your new cable made? I am also going to have the axle of the keel winch enlarged. It seems that I would need to use less cable since less cable now will fit on the winch. What are your thoughts?
Hi, Curtis
Mine’s 10′ also. In the last picture of a winch above, you can see that this makes one full layer of wraps on the drum, which is one of the newer winches. Yours must be one of the older model that had a smaller drum. You probably have more wraps on your drum with the keel raised than I do.
There should be little difference in cable length between the two winches. The distance from the winch to the eye bolt when the keel is lowered is the same. But the minimum cable length for the larger drum would be longer than for the smaller drum, not shorter. Almost a foot longer. You need at least several wraps on the winch at all times. Three times the circumference of the larger drum is more than three times the circumference of the smaller drum. A 10′ cable should work fine on both.
Thank you. I went to an industrial rigging company in Anchorage. http://arcticwirerope.com/
They are going to make me a new keel cable for ~$40. A popular Catalina supply house sells their replacement for $20+ more. Plus I get to support a local business. I ordered the 10′ length.
I ordered a new keel cable hose and clamps, a new turning ball and a keel pivot pin from the popular Catalina supply house.
Good on ya, Curtis. I hereby officially declare you a bona fide stingy sailor! I should come up with a secret handshake 🙂
That popular online Catalina parts retailer’s prices for the hose isn’t bad compared to other marine suppliers, so no penalty points there. It’s a standard part too and I wouldn’t be surprised if you could find one in Anchorage being the port city that it is. They do have a monopoly on the keel hanger and turning ball parts, though, unless you can find them on eBay, which happens regularly, even new parts that owners didn’t use. Barring that, a machine shop could easily make the pin and turning ball. A custom fit pin would even be more desirable than a stock pin in cases where the keel hole was overbored.
BTW, I’d jump at a chance to visit Alaska again. Good people and the outdoor opportunities can’t be beat. Reminds me a bit of the old Western Montana where I grew up.
I checked my keel turning ball and it had a nice groove in it clear down to the SS pin. And in not taking about the factory groove that goes around the ball, this one was on one side only. Wish I could send you a picture of it. Good example of why it needs to be checked. Mine started out fairly easy to raise last year but got progressively harder and loud, like a grinding noise loud. Glad I checked it before the season started this year. Also cleaned and lubed my winch.
Thanks for adding your experience. Is your cable still in good shape after all that chafing?
Yes the cable seems to be in pretty good shape. I an going to run it this year and keep an eye on it but don’t expect any problems. I still need to take a look at the keel eye bolt but but I can’t see that while it’s on the trailer… Going to have to dive on it to take a good look at it. I could see the clevis and it looked pretty good.
You should be able to inspect it well enough on the trailer if you can lower the keel a couple inches. If not, your trailer probably needs adjusting.
once I finish restoring this ancient swing keel Macgregor I will keep her at dock with the keel down. Occasional use of the winch may occur but not in my lifetime. Hopefully there will not be the issue of retraction problems-MIKE
Hi, Mike
Thanks for visiting this Catalina-heavy blog. If your Macgregor suffered extensive pivot pin wear, you’d be better off with the keel raised while in a slip and lowered only for sailing. Trailer sailors like ours weren’t designed to spend their whole lives on the water. It’s the constant, however gentle, rocking while moored that wears the parts out. The less leverage you give the keel over time, the slower the wear.
Good luck on your refinishing project. I hope you found some useful info here and you’ll come back often. Tell your Macgregor friends. Maybe someday I can expand the posts here to include some Macgregor projects!
The first maintenance I did a soon as I bought my Macgregor 21 was check the keel pivot bolt and replace the cable.
I have an earlier version on the Mac 21 (Venture 21 – ’74 #712) and that pivot bolt arrangement through the trunk seems fraught with issues (wear -> leaking, etc.). I wonder if anyone has come up with a different mounting system, perhaps like the bolt-on bracket system used on the Cal boats? Is that system more or less secure and wear resistant? My keel core keel (steel bar wrapped in polyester filled resin and glass cloth with a lead bulb at the end) started rusting at the pivot bolt hole. After 20+ years in drydock in my carport awaiting my retirement, the expending rust delaminated and cracked the full length of the keel. I am rebuilding it now….or converting the boat to a power boat!
Thanks for the great blog!
I think this will be helpful to hopefully avoid future problems. Glad I found it. Thanks.
Hi Stingy! I first saw your you tube videos on raising the mast and followed it to here. I have just bought a C22 that a previous owner must have made all 5 of those blunders because his keel fell out into 8-10 feet of muddy water while at the dock. He supplied me with “a keel” but turns out not to be a C22 keel. I have plans to rebuild this boat but need a replacement keel. Any advice on where I can find one? After this is complete you can bet I will not be neglecting MY keel, that is if I can find one. Thanks for your videos and this site. Good stuff here.
Geoff
Panama City, Fl.
D’oh!
He couldn’t recover the keel, huh? If it’s still there, might be worth salvaging.
Watch eBay and craigslist diligently and you’ll probably find another keel for sale for a few hundred bucks within driving distance. There’s two in Illinois on eBay right now. Florida probably has the highest concentration of C-22s in the country and a lot of them are being parted out because they’re past the point of restoration. Also leave messages on every online sailing forum, yacht club, and marina bulletin board you can find.
Worst case scenario, you pay $2K for a new fiberglass-encased lead keel from the factory in Seminole, FL. Not a very stingy move, but you’d never have to refinish it either! Or if you have the patience, part out your current boat and buy a better one.
Let us know how the story ends!
$tingy
Thanks for the direction here. I have just received and answer from Catalina yachts confirming that indeed a keel is available at about $2500 plus $300 to $550 shipping! I will start looking everywhere I can for a used keel but am relieved that there is a fall back plan if all else fails. So here we go with the great search.
Thanks,
Geoff
I replaced my keel cable after about 5 years of owning our boat. I found out the previous owner had used an old stay as a cable. I’m guessing it has been on there 10 years. The cable was getting frayed and we would get those clunking little drops as we lowered the keel. The new cable is very smooth and quiet. I got the full kit from Catalina including the turning ball and hose. I’m a bit afraid to take out my keel pin because I am afraid that the old bolts will be seized in and snap off. This isn’t based on anything except years of experience with old cars so maybe I shouldn’t be worried.
You’re right to be concerned, Sal. Since those bolts have been there so long, they could be seized in the weldments. Depending on how tight they were torqued when they were put in and whether or not thread sealant was used, they could either back right out or snap. If any do snap, it’s not a catastrophe but extracting the broken bolt is a job you won’t want to do again, trust me.
My advice is, if can’t rock your keel side to side by hand when it’s resting on the trailer and you don’t hear clunking when you switch tacks, then just test the torque of the bolts to be sure they aren’t loose and wait to remove them until you have to. They should be between 15-20 lb-ft, no more.
If you do have a loose keel, then plan to replace the hangers and/or pin and allow time to deal with problem bolts. Work them out gently and slowly. Turn them back and forth slightly to work them loose as you go. Take your time and you might get lucky.
Have you or anyone tried Amsteel blue wire rope? It won’t corrode and is fairly cost effective, (stingy). So happy to have found this site for my Laguna Windrose 22.
Hi, Paul
A friend of mine is refitting his C-22 with Amsteel standing rigging. It sounded like the first set of rigging would be about a wash cost-wise by the time you figure in the cost of tools, thimbles, etc. But since you have to replace it sooner than SS, the subsequent sets of rigging would be considerably cheaper. There’s also the break-in (stretch) and retuning period to consider. My opinion is, unless you’re doing it for the “cool factor” or for high-level racing, there isn’t much advantage. But it is an interesting option.
I suffered a failure of the cable fork on my C-22 a couple of years ago. Actually, the cotter pin in the clevis pin at the end of the cable jumped ship as I was raising the keel. The damage to the starboard hangers was severe. The aft bolt and weldment were broken clean off the hull. The forward one was cracked loose. I had to cut thru the liner inside the boat to access the hull for repairs. Cable and fork, eye, etc. were all in great shape. The cotter pin was completely gone. No evidence behind so I don’t know what happened. I had checked it less than a month earlier when I launched for the spring and it showed no signs of problems. Horrible sensation when the winch handle spins free and you know the keel is up…
Wow, Mike, that’s scary. I can’t imagine it wearing out in that short of a time. Makes me wonder if it snagged on something that pulled it out. Did you bend the cotter pin ends back around the clevis pin or did you just spread them a bit?
I have an “87” Catalina 25 swing keel moored on Lake Tahoe. The other day we went out to sail and the keel cable kept getting slack when I was trying to lower the keel. I put on a suit and dove into the water to take a look and noticed that we no longer had our keel. Luckily the failure happened at our mooring in about 10 feet of water. We keep the boat on a mooring with the keel retracted and I think the cable bolt area failed and the keel swung snapping all 4 bolts that fix the fittings for the keel in place. We normally put the boat in the lake at the beginning of the summer and remove it at the end. I do not want this to happen again. Would it be beneficial to leave the keel on my 25 down to prevent cable damage. It seems the most catastrophic thing that can happen is cable failure, fast moving keel, and snapping fitting bolts. What scenario will fail first?? the scenario I experienced or… leaving the keel down all summer unless gunk holing and having the keel fitting bolts or forward keel components fail.
Wow, Brian. That must have been quite a shock to discover!
The swing keel design is sort of a “Catch-22”. You’re right that a free-falling keel is the most catastrophic failure that can happen. On the flip side, leaving the keel extended for long periods invites excessive wear of the keel hanger brackets, bore hole, and pivot pin like in the photos in Why a Stuck Swing Keel Pivot Pin is a Good Thing. Avoid one problem and we’re at greater risk of the other.
Which one will happen first depends. If we moor with our keel raised but don’t keep the cable system in top condition, it will fail first. When it will fail will depend on how often we lower and raise it again, whether we moor in salt water, etc. If we maintain that system but leave our keel lowered almost all the time, the keel pivot point will fail first. When it will fail will depend on the amount of wind and wave action that the sailboat is subjected to, whether we moor in salt water, etc.
Both risks accumulate over time. Since inspecting and maintaining the cable system is more practical and economical, I prefer that option and I keep my keel raised when moored. Inspecting and maintaining the keel pivot parts must be done with the boat out of the water and the keel at least partially removed. Even so, it should be inspected at least annually. I’m about to haul my C-22 out for the winter and inspecting the keel will be one of my highest priorities.
I hope getting your C-25 keel fixed goes smoothly. Let us know if you’re able to pinpoint the cause and how you intend to prevent it from happening again.
Hey Stingy, what are thoughts about using dyneema rope instead of the wire cable? I’m tired of the wire cable not winding on the winch evenly and the subsequent “thunking” noise when the keel is lowered. Plus, the cable seems to take a beating if it’s not would properly and does not last as long. Kevin
There are a lot of people asking about it online but I haven’t seen the results of any long term tests or experiences. It should work okay. They use it on ATV and 4×4 winches and for standing rigging on race boats. I think I’ll stick with old fashioned SS. Mine’s working really well and its easier to see wear points.
Thanks!
We purchased a 1983 Catalina 22 last fall. Now that it is in the water I notice lots of noises and jerkiness when lowering and raising the swing keel. The cable looks new but I suspect the turning balls are badly worn or frozen. Can I get at them with the boat in the water? Thanks
Art
Hello, Art
No, the boat must be out of the water to service the turning ball. The water level with the boat in the water is above the top of the volcano fitting and you must remove the hose, which would sink your sailboat in minutes.
However, before you do that, make sure the noise and jerking you are experiencing are unusual. Is the cable wrapped neatly and flat on the winch drum? If not, some of the noise and most of the jerking is probably from the cable. There can be a small amount of grinding noise when you operate the keel due to the keel turning on its pin. If your cable is wound neatly, and you hear a significant grinding sound, the turning ball is likely frozen in place and/or it has a flat spot cut into it from the cable and you should replace it right away because it is rapidly wearing your cable too. Replacing the ball is relatively easy once you have the hose off. Just drive out the pin that the ball rides on, replace the ball, and drive the pin back in place. But, devise a way to keep the ball from falling down the volcano before you remove the pin.
Hope that helps,
$tingy
How can I get to my swing keel? If it’s not in the water, it’s on the trailer and the cross beams hold it up. There is no boat lift crane at the marina where I am, on a land locked lake. Is there some way to jack it up?
Hi, Johnny
See https://stingysailor.com/2020/01/25/refinish-your-swing-keel-for-best-performance-part-1-removing-2/
I have a Morgan 22 mast sail sloop. The radiator hose has come loose twice on me. The first time was when I tried to raise the swing keel at dock. Water began pouring in and I immediately heard it and shoved the hose back in place and miraculously the flow stopped. I reinforced the hose with gorilla tape and went on sailing for several years until, while out on a sunset sail, I bumped bottom slightly and a friend noticed the cabin 4 inches deep with water about three miles from the docks! Again I shoved the hose back on and bailed while my wife drove us back to the docks. I am now hauling my boat in hopes of solving this problem. Any advise or help would be greatly appreciated. Sincerely, Steve
Hello, Steve
I’m not familiar with the Morgan design. Is this a keel cable hose like the C-22? If so, how is it held in place, with hose clamps? Have you tried tightening and/or replacing them? There should be two for maximum sealing and redundancy.
On a 1982 Catalina 25, when returning to the (shallow water) marina last night I only counted 13 turns of the crank to raise the keel before the winch stopped. Normally I get about 19 turns. When we turned off the motor we could hear water running and found that the rubber hose which surrounds the keel cable fouled into the winch.
The bilge was taking water and I needed to cut almost 3″ of hose off to free it from the winch and slide it back down over the thru-hull penetration.
In freeing the hose from the fouled keel cable, the hose’s embedded stainless steel support wire was wrapped around the winch at least 2 revolutions.
I’m thinking of fabricating a grommet or some sort of hard material to put over the upper edge of the hose, and welcome comment or advice.
Because I had a helper and a good shop-vac with shore power we emptied the bilge quickly but this was destined to be a sunk boat had we not reacted right away.
You really dodged a bullet there, Bruce. Good thing you were paying attention and were able to take quick action. You might not be able to see it now, but if you had removed the winch cover board before the incident, you probably would have seen that the keel cable had cut part way into the hose and/or that the end of the hose had separated and the reinforcing spring was in danger of fouling in the winch.
I’m doubtful that adding a chafe guard to the end of the hose would guarantee against this happening. If the hose is close enough to the cable to contact a guard, it’s too close for comfort and should be corrected. I think the lesson to learn here is to periodically inspect that hose and its clamps from end to end to ensure that it’s clear of the cable, in good condition, and safe. Like Bruce, every swing keel sailboat owner should know exactly how many winch turns it takes to lower and raise their keel and always count them off when operating the winch.
My ss wire on my Gibsea 76 has been replaced with dyneema.
I’ve owned a Catalina 22 for about 2 years now and started learning how to sail with it. I love the boat but all the issues with the keel system chafes my nerves to say the least. I certainly can’t afford disaster, especially if my wife and her friends were on board. I keep it in a slip in salt water so I can’t inspect it as often as I would like. I thought when sailing that I wanted to hear that hum. I thought that was the “Catalina hum” and was a good thing because no hum meant too much flopping around of the cable which weakens the clevis crimp area? Where is the sweet spot then?
David
That hum is well known but that doesn’t make it harmless. I don’t know of anybody who has done a scientific analysis of the vibrations, particularly at different frequencies, but the effects of repeated bending of metal is undebatable. The damage accumulates the farther that the material is bent and how often. Stainless steel is also more brittle than other alloys and less likely to show damage until it fails. So, my logic is if it’s humming, I know it’s bending hundreds of times per minute. If it’s not humming, the cable is either slipping through the water stationary or it’s vibrating so slowly as to not make significant noise, either of which are preferable.