
Early on in our sailing career, the first mate and I discovered that we really enjoy anchoring out overnight. The bays in the North Idaho lakes where we cruise are surrounded by snow-capped mountains, covered by crystal clear starry skies, and afford plenty of privacy. The problem was, Summer Dance didn’t have an anchor light, which is a shame because according to the original invoice that I have, it would have only cost $36 in 1981 when she was built. Not even $tingy Sailor can add one that cheaply today.
According to Rule 30, paragraph (e) of the United States Coast Guard Navigation Rules (COLREGS), an anchor light is not always required on sailing vessels the size of the Catalina 22:
“(e) A vessel of less than 7 meters in length, when at anchor, not in or near a narrow channel, fairway, anchorage, or where other vessels normally navigate, shall not be required to exhibit the lights or shape prescribed in paragraphs (a) and (b) of this Rule.”
That pretty much sums up where we anchor most of the time although occasionally in a quiet anchorage. Seven meters equals 22.9659 feet. The length of a Catalina 22 hull is 21.5 feet, a foot and a half under the minimum length for a mandatory anchor light. But not wanting to get run into by drunk or wayward powerboaters, I took on the challenge anyway.
The good news is that the hull was already wired for one. I found one end of the positive wire near the breaker panel and labeled “Mast.” They probably wired them all that way during manufacturing and only added the hardware if ordered. The first hurdle was finding the other end of that wire. Almost all of the wiring in the first generation C-22s is embedded in the fiberglass of the boat. This makes the wiring mostly unserviceable. When no mast light is installed at the factory, there is also no mast wiring connector near the step. Fortunately, Catalina made a little dimple in the cabin roof a couple inches to the left of the mast step to indicate where the mast wiring terminates inside the upper deck.
Drilling for copper
Starting with a 1/4 twist bit, I cautiously drilled into the dimple and was relieved when the bit broke through into a void between the roof deck and the cabin liner. Then with a 1/2″ hole saw, I opened up the hole so that I could fish the wire ends out of the void with a coat hanger. About a foot of 16 gauge black and white wiring emerged that hadn’t been touched in 33 years. I connected the ends to the female half of a Sea-Dog 426262-1 polarized connector and screwed it into pilot holes in the deck sealed with butyl tape. I connected the other end of the positive wire to one of the breaker switches in the electrical panel. The other end of the negative wire was already connected to a common ground wire that runs along the port hull seam and serves the port dome lights and the bow navigation light.
With power to the mast step, the rest of the circuit needs to be inside the mast. I pulled 25′ of 16/2 duplex wiring through the mast and made a loop in the cable with a Zip Tie around the masthead bolt to carry the weight of the cable instead of the light connections. Before making the connections on both ends, I slipped closed cell foam pool “noodles” over the cable inside the mast. These prevent the cable from being damaged by hardware fasteners that protrude inside the mast and they prevent the mast from ringing from the cable slapping inside the mast when at anchor. This is much easier and cheaper to install than the recommended PVC conduit.

I drilled a 1/2″ hole in the bottom of the mast on the port side above the step and installed a rubber grommet. I ran the lower end through the grommet, slipped a piece of braided flex loom over the end to dress it up and connected the conductors to the male end of the deck connector.

It’s lonely (and expensive) at the top
At the top of the mast, the conventional wisdom is to use parts from a certain Catalina parts dealership:
- Z2004 Navigation Anchor Light
- D1157 Anchor Light Mast Mount Tube
- Z1798 Anchor Light Tube Installation Kit (if you don’t already own the right drill bits and taps)
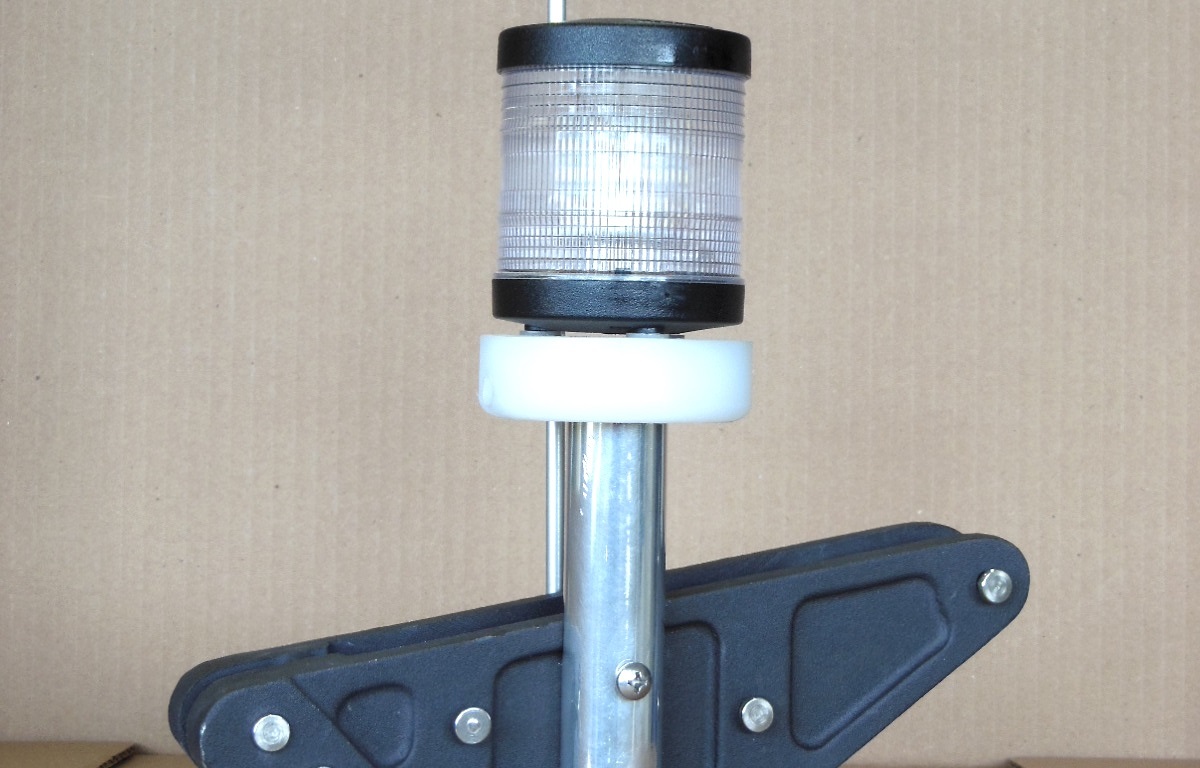
But that’s over $70 before replacing the incandescent bulb with the LED array that I described in Convert Your Lights To LED Bulbs For More Light With Less Power. Being one who doesn’t always follow the conventional wisdom, I purchased the same Aqua Signal series 25 light from my local marine discounter for $10 and set out to fabricate my own mast mount tube.

I used a leftover piece of 1″ aluminum tube from my bimini project and purchased a 3/4″ length of 2-1/2″ diameter UHMW rod from my local specialty metals shop. Along with a through hole for the wiring, I drilled a 1″ diameter countersink in the bottom of the disk to accept the tube, countersank two panhead screws through the sides to attach the disk to the tube, and drilled three pilot holes in the top of the disk to mount the light.

The assembled mount is very solid. At the bottom of the tube, I cut out a profile to fit the side of the masthead casting and I drilled and tapped the masthead for two 10-24 machine screws to attach the completed light assembly.
I also drilled a 1/4″ hole through the bottom of the masthead to route the wires up through the tube and into the light base where they connect to the terminal screws.
To finish the project, I replaced the 10 watt incandescent bulb with a 3.6 watt cool white LED array (#819279) from Sailboatowners.com. The LEDs put out brighter light than the old style bulb and use a third of the power.

Now we’re properly lit while staring at the stars from our king size bed made up in the salon.
The Bottom Line
Suggested price: $163.68
$tingy Sailor cost: $61.76
Savings: $101.92
Most C-22s have a similar anchor light setup. Is yours different and how do you like it?

Stingy, Just found your page. I’ll be back! After 3 months of off/on work I/we have our 76′ C-22 keel redone, bottom painted, Zincs, fashioned a new tiller handle myself, etc. Putting her in the water at Spring Creek, just S of Tallahassee, FL, soon. I put together a mid-mast LED nav/anchor light bulb replacement by soldering a $4 LED into the old base. May do the same at the rear.Not quite as bright as the orig to the sides, but visible at least 1 mile directly ahead and uses zip power.
I need to run a second wire set to run a auto halogen Fog light that came mounted on the spreader. Thoughts for the run from mast base to battery?
Could use a Windex… No stingy solution there, I suppose…
Brian
Hi, Brian
It sounds like you’ve gotten into the stingy spirit! My hat’s off to ya for doing all that tough bottom work first before launching. I saved mine for last 🙂
Since you already have a combination steaming/anchor light, how do you switch from one to the other? The steaming light should only be forward-visible but the anchor light all around-visible and for 2 nm minimum. Your ’76 is probably like mine with only one power circuit up the mast. Is yours just one light? If so, then what I would do is how Don Casey describes in his book Sailboat Electrics Simplified and wire the one circuit to a DPDT switch with diodes to reverse the polarity of the circuit and drive both lights. One will turn on with the switch in the first position, it will turn off and the other on in the second position, and they both turn off with the switch in the middle position. No need for a second circuit from the panel to the mast.
As for a stingy Windex solution, yeah, it’s called yarn 😉 Seriously though, best wishes fixing up your C-22. Hope to see you around here some more!
Ken
Ken, when you ran the pool noodles up the mast with the wires, how did you deal with the compression tube that goes between the spreader bracket?
My thought right now is that you measure and cut one section of the foam to go above the spreaders and the second below, using gorilla tape to connect the segments of pool noodle, then use a fiberglass electricians fishing rod to run the wire up the center of the foam… Is that what you did?
Pretty much but it was even easier than that – no measuring, no cutting, no taping. The mast shape compresses the sides of the pool noodles and holds them in place; at least with the size noodles I bought. Shove three 4′ noodles one at a time from the top down to the compression tube and three noodles up from the bottom. I used a length of PVC pipe as a push stick but any >8′ long stick will work.
That’s 24′ of noodles with the lower shroud compression tube in the middle of the 25′ mast. It leaves at little space at the top and bottom for routing the cable through the masthead and out the bottom hole, respectively. I also made a loop in the cable at the top with cable ties to hang the cable from the masthead compression tube so there’s no strain on the light connections.
The hardest part for me was getting the noodles past the jam cleat screws that protrude inside the bottom of the mast. Mine were seized so hard that I couldn’t unscrew them, so I used a cold chisel on the inside of the mast to cut the ends off as close as I could. The screw stubs ripped the skins of the noodles a little bit going in but not enough to matter.
It doesn’t completely silence the mast from halyard ringing, but the cable doesn’t ring at all. It’s bomber conduit and way easier to install than any other option I’ve seen. A side benefit is that it provides about 48 lbs. of flotation in the mast that will help prevent the boat from turning turtle in the event of a capsize.
I’m curious as to whether a Cat-22 mast head will fit on a Mac-22 mast. I’m rather limited on halyard space upstairs. It seems with your masthead you have a potential for four or more whera po was my ’82 Mac-22 has two halyard pulleys secured to tangs which are secured to the mast. That,’s pretty busy up there especially now that I want to mount a VHF antenna.
I don’t think it will fit, Chris. The two masts have different cross-section shapes. Your best bet might be to have one custom fabricated for you that would have any or all of the following: tabs for the main and jib halyard blocks, an extension (crane) for a spinnaker halyard, an anchor light mounting tab, a Windex mounting tab, and a VHF antenna mounting tab.
Is that woven conduit waterproof that goes from the mast to the deck? I am rewiring my mast right now and all I have left is to add the connectors and something to go around the wire while it is out of the mast. I am just wondering because if it isn’t waterproof wouldn’t it run down the wires into the connector? Thanks.
Hi, Dominic
The loom material that you see in the photo is not waterproof. It’s just chafe protection and for aesthetics. To make the connector waterproof, fill the connector shell with silicone sealant after you connect the wires and before you screw the shell together. That will help prevent corrosion of the connections and intermittent lights.
Thanks for your question,
$tingy
From my days of an ODay 25 – currently have a Stuart Mariner (19ft, but also has a 25ft mast) – I thought that mast head was too high to be an effective anchor light in the coves I like to anchor in. My anchor light was not to warn ships, but to point out to boats less than 40ft that I was anchored in the cove. People on small boats don’t see the masthead light unless they are hundreds of yards away.
My solution was to hang a portable anchor light about 8-10ft above the deck on the forestay using the jib halyard. In my ODay 25 days, ACR made a 6V lantern battery light that was perfect – just enough weight to hang well, enough battery for several nights using an incandescent bulb. Wish I still had the light for the Mariner, replacing the bulb with LEDs would have been perfect.
But I do really appreciate your site – I will be ordering the hinged mast gate in the near future for the Mariner.
Fred W
Mariner #4133 Sweet P
Yeopim Creek NC off Albemarle Sound