

It amazes me how expensive boat grills and their accessories are. Of all the boating gear, they are the boat jewelry: glittering polished stainless steel grills, covers, and ridiculously priced mounting hardware for every conceivable configuration. But they don’t make the food taste any better. It must be big money for the manufacturers, knowing how much men love to eat and love their grills to cook on.
Now, I like barbecue as much as the next guy, but I can’t see spending more money on cooking apparatus than several years worth of the food to cook on it. It doesn’t have to be that way. All it takes is a little ingenuity and some inexpensive parts and fasteners.
We have an inexpensive little portable propane grill that we take RV camping with us. It’s small, lightweight, sturdy, and big enough to grill meat and veggies for four to six people. We’ve used it aboard Summer Dance by setting it on one of the cockpit seats with a piece of aluminum foil underneath. The foil catches any drippings and prevents heat damage to the fiberglass. However, it takes up seating space and isn’t heel-proof. The rail mounts that I made for it solves those problems. These could also be used to temporarily mount other equipment to a railing either horizontally or vertically, such as a solar panel, popcorn machine, plasma TV…just kidding.
Start with the closest thing
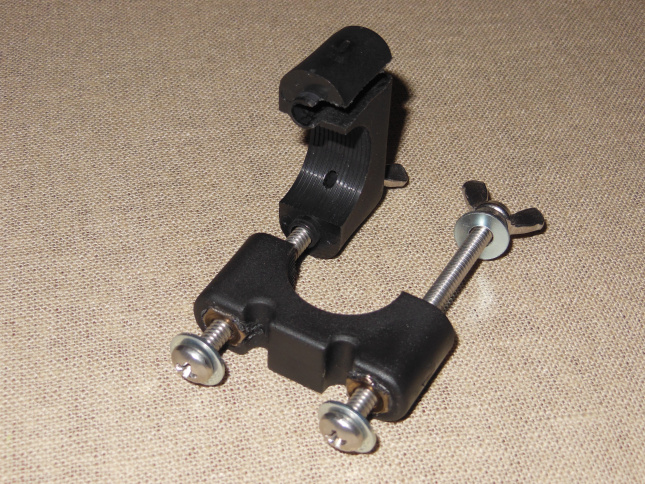
The mounts are modified versions of the Sea Dog 327190 Rail Mounting Bracket. The stock brackets are designed to permanently attach something to a 7/8″ or 1″ horizontal railing. I modified them to mount permanently to my grill and temporarily to a railing without requiring hand tools.

Besides the brackets themselves, you will also need some fasteners to replace those that come with the brackets, which are too short for this modification:
- (4) #10-24 x 3″ stainless steel pan head screws
- (8) #10-24 stainless steel nuts
- (8) #10 stainless steel washers
Modifying the brackets
To modify each bracket:
- Embed a nut in the fixed half of the bracket where it will mount against the grill. This will capture the nut and serve two purposes. It keeps the fixed half of the bracket attached to the grill even when the clamping half is loosened and it keeps the screw from turning when the wingnuts are loosened. I did this with these steps:
a. Insert a screw into one hole of the bracket so that the end of the screw protrudes out of the side of the bracket that will contact the grill and loosely thread a nut onto the end of the screw. Hold the head end of the screw like a handle so that you don’t burn your fingers in the next step.
b. Heat the nut with a propane torch just until it begins to discolor (brownish).
c. By pulling on the head of the screw, draw the nut into the plastic bracket half until the nut is flush with the bracket.
d. Hold the screw straight in the hole until the plastic cools. If the two screws are not parallel, the clamping half of the bracket won’t fit right. Run cold water over the part to speed up cooling.
e. The displaced plastic will flow out from around the nut and after it cools, trim it off with a utility knife.
f. Repeat for the second screw of each bracket. - Cut open only one hole of the clamping half of the bracket so that it can be rotated away from the screw while mounting the grill on the rail. I ran the part through my table saw, which made a nice, clean cut. Leave the other hole of the bracket as-is. It will hold the two halves together while you attach and detach the grill from the rail.
Attaching the brackets
To assemble the brackets with the grill:
- Use one of the brackets as a pattern to drill two pairs of holes in the bottom of the grill along its centerline. Pick any convenient, flat locations depending on how your grill is made. Space the holes far enough apart to hold the grill stable on the rail.
- Mount the fixed halves of the brackets to the grill. Insert screws with washers from the inside of the grill through the drilled holes and into the embedded nuts in the brackets and tighten. The screw ends should extend past the fixed halves of the brackets a couple of inches. I made insulators from some fiberglass webbing and mounted them between the grill and the brackets to keep the brackets cooler while grilling. You might also try high temperature RTV silicone sealant.
- Place the clamping halves of the brackets over the screws and fasten loosely with wingnuts and washers.
- Peen the ends of the screws so that they retain the wingnuts and washers and keep them from getting dropped and lost.
Using the brackets
To mount the grill on a pushpit rail:
- Loosen the wingnuts fully and rotate the clamping halves of the brackets at least 90 degrees so that the fixed bracket halves can fit over the rail.
- Set the grill on the rail and rotate the clamping halves of the brackets back in line with the screws.
- Tighten the wingnuts.
- To reflect heat away from the mounts and to help prevent them from melting, place a sheet of aluminum foil between the burner and the grill bottom. It also makes cleanup easier.
To remove the grill, reverse the steps.
The modified brackets hold the grill level and steady while grilling yet make it easy to remove the grill for stowing after it cools.
The Bottom Line
Suggested price: $99.98
$tingy Sailor cost: $14.22
Savings: $85.76
What else would you use these for?

do you have any issues with the heat melting the brackets?
It did start to be an issue until I put a sheet of aluminum foil in the bottom under the burner, which helps make it easier to clean anyway. Since then, hasn’t been a problem for us.
Thanks for the feedback. I’m looking at using these mounts: http://www.amazon.com/Sea-Dog-Mount-Square-Brackets/dp/B002NSO9LI/ref=sr_1_2?ie=UTF8&qid=1463698675&sr=8-2&keywords=sea+dog+line+rail in a similar manner and hope the metal would help dissipate to, but will use tin foil internally. Do you have trouble keeping your grill lit? I’m looking at a similar budget grill and have read comments that haven’t been too inspiring.
I considered using those too but they’re a real hassle to fasten temporarily. If you want to mount your grill semi-permanently, they should work okay. Haven’t had trouble keeping ours lit but we don’t usually cook in the cockpit if it’s real windy. I sometimes just use the grill normally (sitting on its folding legs) on a cockpit seat with a sheet of aluminum foil under it to prevent burning or dripping. That also provides a little more wind protection.