

This post is the continuation of Refinish Your Swing Keel for Best Performance – Part 2: Cleaning. I will describe common keel defects, the fairing system I used, sealing a freshly sandblasted keel, applying body filler to build up an accurate hydrodynamic foil shape, and paying extra attention to the shape of the leading edge of the keel.
Before I get started, a bit of legal housekeeping. This post contains affiliate links. That means I receive a small commission if you make a purchase using these links. You can purchase these products anywhere you like, of course. For a complete explanation of why I’m telling you this and how you can support this blog without paying more, please read my full disclosure.
Congenital keel defects
Most older C-22 keels are misshaped from the “factory”. The urban legend is that they were cast by one guy on a beach in Mexico. A big MEXICO stamped into the starboard end and the Swing Keel Refinishing DVD confirm that they were made somewhere in Mexico, beach or no beach. The DVD also says that most keels have one flatter side and one concave or flared side, which can cause the boat to point better on one tack than the other. It also explains that most of the foil shape is only in the lower quarter to third of the keel, which increases drag.

That was all true with the keel on Summer Dance. The port side shape was pretty close to the 13% template that comes with the DVD for the bottom quarter of its length but the shape quickly tapered to almost flat at the top. The starboard side was only shaped near the bottom. Over half of that side was nearly flat. To top it off, the keel hung at a slight angle to port, presumably because the pin hole wasn’t drilled perpendicular to the keel’s center line.
Like a seven layer cake
To refinish the keel, I applied a system of coatings that: seals the raw metal and provides a base for the rest of the coatings, shapes the keel to a proper foil, provides a moisture barrier, guards the leading edge against abrasion, and tops it all off with the same bottom paint as the hull received. The complete system with all its layers is illustrated in the following picture.

Start with a waterproof foundation
The same day that I picked up the keel from the sandblasting shop, I hung it by cables from the center beam of my shop so that I could work on the entire keel at the same time without having to flip it over.
To start, I applied West System 105 epoxy using cheap, disposable 3″ chip brushes. For the first coat, I mixed 10 pumps each of resin and hardener per side. I scrubbed it on using a circular motion to work the epoxy into the pits to seal the bare surface.

Then I lowered the keel flat onto a fork lift pallet on my utility trailer to apply a second coat to one side at a time. The reason for this was the pits in the surface. With the keel flat, I was able to fill the smaller pits (up to about 1/2″ in diameter) with epoxy. With the keel hanging, the epoxy flowed out of the pits. The starboard (worse) side took 16 pumps each of resin and hardener for the second coat. The port (better) side took 13 pumps.
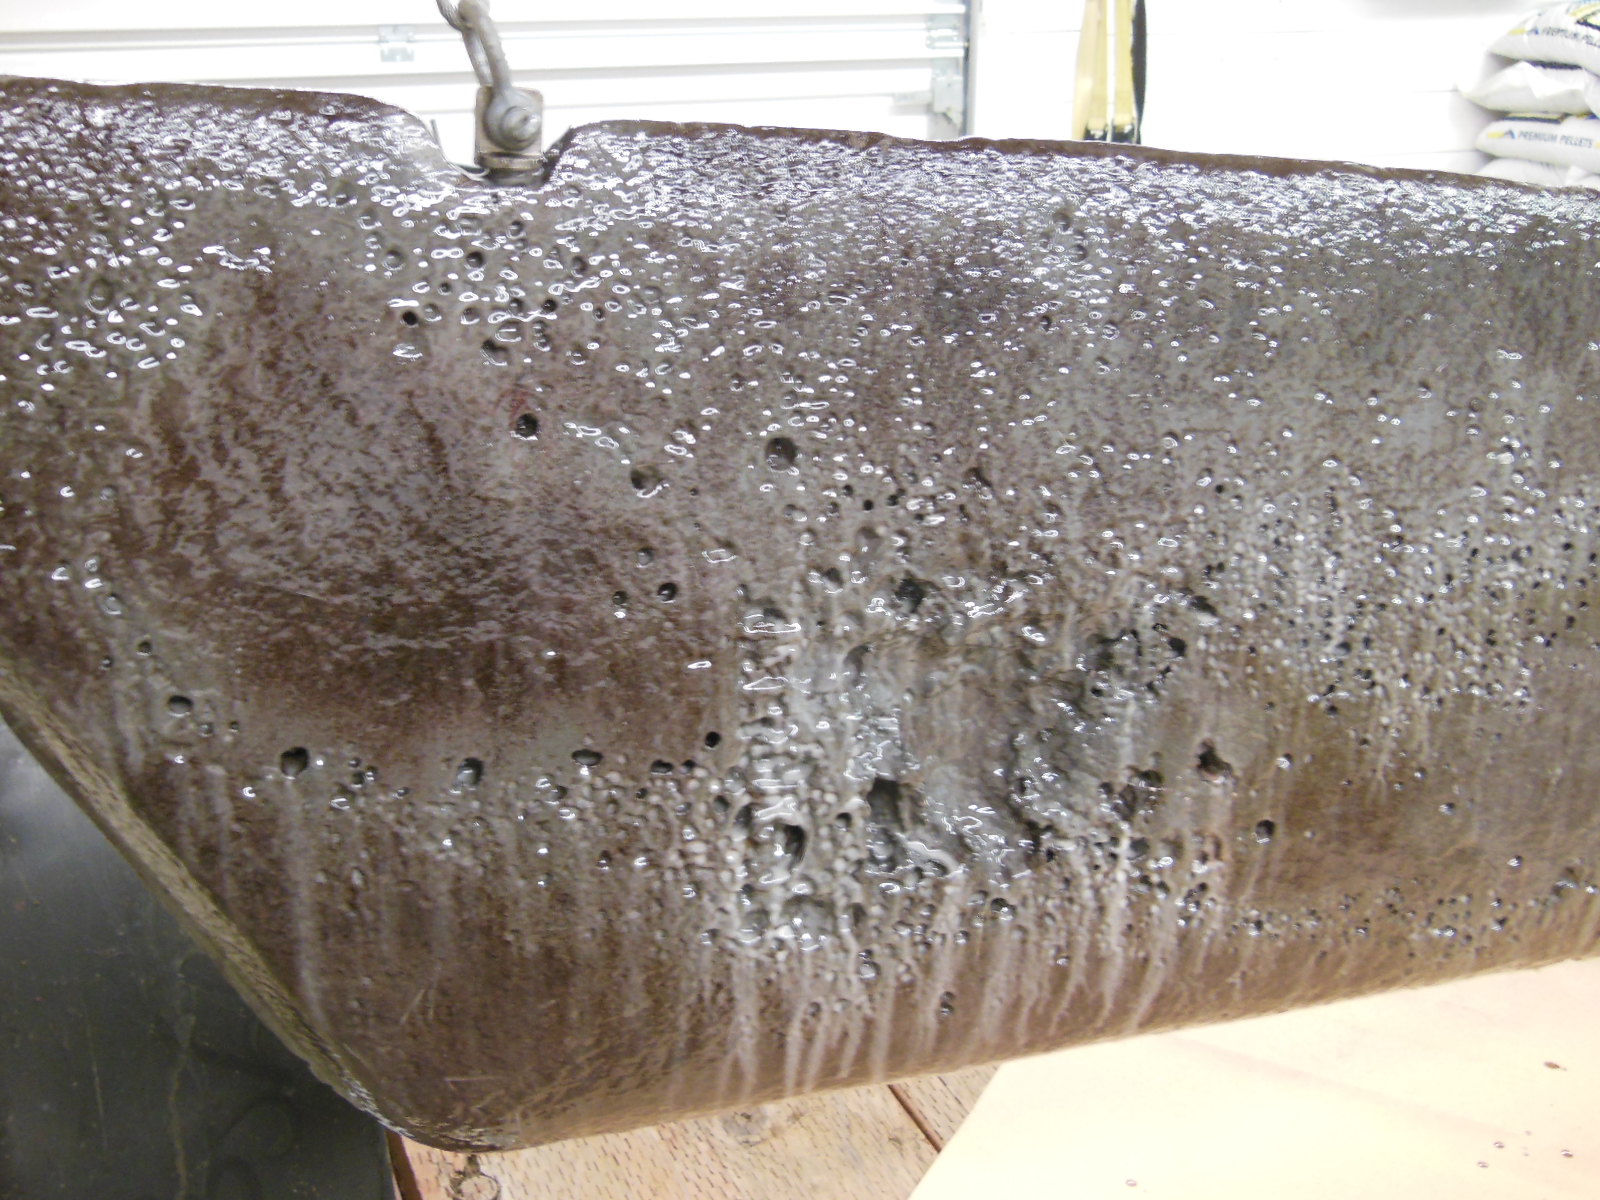
After I applied the second coat this way, I wiped it down twice with acetone and then scuffed the surface and knocked down the high points with 80 grit sandpaper. The surface was smoother and ready for fairing. Except for that big cavity, that is. That took several layers of filler to correct.
Houston, we have a problem
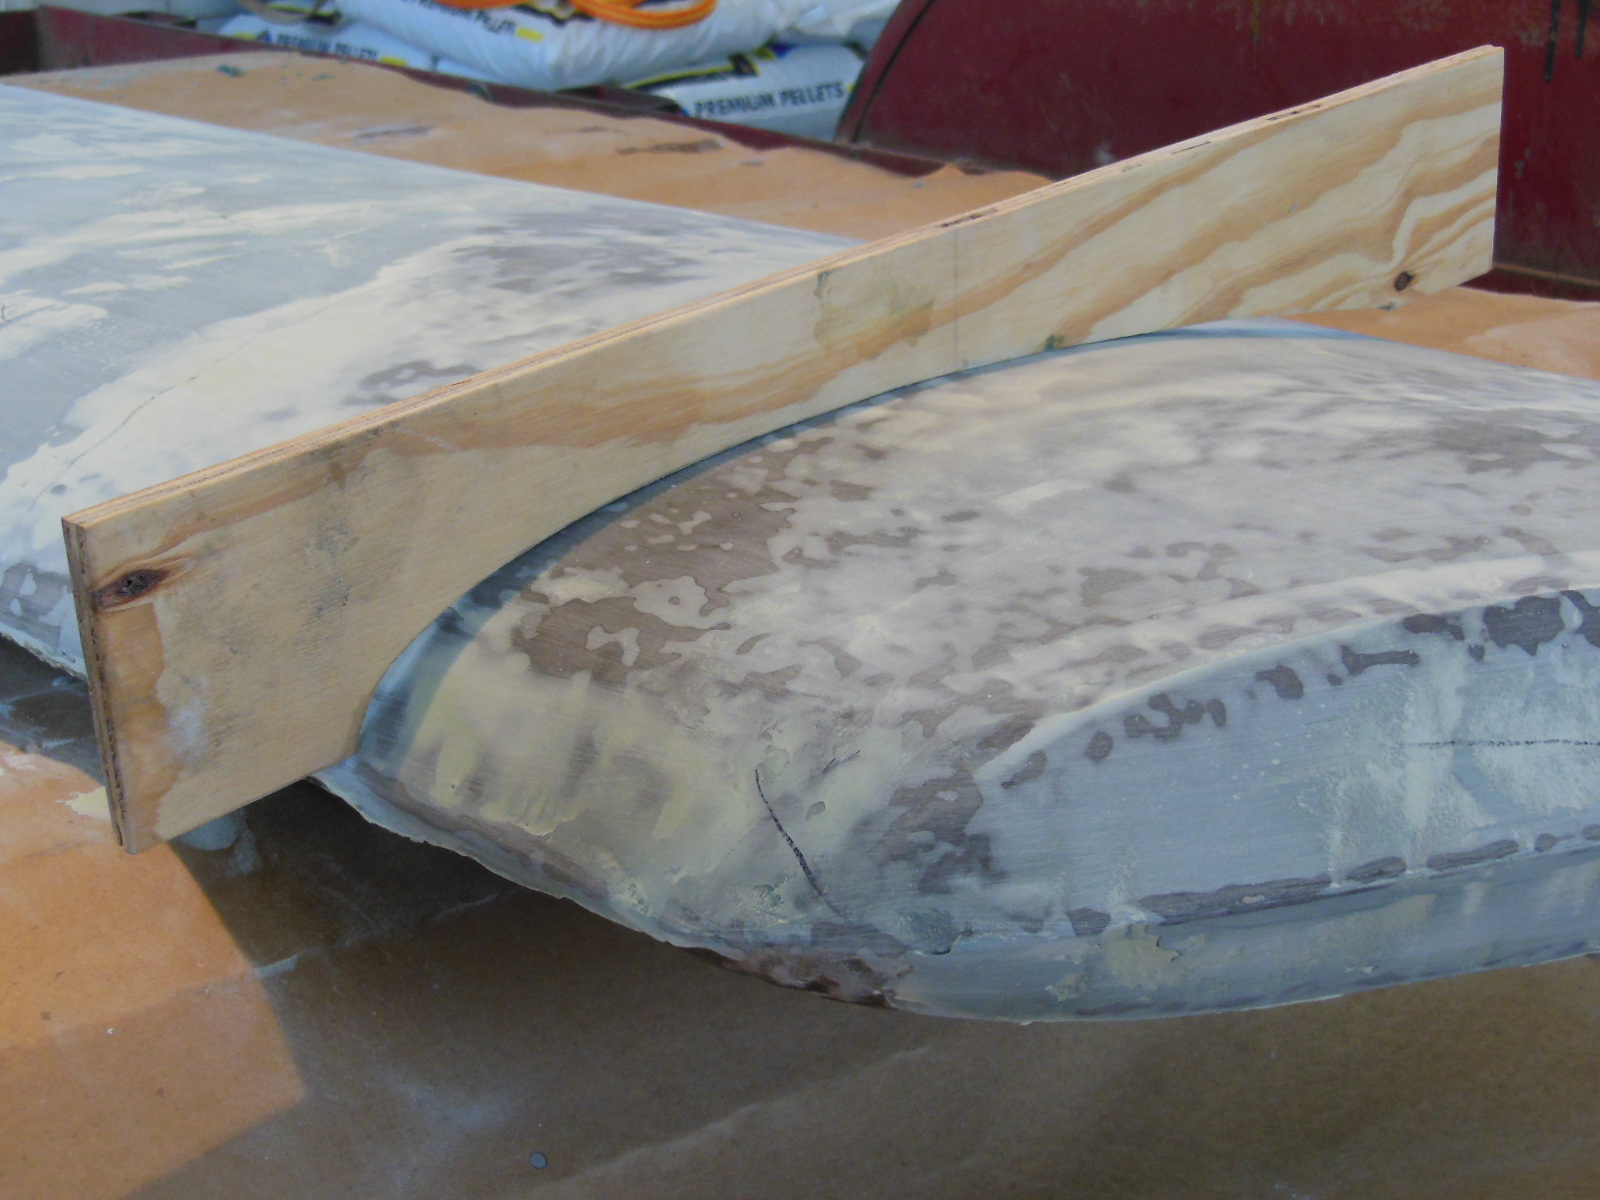
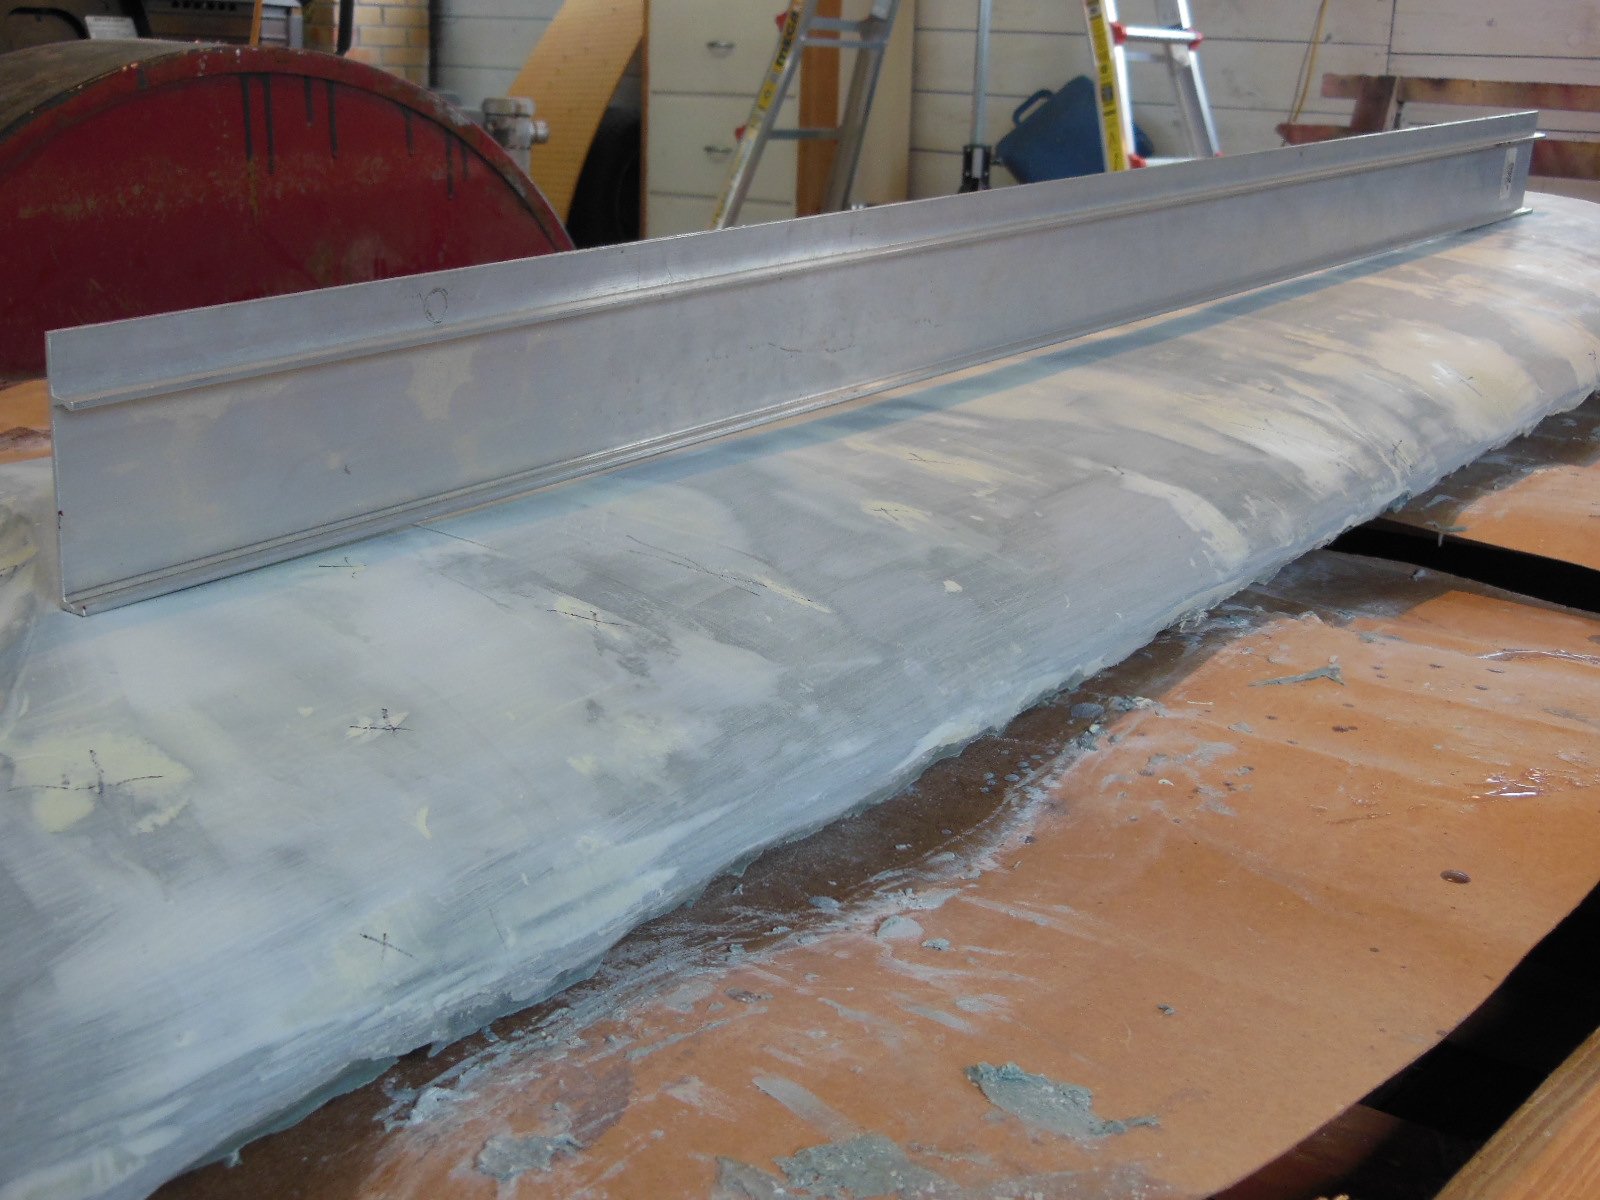
To fair the keel for best performance, I turned to the template that is included in the Swing Keel Refinishing DVD. To use the template, you trace the curve onto a piece of thin plywood so it is easier to handle and then cut it out with a sabre saw, jigsaw, or bandsaw. You hold the wooden template perpendicular to the keel centerline (as shown in the picture below), to check the keel shape and thickness as you add the fairing compound.
The goal of the template is to make a standard NACA 13% foil shape for minimum drag and best pointing ability at the average hull speed of the C-22. Unfortunately, the template that is included with the DVD is the wrong shape because it is based on the wrong keel angle. It results in a keel that is 1″ too thick, creates excess drag, and stalls (stops producing enough lift to offset the excess drag) too soon compared to the 13% foil. Describing it is quite technical, so I described it in detail in The Error in a Popular DIY DVD That Will Slow Down Your C-22. Don’t buy the DVD or, if you already have it, don’t use the template until you read that blog post. You could be wasting your time and money.
Bell bottom keels
The maximum thickness of my bare, unfaired keel near the bottom end was 3.5″ thick. That point is also nearer the midpoint of the keel than it should be when compared to the template as you can see by the gaps in the following picture.
Doing the math told me that the keel ends in about a 19% foil curve, almost 50% fatter than the design goal of 13%.
Since removing the extra curve by lots of grinding wouldn’t be worth the trouble, I chose to shape the keel to 13% as much as possible except where it is 19% at the bottom. The extra thickness at the bottom should not make a noticeable difference. I also rounded the leading edge, which was cast to a slight point as you can also see in the picture above.
The top end of the keel doesn’t need to be shaped to a foil where it rotates up into the keel trunk, so I drew a line below the pivot pin at 60° from the edge of the keel (parallel to the bottom of the hull). That is where I stopped the foil shape so it wouldn’t bind in the keel slot when the keel is lowered.
Fair thee well
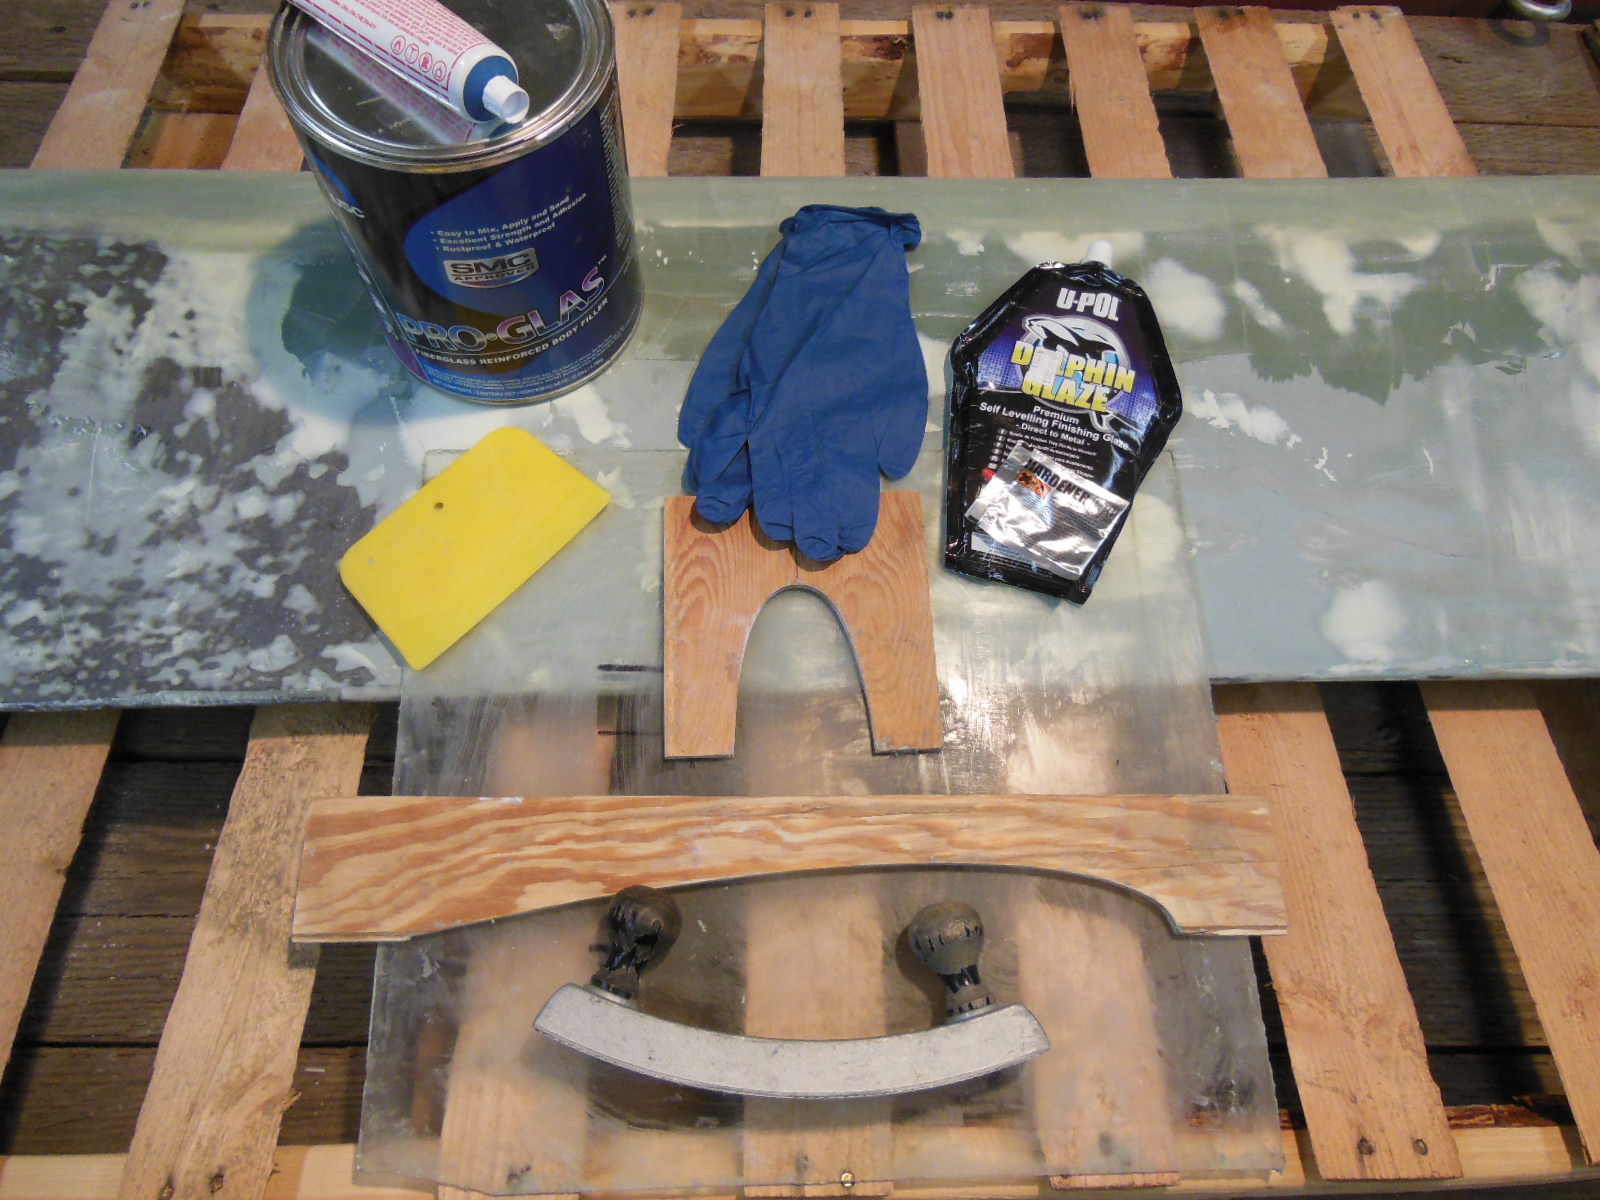
Out of the wide spectrum of fillers available, I chose USC Pro-Glas Fiberglass Reinforced Body Filler instead of regular polyester (Bondo) auto body filler on the cheap end or marine grade fairing compound on the expensive end. Compared to Bondo, the fiberglass reinforced filler is stronger, adheres better, and is waterproof to prevent the keel from absorbing any moisture that might penetrate to it like non-reinforced filler can. It applied smoothly with a plastic spreader, hardened gradually, was easy to shape with a Stanley Surform Plane
, and sanded well.
For the first coat, I wanted to establish a flat, smooth base for the areas that didn’t need to be built up, so I just skimmed the surface to fill in any low spots and to fair the edges. After that cured, I used my template to draw an outline of the area that needed to be built up right on the keel with a Sharpie marker. Then I divided the maximum build-up thickness (about 1″) into 1/4″ layers and drew approximate outlines on the keel like a topographical map.
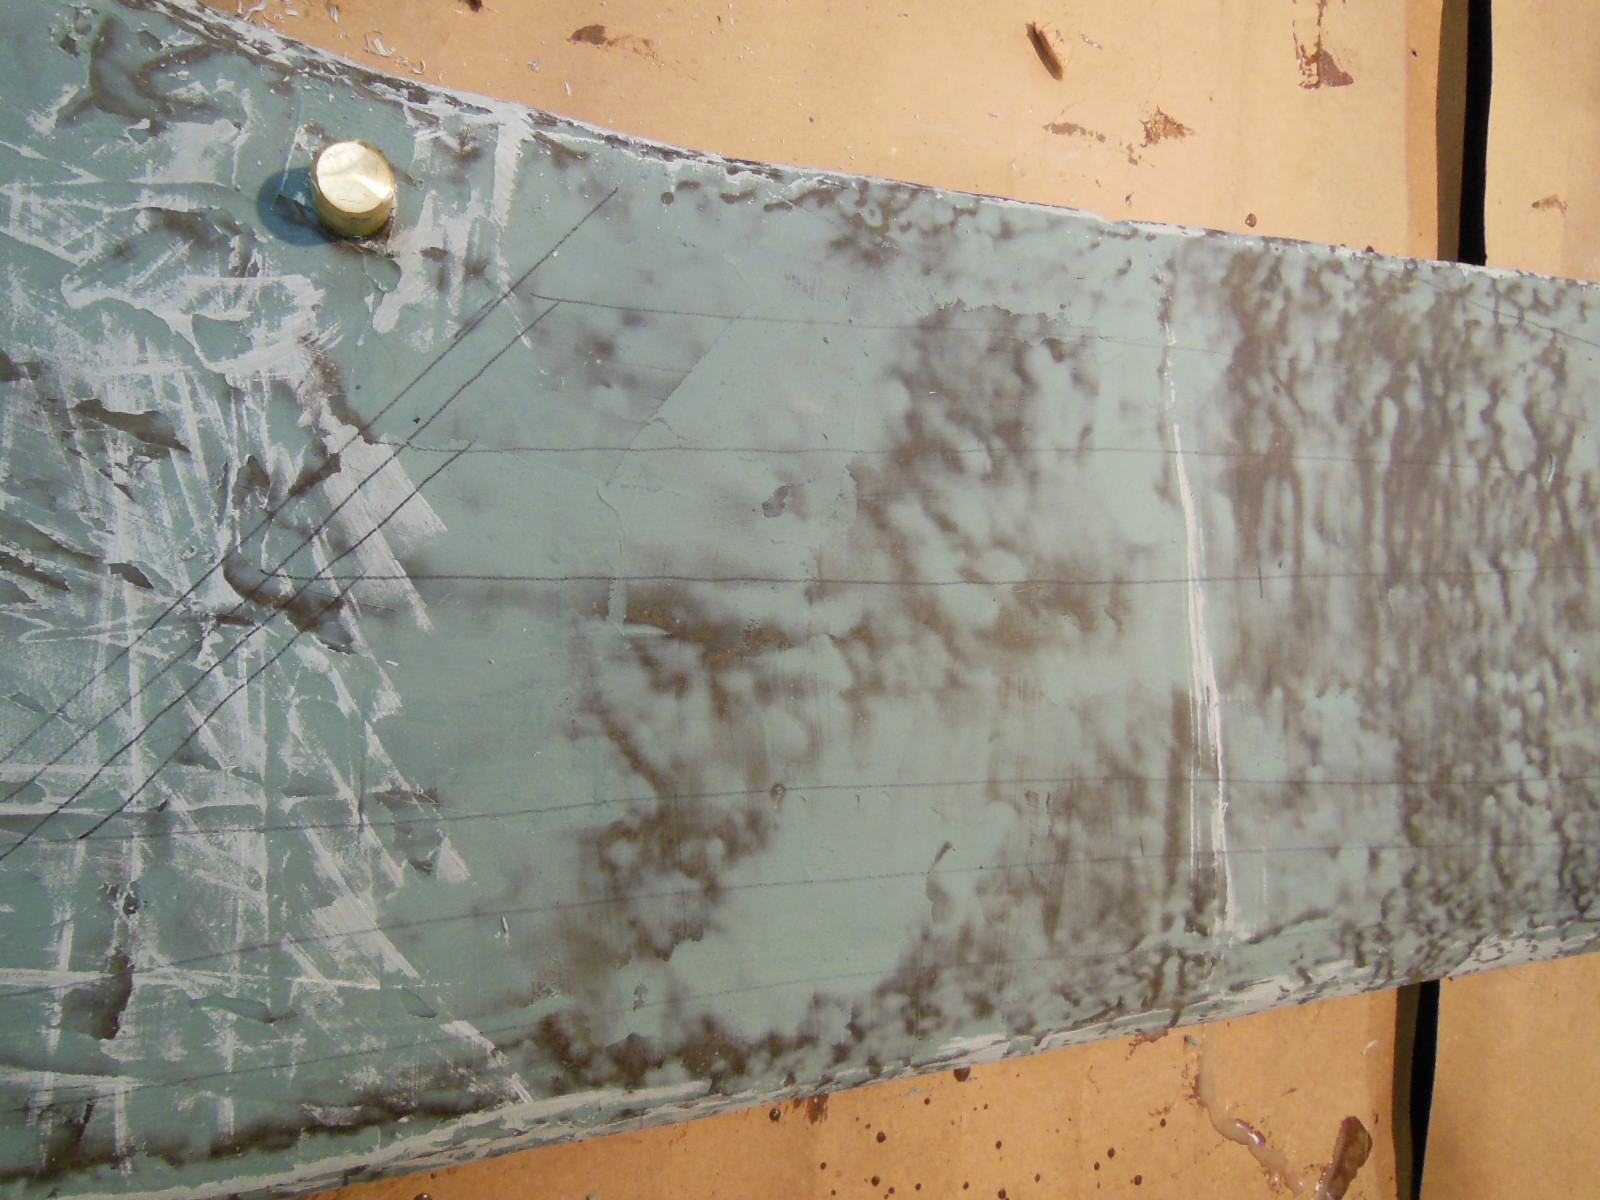
With the lines for visual guides, I was able to build up the area in multiple layers that weren’t too thick to work with and with minimal waste. Frequent checks with the foil template revealed the low areas that needed to be filled.
Remarkably, it took about one and a half gallons of filler to build up each side for a total of three gallons.
If you don’t feel confident about fairing by eye or you’re running short on time, there are some excellent techniques described in Appendix B of the Final Fairing and Finishing guide available as a free download from West System.


After the filled area was close to the template shape, I applied a thin layer of U-Pol Dolphin Glaze to fill in the smallest imperfections and give a smooth overall surface on which to add the top epoxy layer. The DVD recommends this step but, in my opinion, it’s unnecessary. You should only apply the sanding glaze to a maximum thickness of 3mm. That’s pretty noticeable on a show car hood, not so much on a sailboat keel. You can get similar results with fairing material or epoxy.

In contrast to the filler in which a lot doesn’t go very far, a little bit of glaze goes a long way. Only two cookie-size batches covered an entire side of the keel. Plastic spreaders and rubber squeegees don’t work well with this material, which is very dense. A 4″ steel putty knife gave the best results.
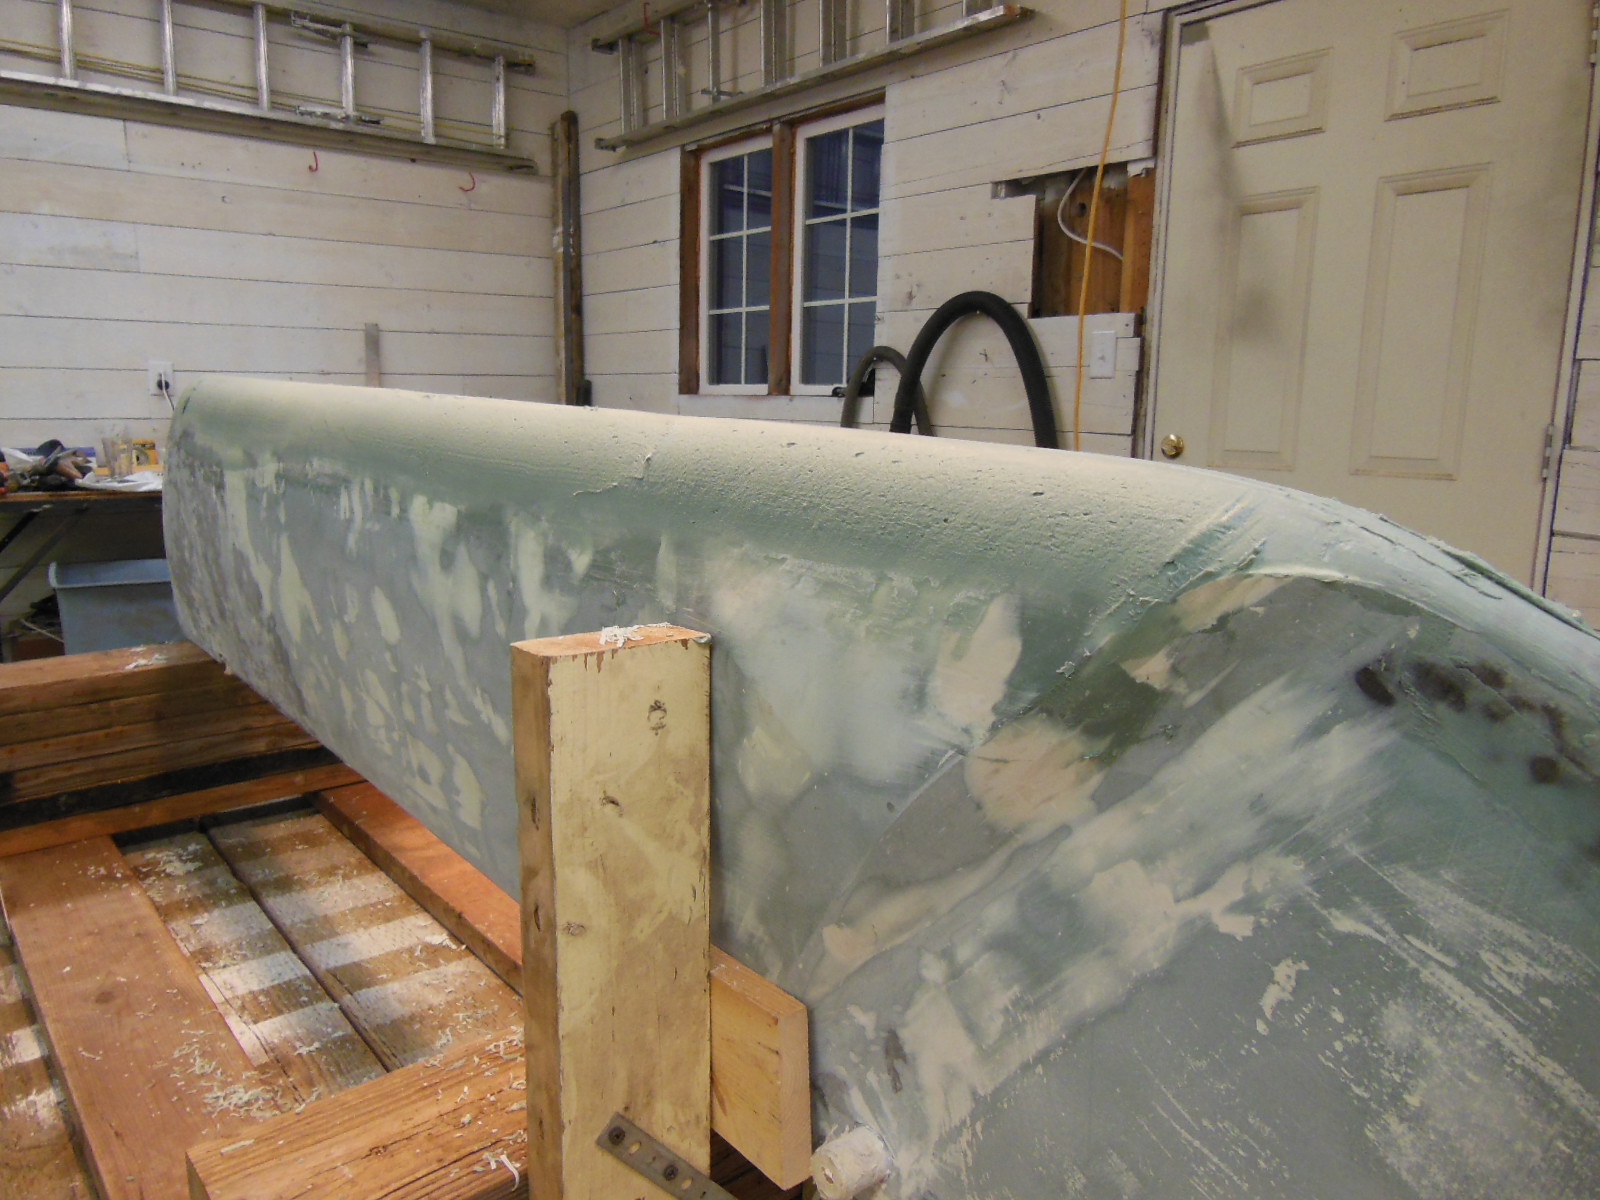
After fairing one entire side of the keel, I flipped the keel over and repeated the process on the other side. When I finished that side, I hoisted the keel up and set it upside down in the sled on top of the trailer so that I could fair the leading edge, which is difficult to do while the keel is laying on its side. With the keel upright, the job was much easier.
The foil template and the casting itself both come to a high-angle point at the leading edge. A true NACA foil shape is rounded at the leading edge.
I experimented with making a 1/4″ plywood template of just the leading edge and using it to screed the filler down the length of the keel but it didn’t work very well. What did worked well was to bend a plastic spreader to the desired curve and, holding it at a low angle to the keel, pull a blob of filler down the leading edge, effectively extruding the filler to the correct shape. After it cured, I only needed to sand it a little to remove the high points and to feather the edges.
This technique also worked well to put near-perfect rounded edges on the end of the keel that swings up into the trunk.
Flatten the trailing edge of the keel to 1/4″-1/2″ wide for minimum turbulence. Don’t fair it to a sharp edge.
With the long process of fairing complete, I finally moved on to the top coats described in Refinish Your Swing Keel for Best Performance – Part 4: Sealing and Painting. In that post I describe: building a fiberglass reinforced guard on the leading edge, applying the last shell coats of epoxy, bonding centering shims onto the pin end of the keel, priming with a barrier coat of epoxy paint, and applying anti-fouling paint last.
Would you like to know when I publish more posts like this? Enter your email address below to subscribe to this blog and receive notifications of new posts by email. You will also receive occasional newsletters with exclusive info and deals only for subscribers and the password to the Downloads page. It’s free and you can unsubscribe at any time but almost nobody does!

Excellent write up!
My keel doesn’t have the mexico stamp. Have you uncovered any indication that later models didn’t have the stamp? Also, I used the template from the video and made a plywood template, but it seems to not fit my keel too well. The length of the template is shorter than my actual keel. All this makes me wonder if it’s really for a C-22.
Also, I don’t understand “bend a plastic spreader to the desired curve”. How did you keep it bent to the exact curve as you used it?
Hi, Cap’n!
I have heard speculation that during the peak of the Catalina 22s popularity, their keel mfr. may not have been able to keep up with the demand and Catalina Yachts might have contracted with an additional mfr. to help them fill orders and keep the production line moving. Makes sense. So, you might have one of the rare, US made keels. That would also suggest why yours is wider than 15.75″. If you look at some of the later mfg. drawings on the web, you’ll see notes on the drawing from when they did checks against the molds and corrected the drawing. The one I’m thinking of shows 16.5″ since 1985. Other owners I’ve heard of with these US made keels stated that theirs were more symmetrical, better shaped, had few pits, and were of a higher quality than the Mexican keels. So while you have the problem of the keel pin repair to contend with, you might have an overall better quality keel that will take less to refinish!
The yellow plastic spreaders are fairly flexible. I just bent and held it by hand, then it sprang back into its original shape.
Thanks for the clarification. Since the overall measurements seem to fit, I expected it might be something like that. My keel is definitely not as pitted as yours.
Sure wish I found this a few years ago when I had to rebuild my keel. Perfect post. Looking forward to reading “Part 4: Painting”
I’m reading the West System info preparing to purchase, and sales blurb says ” #205 Fast Hardener, mixed at a 5:1 ratio with #105 resin, results in a pot life of 9-12 minutes at 72°F, with solid cure in 6-8 hours. ”
The tech sheet http://www.westsystem.com/ss/assets/Product-Data-PDFs/TDS%20105_205.pdf also only mentions 1:5 ratio.
What was your reasoning in deciding to use equal pump count of resin and hardener?
I use the West System pump dispensers that automatically meter the right amount of resin and hardener per pump for a 5:1 ratio.
Ah, thanks for the clarification. Haven’t seen the pump system yet. Ordered it today.
I’m not having much luck finding affordable 80 & 120 grit wet/dry aluminum oxide sandpaper at affordable prices. Where do you get yours?
It depends on the project and the tool (belt, disk, block) but I usually get general purpose coarse grit sheets at Harbor Freight. For fine grit sheets and important projects, I have a couple of auto paint supply stores I shop at. One is a NAPA Paint & Supply that carries good quality supplies. Maybe there’s one near you?
Guess I missed it at Harbor Freight. Will go back and check. Yup, NAPA is nearby – thanks for the info.
I assume the USC Pro-Glass filler was a polyester. I am concerned about putting a polyester over an epoxy base even with an 80 grit tooth. I know West Systems says its OK to put epoxy over poly, but most boat builders shy away from the opposite ploy over epoxy for adhesion reasons. What were your thoughts on that mix?
Hi, Ken
From the MSDS sheet, USC Pro-Glas is composed of 15-20% styrene, 40-50% non-fibrous talc, 5-15% calcium carbonate, and the rest milled fiberglass and other minerals. I chose it more for its resistance to water absorption than its compatibility with epoxy. Polyester fillers are well known for absorbing water. Considering that and how porous the keel was even after sealing in epoxy, I can’t imagine how it could come unbonded. There was a LOT of mechanical bonding. I also applied the filler soon after the epoxy had mostly cured so there could also have been some chemical bonding as well.
The manufacturer (US Chemical & Plastics) recommends it for use over steel, aluminum, fiberglass (including marine applications), wood, masonry, concrete, and sheet molded compound (SMC) automotive body panels. That’s a pretty wide range of good adhesion and I couldn’t find any warnings against use over any particular substrates.
I’m not a chemist, so if you find any information to the contrary, I’d like to hear about it. A year later and the keel still looks like I just refinished it but I’ll be sure to update this post if I notice any longer-term problems.
Thanks for your question!
Stingy, Thanks for the wonderful and very detailed descriptions. I will be refinishing my swing keel in a year or so. I get the “thing” about the 19% vs 13% foil and commend you on your attention to this detail. But, unless I’ve missed it, you suggest that the template be placed perpendicular to the vertical center line of the keel instead of parallel to the bottom of the keel i.e. racked “up” at the leading edge by 30%. Am I missing something? You’ve gone to all this effort to recalculate the foil size only to place it so that it does not orient parallel with the waterline. Help please…
A long-time Stingy follower
Hi, John
That’s what I try to explain in The Error in a Popular DIY DVD that Will Slow Down your C-22:
I compensated for the angle of the keel by shortening the foil template so that it could be held perpendicular to the keel while still producing the desired shape at the waterline angle. It’s a little counter-intuitive, I’ll admit.
Hope that helps,
$tingy
Thanks for the explanation, it works for me. Keep up the wonderful job.
Hey Stingy!
I’m about to take on this behemoth project and I wanted to know if you’ve had any problems with the fairing compound delaminating after a few years. I’ve got a can of the same stuff and I’d like to get started on the process soon here, but I’m nervous about it.
Thanks,
Chris
Hello, Chris
I haven’t had any delamination that I can see. Go for it. Just be sure to wash the amine blush off the whole keel thoroughly after you seal it with epoxy.
$tingy